Plastering is required in order toPrepare the walls for finishing, align them, give the necessary properties. Plastering with their own hands is not so difficult, but a certain work experience is required. For work a special plaster mix is used, it is selected for a specific kind of walls.  Wall plaster is necessary if you want to glueWall paper or paint. Today on sale it is possible to find various compositions which are used at certain stages of work. With their help, you can prepare the wall before wallpapering, align it, create a protection against moisture. In addition to the selected version of the plaster mixture, you will need:
 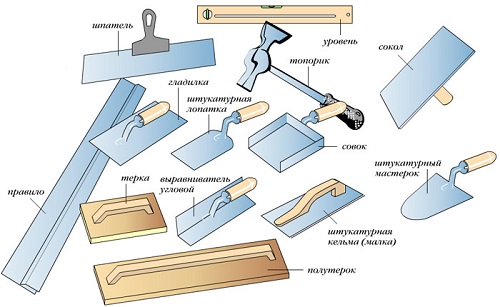 Tools for plastering walls.
- mixing tank;
- electric drill with a nozzle "construction mixer";
- building level;
- lighthouses;
- a set of plaster tools (angular equalizer, wide metal spatula, scoop, falcon, plaster trowel and trowel, grater and semifinished);
- rule;
- protective gloves for work.
It is not so difficult for yourself, but you need to comply with everythingstages of work. The mixture should be smooth while stirring. Before starting, it is necessary to completely remove the old covering from the walls, when leveling it knocks down to the base. Further, the condition of the wall must be assessed, all cracks and other defects must be eliminated.
Types of plaster for work
To plaster the walls, you can applyvarious mixtures. All of them differ in properties and purpose. Primers provide a rough surface, they are great for preparing a wall under the lining or lining. The layer will be distinguished by its strength, smooth surface, resistance to various types of influences. 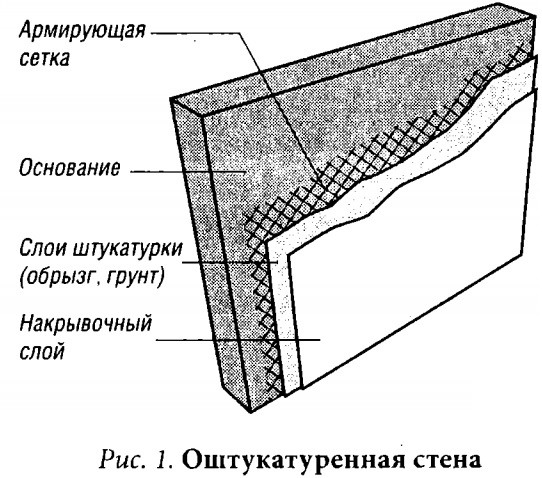 Scheme of wall plastering. Finishing plaster is called a cover. This is a completely independent type of decoration. Such compounds are excellent on the ground, i.e. they are applied after the preliminary primer layer has been made. If the surface is painted with enamels, then the wall should be made as smooth and absolutely smooth as possible. Protective plaster allows to protect a surface from excessive dampness. Such compounds are suitable for basements, basement floors. Outer formulations are a completely separate type of coating, which is used only for external works. The appearance of such plaster mixtures can be different. It is well known to many "bark beetle", "marble" coatings and other options. The color of the plaster mixture can be different. It takes experience to apply, it is usually recommended to use the services of professionals. Back to contents</a>
Composition of the plaster mixture
Wall plastering can be done with special mixtures, inwhose composition includes various components that provide the required properties. The filler is represented by quartz sand, white and sifted. Do not use sea sand, as it contains a large number of shells and crumbs. In mountain sand, which is better not to use, there are numerous impurities.  Scheme for the production of calcareous dry plastermixture. It is best to plaster the walls using coral, white river sand. If plastering will be concrete smooth walls, then use ground quartz, which will ensure the durability of the coating. As binders use cement, gypsum, lime or clay. It all depends on the stage of work and on what the wall will be. It is better for the solution to use 2 types of binding components. Clay is rarely used today, it is no longer used for internal works, since it has the property of punching, the lining can eventually lose its attractive properties. Lime gives the mixture strength. Plastering walls with this solution is necessary when a smooth and light surface is required. During drying, drafts must be avoided, as the surface will crack. Gypsum is used in the case when it is necessary to plaster the walls before finishing finishing works. The mixture during mixing is mixed in small portions, since it retains its properties only for 10 minutes. Cement is the most durable binder, it is used for various works, including external and internal, leveling, when high-quality surface repair is required. Back to contents</a>
Stucco walls by lighthouses
Most often used for walls is the plastering methodwith the installation of metal beacons. They allow for perfect alignment. In addition to metal, gypsum beacons are used, beacons from solution, the choice depends on the specific working conditions. If the strength of the base wall is sufficient, then it is possible to mount the guides from the metal, i.e. it is best to use metal beacons.  Scheme of plaster walls on lighthouses. To smoothly plaster the walls, you must first perform the markup. An arbitrary point on the wall is planned, a nail is driven from it at a distance of 15-20 cm, a plumb line will be fixed to it, ie, a small load on the string. The same nail is driven in the bottom, another plumb line is installed. Between the 2 nails, 3 sections of the solution are sprinkled. The lighthouse of aluminum is put on the solution, in addition it is fixed with screws. Beacons must be put, pressing into the solution, controlling their evenness. All beacons are installed on walls, the step between them should not exceed 1 m. After installation, it is necessary to further check the evenness of their location, on the 2 sides to strengthen the beacons, leave them until the solution solidifies. Back to contents</a>
Stages of plaster application
Walls can be plastered using various methods.Popular "spray", priming, "cover". To plaster the walls in the first way, it is necessary to prepare a solution of a creamy consistency, it should be easily sprayed onto the surface. The thickness of the layer depends on the material of the walls. For wood, it should be 10 mm, and for concrete and brick - 4-5 mm. The prepared solution is drawn into the falcon, after which the plaster is literally sprayed onto the walls with neat movements using a spatula. This is best done with a brush. This method completely covers the entire wall, it is no longer necessary to level it. Only those areas that protrude too much should be removed. The priming method is applicable as the 2nd layer. First, a solution with a pasty consistency is kneaded. Make sure the plaster is completely dry before application. It is easy to check this: if the wall does not crumble when pressing with your finger, then priming can be started. The plaster is poured onto the surface, after which it is neatly leveled from bottom to top with a rule. All remaining excess must be removed into a container with the mixture. During leveling, the surface should turn out to be even and smooth, plastering should be done so that there are no empty spaces. The final alignment is carried out with a scraper, which is run vertically and horizontally. The layer thickness is 20 mm for a wooden wall, for others it may be less. After the second layer has dried, you can plaster the walls, applying the 3rd "cover" method. For this, a mixture of a creamy liquid consistency is used, such a layer will perfectly hide all the imperfections that could remain after priming. The maximum thickness is 2 mm, while before mixing, all components must be sieved through a fine sieve. The wall is first wetted, then a thin layer of plaster is applied with a trowel. The solution can go 2-3 mm beyond the edges of the lighthouses, but not more. The wall is leveled with the rule, with clear and accurate movements. The lighthouses are removed, all cavities are filled with mortar, the surface is leveled. not so difficult, but it is necessary to choose the right solution, and then follow all stages of the process. Before work, the surface of the base must be prepared, all defects must be removed. The thickness of the plaster during application depends on the material of the walls, for concrete and brick it will be less. </ ul>


