In order to , homeowners often resort tosuch a method as laying plywood on joists. The choice of these building materials is justified, since both plywood and support beams are environmentally friendly. Plywood itself, although a product of wood processing, retains all its properties. Existing sizes of plywood sheets.Multilayer veneer can be used not only as a rough coating, but also as a finishing lining. Of course, for this you need to choose the highest quality sheets, free of defects. For the substrate, material with defects on the outer layers is suitable, but they must all be well glued.
Disadvantages and advantages
Plywood also has its disadvantages.One of them is weak resistance to moisture. True, some brands can be used even in extreme conditions, but their use indoors is undesirable due to the harmful substances they emit (formaldehyde), so it is best to make a floor in the house from plywood of the FK brand. Improving its moisture resistance characteristics is not so difficult, but you can be sure that such a floor is harmless to health. Another disadvantage (not even plywood, but a floor on logs) is that the room loses height after its installation. Characteristics of plywood.The undoubted advantage of plywood is that it is much cheaper than boards. At the same time, material of the same thickness is 1.5 times stronger, which allows you to save money when buying beams for logs (they can be laid less often). The table shows at what distance from each other the beams can be located if sheets of different thicknesses are laid on them (the table provides data on the plywood most often used for laying the floor). Plywood thickness (mm) Distance between logs (mm) 15,400 18,450 20,500 22,600 It should be added that it is best to lay the logs on a leveling screed. This will significantly simplify the task of arranging an absolutely flat floor. In addition, thinner beams (50 x 50 and 100 x 50 mm) can be used for their installation, since they will rest on the screed with their entire surface. A floor mounted on a flat base will not creak or wobble. In addition, the placement of the beam joints is subject to less stringent requirements than when laying joists on an unprepared surface. Return to Contents</a>
Align base
Return to Contents</a>Dismantling the old floor and installationwaterproofing So, before making the floor, its base must be prepared. These activities include not only leveling the floor, but also ensuring proper waterproofing, because it will prevent mold, wood rot and improve the thermal insulation characteristics of the new coating. Scheme for dismantling concrete floor screed.First of all, remove the old floor and screed. It should be removed to the very base with a hammer drill or crowbar. Having removed everything that is left of the old coating, carefully inspect the floor and repair it, filling cracks and potholes with mortar. You may have to chip off the sharpest protrusions to make the surface of the floor smoother. Leave the base for a while to dry. Then treat it with antiseptic preparations, and after they dry - with a primer. Now you can lay a waterproofing layer on the base. A more modern technology for its installation is to apply a special mastic to the surface. It is applied with a brush in 2 layers. In addition, the walls are also coated with the composition to the height of the future screed. You can also use traditional waterproofing materials: roofing felt and polyethylene film. They are also laid with an overlap on the walls. In addition, all connections of the waterproofing layer are made with an overlap. The joints of the roofing felt are sealed with liquid bitumen or mastic based on it, and the joints of the polyethylene are sealed with tape. Return to contents</a>Construction of the plane To get it perfecthorizontal screed under plywood on logs, beacons are laid on the base, along which the solution will be leveled. Installing them using only a building level is a tedious task. It is better to build the plane of the future screed using:
- chalk and chop cord;
- hydro level;
- tape measure or ruler;
- nylon threads;
- dowel-nails or self-tapping screws (depending on the material from which the walls are made).
 Scheme of beacon placement.First, create the so-called zero line. Put a dot on the wall (you can choose the height from the floor yourself, as long as it is convenient for you to make the markings). Using a water level, make another mark on the same wall. Stretch a cord between them and beat off a horizontal line with chalk. Repeat the procedure on the remaining surfaces. On walls up to 3 m long, it is enough to put 2 dots; on longer surfaces, the number of marks should be increased. Select the highest point of the base. Measure the distance to the zero line from its projection on the wall. Subtract 2-3 cm from this value. At the resulting distance, put dots below the zero line and connect them with horizontal lines beaten off with chalk. Screw in dowel nails or self-tapping screws along them and stretch threads between the opposite walls. The plane is ready. Install the beacons along it. After that, pour and level the solution. Return to the table of contents</a>Preparing plywood and joists and laying the lathingWhile the solution is hardening, prepare the material so that laying the plywood on the joists will go smoothly. The joists should be dried under a canopy. After ten days, treat them with an antiseptic. While the beams are drying, improve the characteristics of the plywood. To do this, prepare:
- drying oil;
- brush or roller;
- iron or building hair dryer.
 Scheme of laying support joists on a concrete base.The drying oil is heated to 60° and applied to the veneer on both sides. After that, the surfaces are dried with an iron or a hair dryer. The impregnation is applied again, etc. The procedure is repeated until the drying oil stops being absorbed. By the way, the edges of the sheets after cutting must be additionally coated with impregnation. 4 weeks have passed. The screed has hardened, the logs and plywood are prepared. You can start installing the lathing.
After laying the heat insulator (mineral wool or polystyrene foam), plywood is laid on the joists. Return to contents</a>
How to put plywood?
The plywood floor looks like this.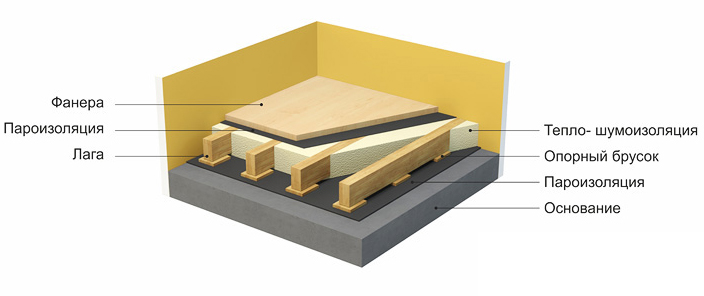 Scheme of laying plywood on joists.
If you are laying another layer of plywood, it is laid perpendicular to the previous one.


