Carrying out repairs in an apartment or house forcesmany people think about how to putty a ceiling for painting, because this type of decorative coating, although very convenient and beautiful, still has one significant drawback, namely, it does not hide existing defects. Even wallpaper can largely hide unevenness or roughness, but when painting a ceiling that is not well puttyed, any unevenness will be very noticeable.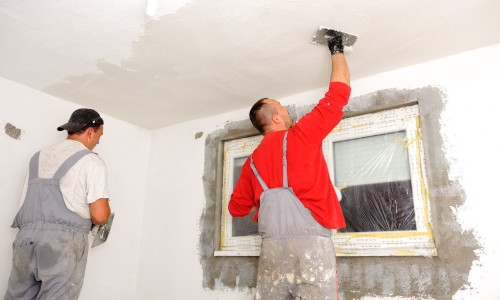 Before painting the ceiling, it must be leveled with putty.
How to properly prepare the ceiling for shpaklevke?
Preliminary preparation of the ceiling for puttyingincludes a whole range of activities. First of all, you should carefully inspect the ceiling and determine whether it is worth removing the old putty. If the putty is old and cracked and peeling off in places, then it is necessary to remove it, since applying a new layer will lead to the fact that cracks and other defects will appear on it very quickly. Before you start plastering the ceiling, you shouldremove old finishes using water, a knife and a spatula. Also, if there is an old decorative layer on the ceiling, it should be removed in advance, regardless of what it is: paint, whitewash or any other material. Until recently, paint was applied only to wallpaper, so removing it will be as easy as removing ordinary wallpaper. Using a special wallpaper tiger, that is, a device with a large number of spikes, you can quickly make many holes in the wallpaper and paint, through which water will quickly seep to the glue, ensuring that the wallpaper comes off along with the paint. If the paint was applied directly to the ceiling, then the matter is somewhat more complicated, since you will have to work with a spatula. With whitewash, everything is a little more complicated, since it needs to be washed off. When carrying out the procedure for washing off whitewash, you need to take a roller on a long handle and thoroughly wet the ceiling with hot water. It is imperative to wet it very generously so that the entire layer of whitewash is well saturated. Next, you need to leave the ceiling to soak for about 15-20 minutes, after which the whitewash can be removed using a regular wide spatula. After all the whitewash has come off, the ceiling is again washed several times with clean hot water using a roller to remove any remaining decorative material. It is better to remove the old putty that is located between the seams of the tiles, since it is in these areas that, as a rule, the greatest number of defects may occur in the future. While the ceiling dries after removing the decorative coating and old putty, you need to take care of the necessary tools that will come in handy during the work. These include:
- high capacity;
- spatula - 100 mm;
- spatula - 250 mm;
- spatula - 450 mm;
- building mixer;
- a table capable of withstanding a person's weight;
- paint roller;
- priming tank;
- respirator;
- protective glasses;
- nylon mesh with cells 2x2 mm;
- waterproof fine-grained sandpaper.
 Tools for puttying the ceiling:spatula, mixer, brush, roller, sandpaper, rule, bucket for mixing the mixture. After all the tools are prepared, you need to take care of purchasing both the starting and finishing putty, as well as the primer. There are many varieties of these materials from different manufacturers, so you can choose the most suitable option after consulting with the seller of materials. After the ceiling has dried and all the necessary tools have been prepared, you can proceed to the final stage of surface preparation - applying the putty. At this stage, the cleaned surface of the ceiling is primed. The primer is very important, as it not only prevents the appearance of mold and mildew, but also promotes good adhesion of the putty to the surface. It is best to apply the primer in several layers. After the primer has dried, a nylon mesh is attached, which will further protect the putty from deformation and cracking. Return to contents</a>
How to apply a starting filler for painting the ceiling?
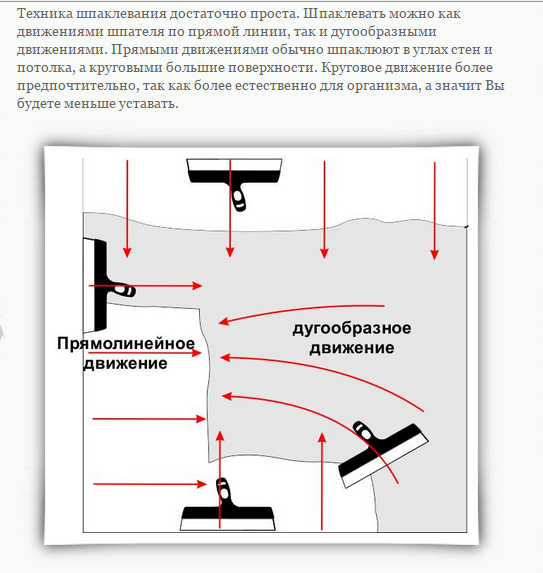 Technique for applying putty.After all the preparatory work has been completed, you can begin making the starting putty and applying it. The starting putty is sold dry, so first of all, you need to prepare the mixture correctly. The packaging of the material always contains clear instructions on the proportions in which the dry mixture should be mixed with water. For mixing, you need to use a wide container and a construction mixer. The consistency of the finished starting putty should resemble very thick sour cream. After the starting putty is ready, you need to take the narrowest spatula and carefully fill in all the small cracks and defects that are on the ceiling. Then you can proceed to the main part of the work. Using a small spatula, you need to take a small amount of material from the container with putty and apply it evenly to the largest spatula in the set. Puttying is done with a wide spatula. The thickness of the first layer of starting putty should be no more than 1 cm. During the work, you should try not to leave marks from the spatula, but at the same time apply the layer as evenly and thinly as possible.
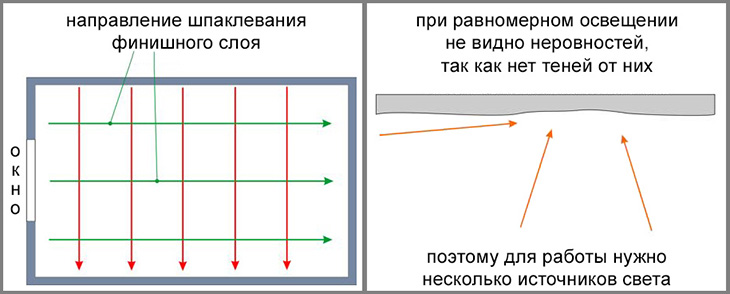 Direction of application of the finishing layer of puttyon the ceiling. To achieve a good result, hold the spatula at an angle of 45 degrees, and do not press it too hard against the surface. After applying the first layer, apply a 2nd layer of nylon mesh. The mesh is literally sunk into the existing layer of putty. Apply another 1-2 mm layer of putty on top of the mesh. Next, let the initial layer dry completely, which will take at least 8 hours. After this, apply a second layer of starting putty, the thickness of which should not exceed 1 cm. The starting putty for painting should dry completely, which may take more than 24 hours. After this, carefully inspect the ceiling and remove any drips, unevenness, and lumps that may be visible with sandpaper. When applying all layers of starting putty, be very careful when processing areas adjacent to the wall and corners, as they are the most problematic. Return to contents</a>
How to apply the finishing filler for painting?
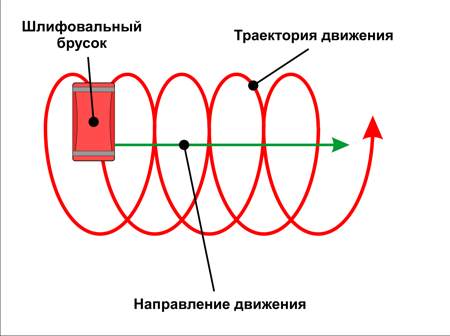 After the putty has dried, the ceiling needs to besand. Finishing putty for the ceiling under painting is absolutely necessary. It is applied over the starting layer in a thinner layer, and the application technology is significantly different. To form the finishing layer of putty, it is best to use a 250 mm wide spatula. First, according to the instructions, you need to prepare a putty solution, which should also be similar in consistency to very thick sour cream. If you plan to paint the ceiling smoothly, it is better to buy ready-made finishing acrylic putty, which is sold already diluted and does not contain lumps and other elements, therefore it allows you to create a higher quality coating. The layer of finishing putty should be 1-2 mm, so when applying the material, you need to press the spatula well to the ceiling. Hold the spatula at an angle of 70-90 degrees. The greater the angle, the thinner the layer will be applied to the ceiling. All excess mixture should be carefully removed with a small spatula. After applying the first layer of finishing putty, you need to form the same thin 2nd layer overlapping the 1st. Return to the table of contents</a>
Surface grinding and preparation for painting
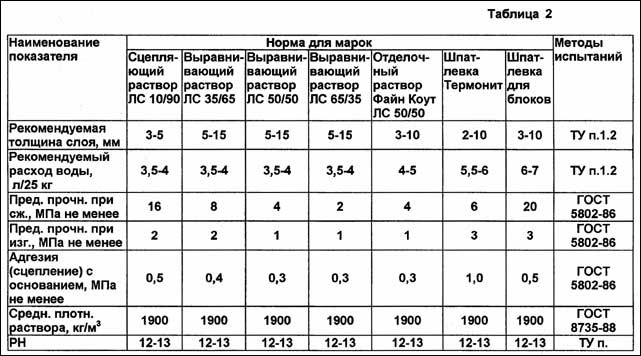 Characteristics of putty solutions.The ceiling putty for painting is completed by grinding. When grinding, it is imperative to wear a respirator and safety glasses, since the surface treatment process is inevitably accompanied by the appearance of a large amount of dust, which can get into the lungs and onto the mucous membrane of the eye, which will lead to health problems in the future. It is best to grind the ceiling putty for painting early in the morning or with the curtains closed. For illumination, you need to use a flashlight, the beam of which is directed at the ceiling. In this case, all existing defects and irregularities will be clearly visible, which will greatly facilitate the work process. For grinding, you need to use fine-grained sandpaper attached to a wooden handle. Often, an ordinary small wooden block is used as a handle, which is comfortable to hold. The grinding process must be carried out very carefully and slowly, since even small defects will remain, they will be clearly visible after painting the ceiling. If a person does not have sufficient experience in such work, it is best to wait until the dust settles after sanding the entire ceiling, and then check the surface using a directed beam of light. After sanding, it is necessary to prime the ceiling surface again. At this stage, the primer can be applied with a regular paint roller, and hard-to-reach places can be painted with a regular brush. It is best to take rollers with a small velor pile, as this guarantees a higher quality result. The primer should be applied in several layers, but so that the 2nd lies perpendicular to the 1st. During the priming process, there should be no excess liquid left on the ceiling surface. About a day after applying the primer, you can start painting the ceiling.


