Despite the recent emergence of a largenumber of new flooring materials, linoleum remains a very popular floor covering. It can be seen on the floor of private homes, high-rise apartments, and prestigious offices. Less often, it is found in industrial and warehouse premises. The most common defects of linoleum are:swelling, peeling, abrasions and small holes, cracks, cuts or small tears. Linoleum has maintained its popularity for so long due to its relatively low price, fairly high strength, remarkable flexibility, water resistance, and most importantly - ease and speed of installation, thanks to which even a person who has never done any DIY can do this work without much difficulty.
The main causes of defects
 Laying linoleum on a concrete screed.But it is precisely the lack of sufficient experience that is the main reason why various defects may appear in the laid linoleum. Another reason for the appearance of defects or damage may be improper or careless use of the floor. The most common defects are:
- bloating;
- exfoliation;
- scrapes and small holes;
- cracks, cuts or small tears.
The first two defects are most oftena consequence of poor preparation of the base or incorrectly applied mastic. The last two are the result of improper use or poor quality of the linoleum. But do not rush to change all the laid linoleum, as some impatient owners do. Of course, the defects that appear are a nuisance, but often a simple repair is enough to eliminate them, which is easy to do yourself, the main thing is to know how and what to do. Return to the table of contents</a>
Elimination of blisters
 Scheme for cutting linoleum edges.If the linoleum has swelled over most of the floor or has come off completely, then gluing it is not rational. In this case, it is better to carefully tear the linoleum off the base, clean its back side from the applied mastic, and then lay it out in one layer with the back side up. The base is also cleaned of mastic, re-leveled if necessary, and then primed. When the primer dries, mastic is applied to it again and the linoleum is laid again. Small swellings are easy to eliminate. If the linoleum was laid using hot bitumen or rubber-bitumen mastic, then a puncture should be made at the swelling site with a sharp object, like an awl, and the accumulated air should be squeezed out through the resulting hole. Then the puncture should be covered with a sheet of paper and a heated iron should be passed over it several times. The mastic will melt when heated and will seize the linoleum again.
 .If the linoleum was laid on a solvent-based adhesive mastic, then in this case you need to make a cut on top of the swelling with a sharp knife, squeeze out the air and inject the solvent, which is the basis of the mastic, into the space between the base and the linoleum with a syringe. After a few minutes, the solvent will soften the mastic, and the linoleum can be glued to the base again, having first leveled it and placed some heavy weight on top. Sometimes it happens that, despite all efforts, the linoleum still does not stick to the base. This can happen if this area was poorly coated or not coated at all during the initial installation. In this case, it is necessary to introduce mastic, not solvent, under the linoleum through the cut, using a long and thin polished wooden chip or spatula as a working tool, try to evenly level it on the base, and then glue the linoleum to it in the same way as in the case of solvent. Return to the table of contents</a>
Repair of cuts and tears
 Step-by-step instructions for repairing linoleum.Cracks, tears and cuts in linoleum can be repaired using cold welding, which uses specially designed PVC C-type glue. This glue has a thick consistency and its composition is as close as possible to the chemical composition of the polymers from which linoleum is made. It is due to this similarity that it is easy to glue cracks and cuts with glue. In this case, linoleum repair is carried out according to the following scheme. First, you need to do some preparatory work: thoroughly clean and dry the place of future gluing and lightly go over the ends of the tear or cut with sandpaper to remove burrs on them. Then, using double-sided tape, fix the edges of the cuts, attaching them to the base. After completing the preparatory work, you can start welding. The glue is squeezed out at the place of the cut or tear along its entire length. Because of its thickness, the glue lays down as a bump strictly in the cut, without spreading over the front part of the linoleum. After the glue has completely dried (24 hours), the resulting bumps must be carefully cut off and the welding spots must be additionally masked with a special linoleum mastic matched to the color of the linoleum. Return to contents</a>
Elimination of small punctures
If you find small punctures on the surface of the linoleum, they must be eliminated. If this is not done, then soon the linoleum will begin to fan-shaped cracks in this place. Types of linoleum by operational characteristicscharacteristics. It is best to use liquid PVC glue to repair small punctures with a diameter of no more than 1.5 mm. Masking tape is glued to the linoleum where the puncture is, and then the tape is also pierced exactly above the puncture, but the pieces of tape at the puncture should not cover the ends of the linoleum. This is the only difficulty with this type of repair. Then the hole is carefully filled with glue, after it has set and dried completely, the tape is removed, and the remaining glue bump is carefully cut off at floor level. For punctures with a diameter of more than 1.5 mm, it is better to use the same C-type glue as for cold welding. Since it is thicker, you can do without using tape when using it to seal punctures. Return to contents</a>
Repair of holes and abrasions
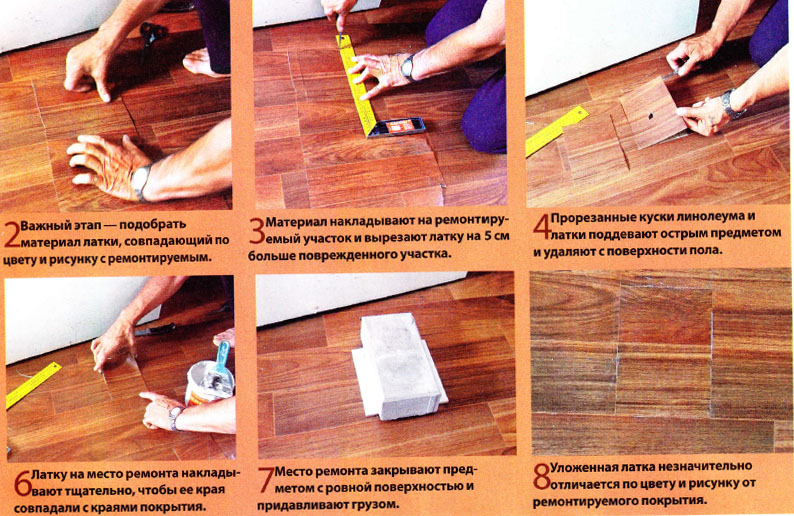
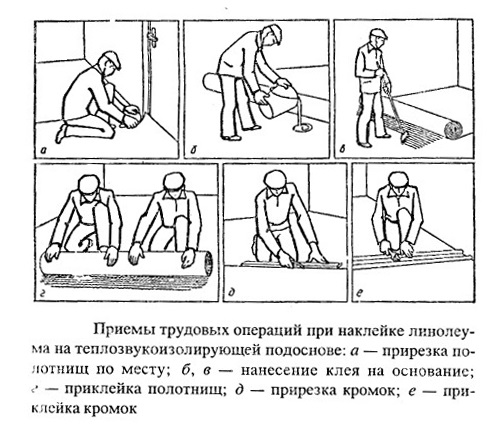 Scheme of the sequence of laying linoleum.Repairing linoleum in places of abrasions or small holes consists of replacing the damaged area with a piece of a suitable color and pattern. If you were thrifty when laying the linoleum and did not throw away the remaining pieces, then there will be no problems, otherwise you will have to run around the hardware stores in search of suitable material. To perform such repairs, you will need the following tools:
- metal ruler;
- sharp knife.
First, a piece of linoleum is cut out from the remains,usually square or rectangular, the dimensions of which are 2-3 cm larger than the damaged area. Then the cut out piece is placed on the damaged area of the floor and a cut is made along its perimeter with a sharp knife in the old linoleum. After the cut is complete, the patch is removed, the cut out damaged area is removed, and the base area is cleaned of mastic residue and debris and re-primed. After the primer dries, the repair patch is glued in place of the removed one. It is best to glue the new patch on the same mastic as the rest of the linoleum, but this is not essential. Any mastic will do for gluing, and even PVC glue type C will do - the same cold welding with which you will need to seal the places of cuts. You need to put some heavy weight on the glued patch and leave it like that for 24 hours. These simple methods can help you avoid the hassle of completely replacing re-laid linoleum, saving money and time. It is clear that over time, the laid linoleum will still become unusable, and will need to be completely replaced. But if you have carried out the repair work correctly and efficiently, the old linoleum is guaranteed to serve you for at least another 5-6 years, i.e., virtually the entire service life of this type of flooring.</ ul>


