Any floor covering needs to be cleaned periodically.change, which entails considerable costs. If you do not involve specialists and carry out repairs yourself, the costs will decrease several times. Of course, not everyone can lay natural parquet or tiles, but replacing them is not that difficult. The most important thing is to properly prepare the subfloor and accurately mark the material, and a step-by-step guide and practical advice from experienced builders will help you avoid the main mistakes in this process. It is better not to lay linoleum on a concrete base - the floors will be cold.
How to prepare a rough floor?
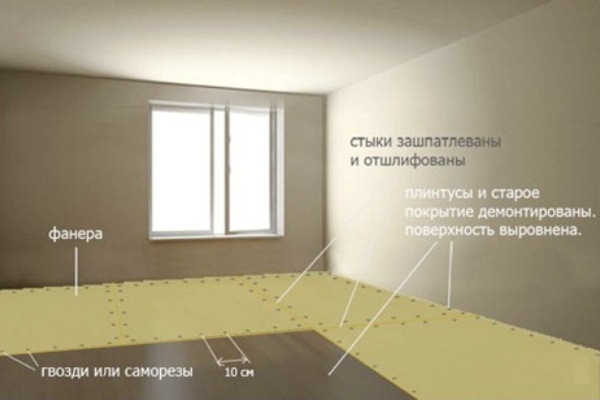
Replacing the floor requires free space, andtherefore, everything must be removed from the room so that nothing interferes with the work. If the old linoleum is in good condition, without through breaks, and the floor underneath has no dents or bulges, the new covering can be laid directly on it. In this case, preparation includes only removing the baseboards and thoroughly degreasing the surface. To reuse the baseboards, it is advisable to number each removed element on the back side, putting the same number on the corresponding section of the wall. Subsequently, this will facilitate the fastening of the strips and save time. Preparing the subfloor before layinglinoleum. If the old covering has become very worn out or there are noticeable irregularities on the floor, the linoleum must be removed and the base repaired. Since linoleum is laid on different surfaces, they have to be repaired in different ways. A concrete base can be leveled with a self-leveling floor or a regular cement screed; this method is the most convenient. It is worse if the subfloor is made of boards: with long-term use, the wood deforms, dries out, begins to creak, and it is much more difficult to get rid of such defects. First, it is necessary to replace all rotten or too warped boards, then strengthen the loose areas, fill all cracks and small gaps with putty, and clean up chips. Parquet floors are prepared in the same way: falling planks are strengthened, rotten ones are replaced, the surface is sanded. If there are too many defects, it is much easier to cover the base with sheets of plywood or chipboard, carefully deepening the screws so that the protruding heads do not damage the new covering. The seams between the slabs are necessarily filled with putty, leveling the surface as much as possible. After drying, the filled areas are sanded, and then the entire floor is cleaned of dust and debris. At this point, the preparatory stage is considered complete. Return to contents</a>
Material preparation and tools for work
 Sequence of cutting linoleum.As you know, linoleum is sold in rolls, so immediately after unrolling its surface is too uneven for marking and laying. To make it convenient to work with the material, it is recommended to roll out the purchased rolls on the floor and press down the edges with something heavy, leaving them in this position for several hours. During this time, not only will the waves on the surface be smoothed out, but the sharp specific smell of new linoleum will disappear. If the rolls have been in the cold for some time, they should be allowed to warm up well in the room before unrolling: this material becomes less elastic under the influence of negative temperatures and may break. The following tools should be ready for marking and laying linoleum:
- roulette;
- pencil and ruler;
- stationery knife;
- scissors;
- Double-sided tape.
The best option for cutting the coating— special scissors with 2 replaceable blades, but regular ones will do. The main thing is that they are sharp. The method of laying largely depends on the size of the room: in small rooms, linoleum is laid on a dry floor without additional fasteners, but if the area is more than 25 m², you will need glue or mastic, as well as a primer, a notched trowel and a roller for smoothing. Return to contents</a>
Cutting of flooring
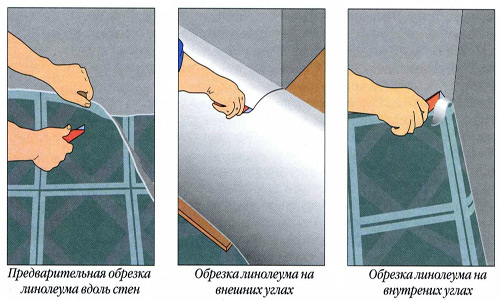
 Stages of linoleum installation.When doing it yourself, you cannot do without cutting the canvas. The overall appearance of the flooring depends on how correctly the material is cut, and therefore all measurements must be taken very accurately. In addition to the parameters of the room, you should take into account the direction of light and the pattern of the flooring so that the joints between the canvases are not visible. Plain linoleum should be laid in the direction of light, then the floor seems monolithic and more neat. Combining strips with a geometric pattern takes more time and increases the consumption of material, but such a flooring looks much more decorative. So, first measure the length of the room, cut the first strip along it and lay it on the floor. The linoleum is placed along one of the walls with a small overlap; subsequently, all the excess will be cut off, and an even gap of 3 mm will remain along the perimeter of the room. The next strip is first aligned with the pattern of the first, and only then cut off. All the others are cut in the same way, and cutouts for pipes and corners do not need to be made at this stage. When the linoleum is laid out over the entire area and the joints are neatly aligned, you can begin trimming the material at the walls. The edges of the covering are slightly bent towards themselves so that there is a gap of 3-4 mm between the wall and the linoleum, and a mark is made on the reverse side with a pencil. Having retreated about 20 cm, everything is repeated again, and so on along the entire perimeter. Then the edges are bent even more and the marks are connected into one continuous line, after which the resulting strip is carefully cut off. Cutouts for heating and sewer pipes are made in a similar way, and the covering is trimmed at protruding corners. Return to contents</a>
Ways of laying the cloth
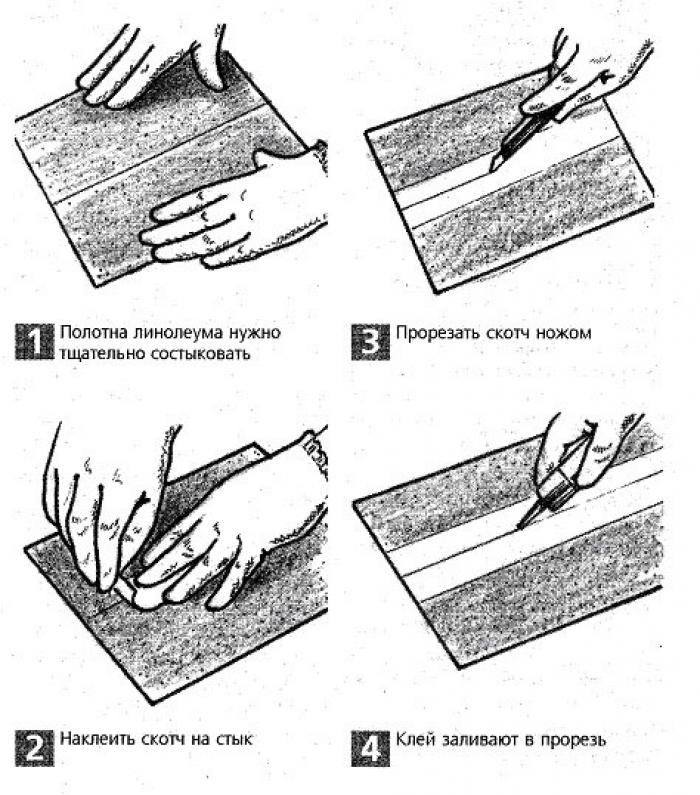
 Technology of cold welding of linoleum with glue.There are several do-it-yourself ones. If you simply lay the floor covering, the strips may shift or rise in waves over time. To prevent this from happening, the material must be attached to the subfloor. For a small area, this method is suitable: the strips along the perimeter and at the seams are glued with double-sided tape, pressed to the floor and the unevenness is carefully smoothed out. If the area is large enough, you can fix the linoleum with a special mastic or glue. When using mastic, it is imperative to prime the back of the sheet and the subfloor. The treated surfaces must dry well, so it is recommended to continue laying after 1-2 days. Both the base and the sheet are covered with a layer of mastic, and then the linoleum is carefully laid in place and pressed firmly. The surface must be carefully smoothed with a rag or roller so that there is no air or excess mastic left under the covering. Laying with glue is done a little differently: the prepared sheets are bent away from the walls to the center of the room as much as possible, and the open areas are smeared with glue. Then the linoleum is returned to its place, pressed to the floor and smoothed out well. Then the sheet is bent on the other side and the process is repeated. At the joints, the sheets are glued with an overlap, stepping back about 3 cm. 3 days are given for drying, during this time it is not recommended to walk on the surface. When the coating dries, you can proceed to the final stage: you need to trim the edges at the joints with a very sharp knife, and then weld the seams with a special compound. At this point, laying linoleum with your own hands is almost complete. It remains to attach the baseboards and wipe the surface, and you can bring furniture into the room. Those who doubt their abilities are advised to start with the smallest rooms, for example, a hallway or kitchen. If you strictly follow the installation technology and temperature conditions, do not rush and perform each stage carefully, replacing the coating will not cause much trouble and everything will turn out perfectly the first time.


