Lags are longitudinal beams, for whichthe floor covering is laid. The logs are made of bars. They can be made of wood, polymer, metal or reinforced concrete. In most cases, the installation of logs from wood, because this material is of low cost and is constructive in the case of laying a wooden floor. You should know that the process of installing the floor on lags from other materials is no different.  The use of a floor lag will increase its noise insulation, will facilitate the distribution of the load, and will ensure the strength of the structure. Advantages of using lag:
- increase the level of noise insulation;
- correct distribution of the load on the lower layers;
- The presence of a ventilated underground, in which it is possible to establish various communications;
- good level of thermal insulation of the floor;
- the creation of a flat base for the flooring of floorboards;
- ensuring the strength of the structure and resistance to various loads;
- if necessary, then any of the floor elements can easily be replaced.
Disadvantages of using lag:
- In the case of a log on the floor, the room will lose altitude;
- to install the logs, you will need to carefully mark and align these devices in one level, which is difficult to do.
How to choose the material for making lag?
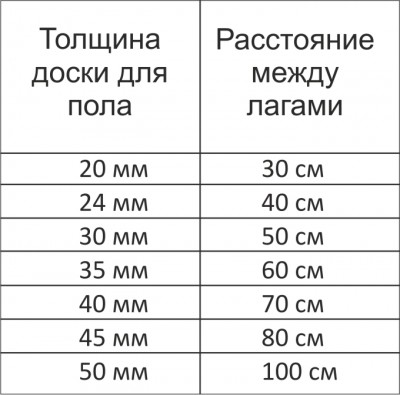 Figure 1. Step lag for boards of different thicknesses. Lags can be made from an array of budgetary tree species: spruce, pine, fir. In some cases, larch is used, but it costs more. Suitable wood 2 and 3 varieties. The humidity level should be approximately 19-20%. The beam should be taken with a rectangular section. The height of the rails should be 2 times the width. Lags with a similar cross section are capable of coping well with large loads. The size of the log must be selected on the basis of the span, that is, the distance between the bars of the lower strapping. Consider the thickness of the insulating material used. In the process of purchasing boards it is necessary to inspect the material for defects. If the boards have a marriage, then they need to be postponed. The material is recommended to be purchased with a margin of 15%. To protect the wood from beetles, fungus and mold, the entire construction will need to be treated with an antiseptic. Lags from the lower side will need to be processed several times, making a gap of 4-5 hours. As a protective agent against mold, the following can be used: sodium fluoride, BBK-3 agent and others. These agents dissolve in water, they can be applied with a brush. Back to contents</a>
What is the distance between the beams of the floor?
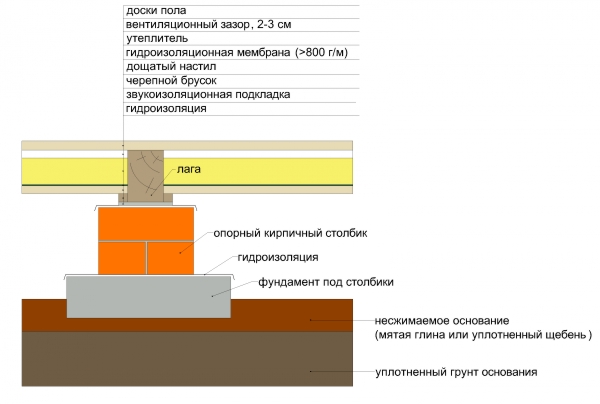 Layout arrangement of logs for laying on the ground. The distance between the beams will depend on the thickness of the flooring flooring. If you plan to use large thickness boards for the cover, the logs may not be installed too often. If there is a coating of small thickness, the logs should be placed frequently. In Fig. 1 you can see the pitch of the log depending on the thickness of the boards used. It is not necessary to make exact calculations, it is sufficient to take the distance between the beams by the value, which depends on the thickness of the floor covering and the width of the structure. If, at the end of the installation, the distance between the bars is not accurate, then you can make the step between the last constructions smaller. In this case, the structure will have good strength. Back to contents</a>
How to install floor lags?
Elements that you need to install and secure lags: 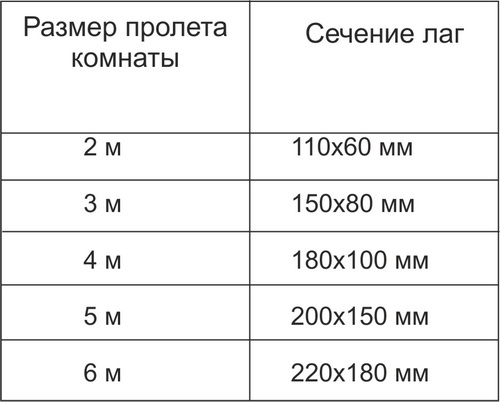 Sectional dimensions of the log for different span sizes.
You can install the lags on both the earthen base and on the floors of houses. Back to contents</a> How to fix the logs on the ceilings of wood? It is recommended to fix the logs to the beams. However, in most cases the beams do not have an even level, therefore it is possible to fix the logs to the lateral surfaces of the beams. The horizontal leg can be checked with a control rail, you do not need to use the lining. The logs are fixed with screws with a diameter of 6 mm. The length of these fasteners should be 2.5 times the width of the lag. In order not to damage the beam, it is recommended to drill a hole first in the beam and lag. To do this, you need to use a drill, whose diameter is 2.5 mm smaller than the fastener. If the beams are placed far apart, then it will be necessary to make double lags. First of all, the first layer of the log on the beams is installed, after which another one is mounted, but with a smaller distance. Back to contents</a> How to install lags on a concrete base? There are 2 methods of installing the log on a concrete surface. The first method involves laying different thicknesses between the beams and the concrete base. They are used to make it possible to level the level. This method is used quite often, but you should know that it is not recommended to use it. After some time, the linings may begin to dry out, change shape or fly out. As a result, the floor may begin to creak or sag.  Variant of fixing the log. The second method consists in pouring cement screeds to level the base of the floor. On the made coupler lags are established. In this case, the floor base will not deform, and the screed can provide a reliable support along the entire length. Before you install the lag on a concrete base, you will need to do some things:
After these works there will be an opportunity to establishlags. It is recommended to use bars longer than 2 m in the course of work. If the length is not enough, then the rails can be joined together by the end parts. If it is planned to connect the logs, the joints of the adjacent rows will need to be placed not at the same level, but with a displacement of 0.5-1 m. It is not permissible to install lags on soft insulation material, since such a structure will be unstable. Heat insulation material must be installed between the lags. If there are gaps or cells, they will need to be filled with scraps of insulation material. Back to contents</a> How to lay logs on the ground? First of all, it will be necessary to level and ground the ground. This work can be done manually, for which you should use a large log. From the bottom to the log a board is nailed. To trample the base, you need to move the tool over it. The board should have a thickness of 5 cm or more. Next, you will need to perform measurements and markings for the pillars under the beams. If it is planned to use the bars of the lower strap as support elements for logs, the marks should be placed directly on the bars with a simple pencil. If a grillage is used, which is covered with a roofing material, then marks should be placed on the roofing material. The distance from the initial lag to the wall should be approximately 15-20 cm. In some cases, the distance may be less. For supporting pillars, you will certainly need to make a foundation. You can make a separate base for each pillar or joint under a row of pillars. The minimum size of the base for one column is 40x40 cm, the height of the structure is at least 20 cm. The foundation is poured into the bricks in the following way: 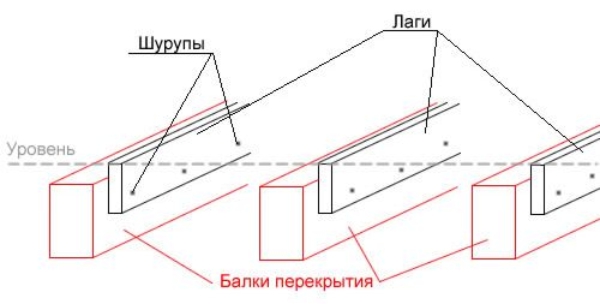 Scheme of mounting the log on a wooden floor.
After the concrete mixture has dried,to produce waterproofing. To do this, you need to cut the material according to the size of the post. The material is laid on concrete. It is not necessary to lubricate the bitumen with a bitumen. The next step is laying bricks in 2 layers. The last layer should be perpendicular to the length of the lag. In the process of laying, a solution of cement and sand should be used. The brick must be not less than M100. Next, a waterproofing material is laid along the brick. To do this, cut the ruberoid according to the size of the brick column, and then lay it on top of the structure. Next, a gasket for sound insulation is installed. It is recommended to fix it additionally so that it does not move. The floor base on the logs should be flat, therefore it is important to check the horizontality of the logs. To do this, you must first lay "lighthouse" lags. If the lag was installed with irregularities, then the excess can be removed with a planer, and the linings should be installed under the deflections. The maximum deviation is 1 mm per 1 m. All intermediate beams are then installed. The logs are fixed with corners to the posts. In this case, it is best to use self-tapping screws, which must be inserted into the bar for 4-5 cm. The other part of the corner is fixed to the support post with dowels. If you plan to place various communications between the beams, you should know some rules:
Installing lags with your own hands is easy enough if you have all the tools and materials you need to work.


