Ceiling defects can be hidden with the help ofstretch ceiling technology. To install a suspended structure, you will need a water level, a hammer drill, a drill, a tape measure and a grinder. Such ceilings are mounted with your own hands using a profile. Scheme of a slatted suspended ceiling.
Preparatory work
Calculations are made in advance. The guide profile is calculated along the perimeter of the room (the total area, length of the walls and profile are taken into account). Drywall comes in the following types:
- moisture resistant;
- normal;
- refractory.
The calculation of the quantity of this material is madeaccording to the following formula: the area of the ceiling is divided by the area of 1 sheet. The suspended ceiling is mounted on a direct hanger. The calculation of such fastening is made taking into account the area of the room and the type of the structure being installed. Installation work is carried out using crabs, dowels (dimensions 8x10 cm) and self-tapping screws 25 mm long. The installation location of the guide profile is marked using a water level. If the installation of spotlights is envisaged, then an indent of 10 cm is made from the ceiling. The marking is made on 4 walls. Then holes are made for the dowels. The guide profile is mounted to the wall with a step of 30-40 cm. In the corners, a distance of 10-15 cm is maintained.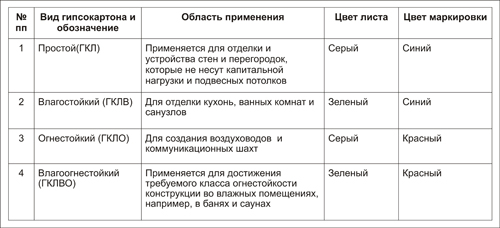 Types of plasterboard and their color marking.Then, marks are made on the wall along the perimeter of the room with a step of 60 cm (for installing the ceiling profile). The marking is made on 2 opposite walls (when installing a single-level ceiling). The suspension is attached to the ceiling. The next stage is to install the ceiling profile. A drill or screwdriver is used to connect the junction of the guide with the ceiling profile. The profile must be attached evenly, without deflections. If necessary, wiring and heat-insulating wool are laid. Installation of drywall is carried out using self-tapping screws (step 10-15 cm). The ceiling is sheathed in the center and along the perimeter of the room. If the sheets do not have rounded ends, then small indentations are created using a knife. The heads of the fasteners are sunk into the gypsum board by 1 mm. Holes for installing communications are cut out with a knife or a hammer drill with a special attachment. The next stage is puttying the surface. First, you will need to buy gypsum plaster and a special adhesive mesh. The putty is applied to the joints. Then the entire surface of the ceiling is puttied using finishing plaster. To get a smooth ceiling, you will need 100/120 sandpaper. Experts distinguish several methods for decorating a single-level suspended structure. Various materials are used to decorate such ceilings, including gypsum molding and baguettes. Return to contents</a>
Plastic hanging structure
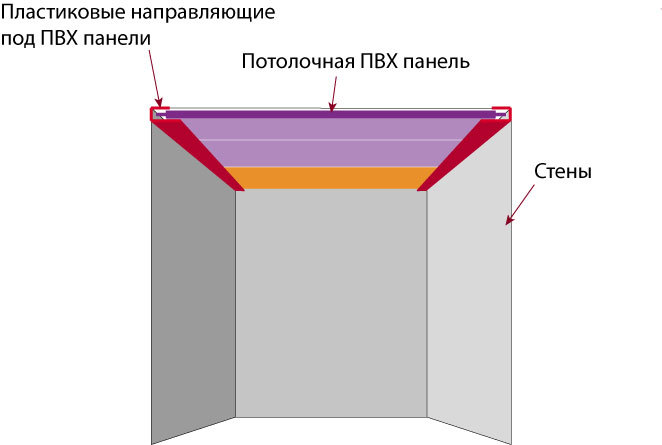 Scheme of installation of PVC panels on the ceiling. Installation of ceilings from PVC panels is carried out in rooms with high humidity. The advantages of this material, according to experts, are:
- ecological compatibility;
- hygienic;
- low weight;
- easy installation.
These panels are available in a variety of colours.gamma. A pattern can be applied to a glossy PVC ceiling. The design hides communications underneath, allowing you to install spotlights and overhead chandeliers. To assemble such a ceiling, you will need bars, a level, a rule, a tape measure, a pencil, a wood saw, a drill, a concrete drill (6 mm in diameter), a screwdriver, a hammer, and a knife. To install the lamps, a wire is laid in advance. If the PVC ceiling is installed on a loggia, then the wiring is laid from the next room. Chases are made in the wall using a hammer drill. The wiring is laid in a corrugated plastic sleeve. It is designed to protect the wiring from deformation and rupture when the temperature level in the plaster changes. It is permissible to lay the cable in a special plastic channel. In this case, the corrugation is not required. The channel box is mounted on the wall. On the floor, it is hidden under the baseboard. Return to the table of contents</a>Step-by-step instructions The PVC panel ceiling is installed after the appropriate calculations have been made. The material used is produced in the following sizes:
- length - 2700, 3000 and 6000 mm;
- width - 200, 250, 300 and 330 mm;
- thickness - 8-25 mm.
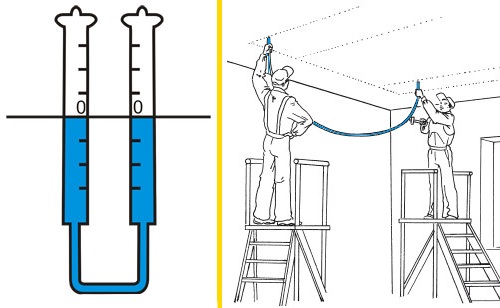 Scheme of marking the ceiling using waterlevel. To calculate the number of panels, you need to calculate the area of the ceiling and the 1st plate. The first value is divided by the 2nd number. The frame for such ceilings is made of pine timber measuring 20x40 mm. The structure is mounted along the perimeter of the ceiling and perpendicular to the direction of laying the plates (step 40 cm). To calculate the number of timber, use the following formula: (A.4)xB+Ax2=K (m), where A is the width of the room, B is the length of the room, 0.4 is the step of fastening the timber, K is the number of timber. To fix the overhead light, the lathing is reinforced at the place of its installation. Therefore, 1 m is added to the resulting value. If installation work is carried out in regions with high humidity, then PVC panels are installed on a galvanized profile. To fasten the timber, use dowels and screws (increments of 1 m). Installation of the metal profile requires the use of straight hangers. The panels are fastened using fastening strips, presented in the form of 90° corners. Their number is equal to the perimeter of the ceiling to be sheathed. A plastic ceiling plinth is mounted on the strips. Its number corresponds to the perimeter of the ceiling. The plinth is joined using corners and joints. Three screws are required per plate. The ceiling is first primed with a deep penetration mixture. 300-400 g of primer is required per 1 sq. m. The frame is attached to the ceiling after the primer has dried. To evenly fasten the timber, you will need a level and screws. Holes are made in the concrete ceiling for the dowels. For this, you will need a drill, hammer and drill. The slats are mounted with a step of 0.4 m. To strengthen the lathing in places where the lamp is installed, an additional beam is attached perpendicular to the frame slats. Self-tapping screws for wood are used to fix the product. The next stage is to install the strip. One shelf is fixed to the lathing, and a ceiling plinth is put on the 2nd. The last product has a groove for this. Fasteners are screwed in the center of the strip using a screwdriver. The corners are fixed to the edges of the plinth after cutting it. The plinth snaps into the groove of the fastening strip. Ceiling panels are inserted into the resulting recess and aligned. The next panel snaps into the groove of the previous strip. The structure is fixed to the lathing with self-tapping screws. A hole is made under the lighting fixture to bring out the wire. The last panel is cut to size lengthwise. The installation of the PVC ceiling is complete.


