Chandelier of thread always differed relevanceregardless of the conventions of fashion. It fascinates with the unusual appearance. The lanterns from the threads gained success in decorating the living spaces in the 70s of the previous century. 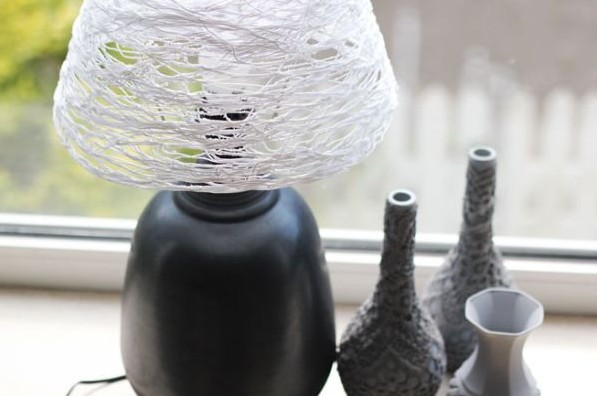 The luminaire of threads is always relevant, since itfascinates by the unusual appearance. They are equally popular today, perfectly complementing the modern decoration of the premises. Pendant lamps and lampshades of that era made fiberglass, which made them look like weaving from the finest threads. Spherical lamp can be made by hand. Outwardly, it will not be much different from fiberglass chandelier. To make it, prepare knitting threads with glue on a starch-based basis (PVA glue can be used). The lamp, created by its own hands, looks impressive and will be the highlight of the design of any of the rooms in the house. Although in manufacturing it is quite simple. Below is a step-by-step instruction on how to make a lamp in a similar style.
Materials for Creativity
Each needlework for its creation involves preliminary preparation of the necessary materials and adaptations. For a filament lampshade the list will be as follows: 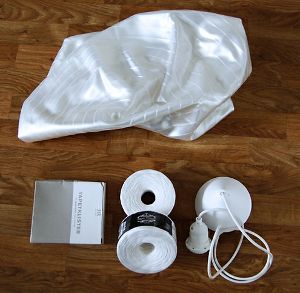 Materials for the manufacture of the lampshade: threads, glue, air ball, electric wire and cartridge.
Air balloon, which in the inflated state forms a sphere with a diameter of 40 cm.
Knitting threads (3 or 4 coils).
Glutinous composition based on starch (a couple of bottles) or PVA glue (its properties are somewhat worse than for starch).
Wiring and fittings for the lighting system for a suspended lamp (sold in stores of economic purpose).
Hook for attaching the product to the ceiling surface.
Light bulb.
Oilcloth or any waterproof material (can be a piece of tarpaulin).
Scissors.
Brush made of foam rubber.
Capron (or plastic) cover or brushes.
Latex gloves.
Back to contents</a>
Lamp with own hands: production sequence
 The main advantage of lamps made by own hands is that they can be of different shapes and sizes.
First of all, inflate the balloon topurchase them as large as possible and fix it with a string so that air can not escape from it. In the process of inflating, you need to monitor the received shape of the ball, as it will become the basis for the final configuration of the lampshade. The ball can be taken in any size, but it's worth starting with a 40-centimeter diameter to practice and gain experience. Then comes the skill of not making a lamp of thread less than the shape of a balloon.
At this stage, you need to remember howschoolchildren, made from the papier-mache a globe or different masks with the participation of a balloon as the basis on which layered paper was stacked. In this situation, the principle of operation is similar, only papier-mache is used, but conventional knitting threads, wetted in glutinous starch solution or glue of PVC.
Take the end of the thread and tie it at the baseball (where he has strings). This area will be the top of the lamp. The cut here is done a little later, so for now, do not worry about the jagged ends or the size of the knot.
Take in the hands of a thread of skein and start wrappingthread air ball. The design of the finished luminaire is affected by the way and sequence of winding movements with the ball threads. An important task is to uniformly envelop the ball with filaments to form a lampshade that would have the same wall thickness on the entire surface. Beginners are not recommended to perform anything original or complex. It is more expedient to pay more attention to the mastering of the technique of crosswise laying of threads and with a tight stretch. At this stage it is enough to acquire the habit of tight tension, which does not deform the geometry of the balloon.
Having learned to wind a thread around the ball,it is necessary to perform 4-5 uniform layers on the entire surface. The result of this step should be a sufficient thickness of winding threads, which would conceal the balloon. If you find small voids, you do not need to worry: it is through these empty places that the light will penetrate most brightly, which will give the final design uniqueness.
The thread is cut off and fixed by tying it to the knot on the ball.
On the working surface spreada waterproof piece of material or an ordinary oilcloth for the table, a piece of tarpaulin. Go to the overlay on the prepared filament surface of the starch ball or PVA glue.
Rubber gloves are worn on hands and with the participation offoam sponges or brushes cause quite a lot of adhesive composition on the whole area of the future lampshade. Glue is saturated with each thread on the ball. Otherwise, even with one remaining dry thread, the shape of the fixture will be far from ideal. It is possible that it will completely disintegrate. Therefore, it is better to overdo it than to put insufficient effort.
The ball in the thread is left to dry for the night. For greater confidence that the perfection of the shape of the ball will not be spoiled by contact with any surface, it is suspended.
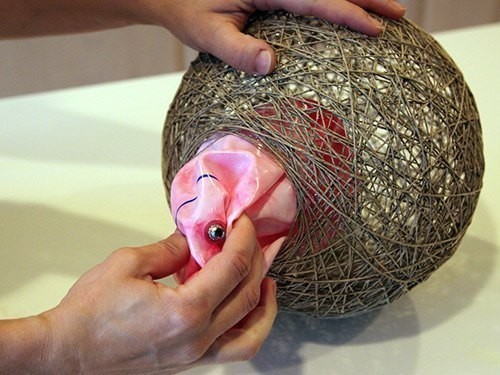
After drying, the bases are taken with a spoke (pin orknife) and pierce the air balloon in the thread. It must burst. There is a possibility that on some walls there will be traces of the ball, which are removed by simple scraping from the lampshade.
At the top of the ball (around the node with attached ends of the thread) a small hole is cut out. A light must pass through it, which is taken into account for its dimensions.
In the lamp shade insert the fixture for lighting andscrew the light bulb. To fix the reinforcement from the inside around the wire wrap a few thin brushes. Then they pass them into the inner space of the sphere and straighten them.
Ready lamp attached to the hook on the ceiling and turn on the lights. All is ready!
Back to contents</a>
Important subtleties of technology
The air balloon should be roundedform. When winding threads begin to work with threads of one key, gradually adding other colors. In such a performance it is possible to make a luminaire with threads with a unique pattern and color. Successful creativity!
Comments
Comments