Laminate is an excellent material for finishingfloor finishes in residential, commercial and public areas. It is characterized by high performance properties and long service life. However, in order for this to be so, it is necessary to know a number of important nuances and perform in strict accordance with the instructions. One of the most important is the preparatory phase. Before starting the main work, you need to properly prepare the floor and figure out where to start laying the coating. Where you will need to start depends primarily on the characteristics of the room and the chosen method of installation. However, first you need to prepare working tools.  Laminate has high performance properties and long service life.
Preparation of tools for laminate mounting
To properly perform laminate laying, you needfirst of all to collect the necessary set of tools. The tools are quite simple and affordable. Even the person without special experience will be able to understand the peculiarities of their use and perform the laying of the laminate in the future. So, before you start laying the cover, prepare the following:  Tools for laying laminate.
Prepare all these tools. Next, before you begin laying, you will need to make a calculation that will determine the number of panels required. Laminate of different classes is available for sale. The class is determined by the strength of the panels and the attendant characteristics. In the apartment or house is best to use the panels of the 32nd class. They are characterized by high strength and excellent performance properties. Suitable for styling in the bedroom, kitchen, living room, hallway and other rooms. Back to contents</a>
Instructions for calculating the required amount of laminate
The laying of the laminate must be carefully prepared. Before starting the calculation, decide which laying method will be used. In case of installation using the traditional rectangular method, the calculation is carried out in the following sequence: 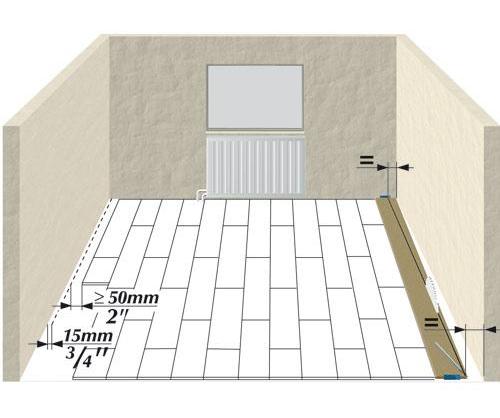 Calculation of the required amount of laminate.
Great for small spacesdiagonal. It allows you to visually enlarge the room and looks more original, but requires more material. The calculation is performed in the following sequence:
After you calculate the required amount of laminate, you can proceed to surface preparation. Back to contents</a>
Recommendations for the preliminary preparation of the base for the laying of panels
 Preparing the floor for laying the laminate.Before figuring out where to start laying laminate panels, you will need to perform a number of preparatory measures. Unlike most other floor coverings, laminate flooring is very demanding on the quality of the substrate. It should be flat and smooth. It can be performed only after the concrete is completely dry. On average, this takes 25 days from the date of filling. The concrete must be covered with plastic wrap. The joints are sealed with tape. You can start laying laminate flooring on a wooden base only after you make sure that there are no fungi and all sorts of pests. When laying on a wooden base, it is most convenient to level it with chipboard or plywood sheets. This method eliminates the need for a vapor barrier layer. Laminate can be installed on linoleum and tiles. If the surface does not have significant irregularities, it is allowed to lay the laminate without first dismantling the old coating. It is enough just to lay the substrate, and you can start assembling the panels. If the surface has many significant differences, it must first be primed and then poured with a self-leveling mixture. It dries much faster than concrete screed. Fill according to the manufacturer's instructions. Back to the table of contents</a>
How can the panels be arranged?
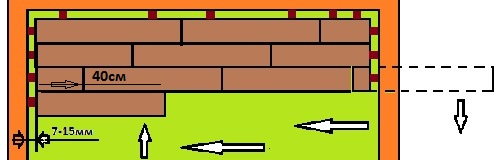 The scheme of laying the laminate using the classical method.Typically, the laminate is installed parallel to the direction of the light. But the specifics of a particular room and design ideas may dictate other methods of installation. Each of these solutions can significantly change the aesthetic component of the room. Therefore, first of all, you need to consider relative to the window opening. This is the classic method in which the panels are mounted parallel to the direction of the light. The method involves sequential installation of the cut off part of the previous row at the beginning of the next row. The method allows you to minimize the amount of waste and ensure the most efficient use of materials. The checkerboard installation method is similar to brickwork. In this case, the rows of panels are shifted by half of one panel. Best suited for single-strip products.
  Diagram of laying the laminate diagonally. With the help of a diagonal way of laying, you can visually transform the premises of a small area. Fitted with this method, the laminate will make the room visually more spacious and airy. Great for rooms with a corner door. As for the direction of the flow of light, the use of this method allows either to concentrate attention on the finish of the floor, or visually change the geometry of the room. Traditionally, the first panel of the laminate is laid in the corner of the room from the side of the window. Back to contents</a>
Step-by-step instruction for laying laminate
During the installation, the panels will inevitably have to be cut. For this, it is better to use a jigsaw. In the absence of such a hacksaw will do. However, in the case of working with a hacksaw, you must be extremely careful not to allow the internal film to be picked up. To create holes for the pipes, a milling cutter is used. The panels themselves are mounted in a certain sequence. First, the substrate is laid. It simultaneously performs the functions of a shock absorber, noise and vapor barrier. When laying panels on a concrete substrate, use a 3 mm thick substrate. For a wooden base, there will be enough material 2 mm thick. For residential premises, it is recommended to use a cork or polypropylene substrate. The cork material is more expensive, but it has higher noise-insulating properties. The substrate must be laid back and forth, without overlapping. Use tape to fasten the stripes. Be sure to consider the fact that the panels can be stacked only on a flat surface. Differences should not exceed 2 mm per 1 m of floor. 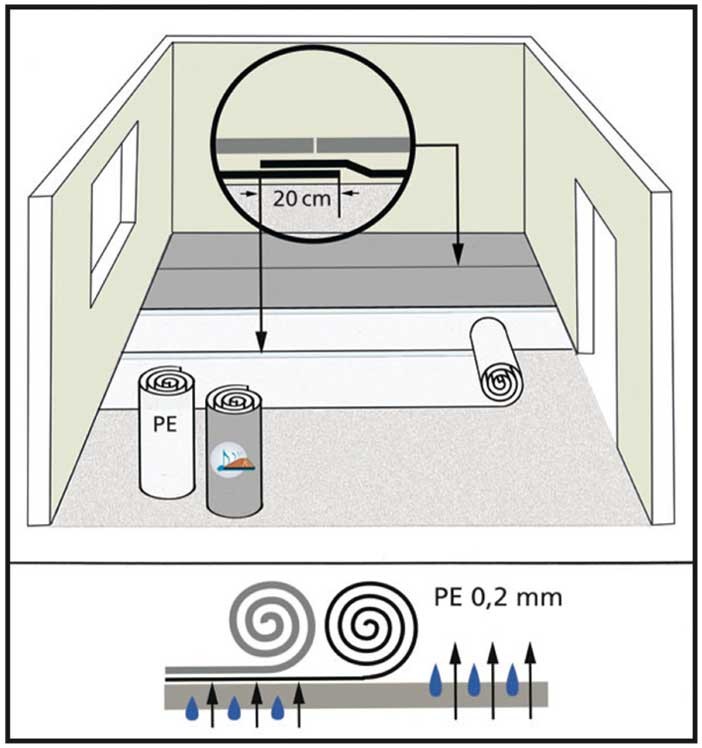 Layout of the substrate under the laminate. Clean the base of all garbage. Vacuum it. Traditionally, the styling is performed from the window opening (from the corner) to the door. Spread a roll of substrate along the long wall of the room. Gradually fill the whole room with a backing, fastening adjacent strips with scotch tape. After the entire substrate has been laid, proceed to laying the first row of panels. The standard dimensions of laminate panels are 126x18.5 or 138x19.5 cm. The plate can have a thickness of 6-12 mm. On the edges of each panel there are special locks, thanks to which they are fastened together. After laying the first plate between it and the wall, insert wedges to provide a clearance of 1.5 cm. This gap will compensate for the linear expansion of the coating. If there is no gap, the panels will buckle with time. Insert the second board in the front lock first and lay. Between the plate and the wall, too, insert the wedges. Lay the first row to the end. The last panel in most cases has to be pruned. To do this, flip the plate face down, attach it end to the wall and draw a line, focusing on the penultimate panel. Use a wax pencil or marker and a corner. Cut a piece of the plate to size and put it in its place.
 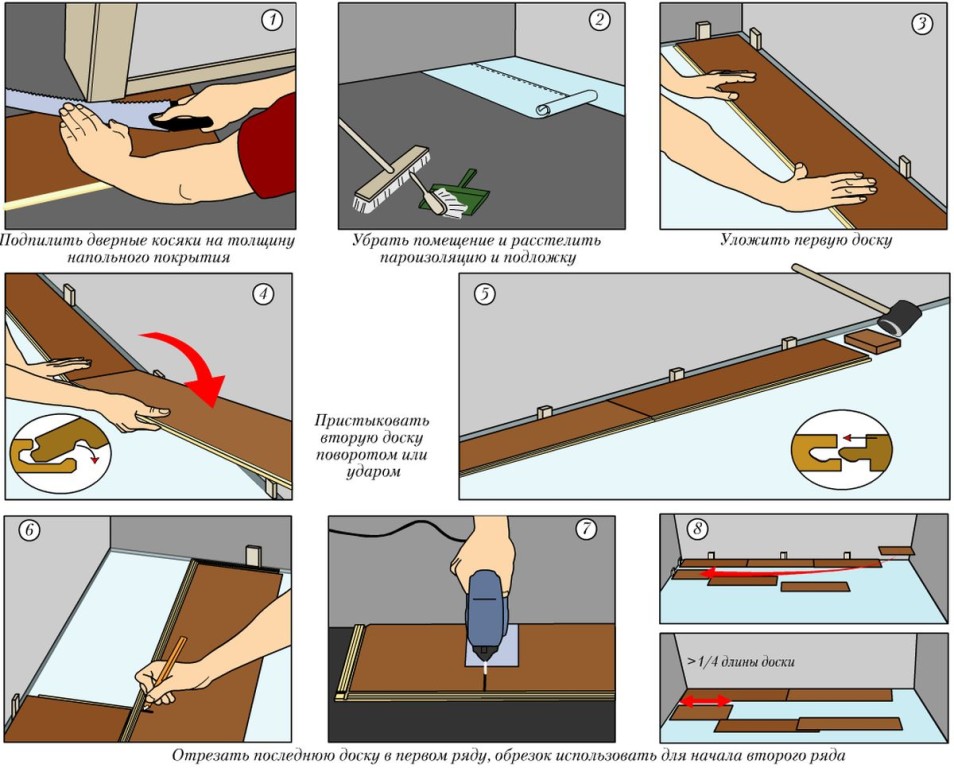 Step-by-step laying of the laminate: step 1-8. Next row begin to stack with the remaining piece of the last panel of the starting line. So you will ensure the most rational consumption of material. If you do not want to save, you can start laying the second row from the whole plate. The second row is similar to the first, only without using wedges. After the completion of its installation, make wedges of the panels in the wedges of the plates of the first row. To do this, raise the 2nd row by about 30 ° and insert the panels into the lock. When lowering, you will hear a click, indicating that the plates are sealed. Mount the following rows as the first two. Do not forget about the wedges that need to be installed around the perimeter of the room between the laminate panels and the walls. It is important to know about the features of laying the panels in the doorway. From the usual installation, it differs in that between the plate and the door you need to make a less wide gap. Later it will be closed by the clypeus of the door. At the walls the gap is hidden by skirting boards. It is important to know about some rules for docking panels with tiles. First of all, docking is performed using specially designed metal paddles. In order to connect the laminate panels with the tiles, it is necessary to make holes in the cement-sand screed beforehand.
 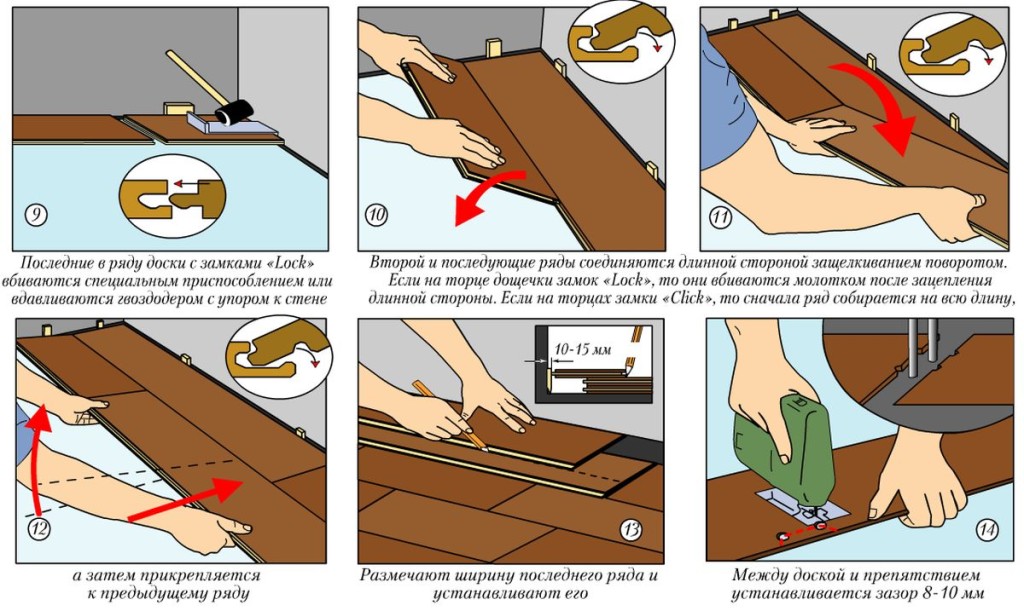 Step-by-step laying of the laminate: step 9-14. They are made with a step of 10 cm. Plastic anchors are hammered into these holes. This technique allows you to perform installation with minimal time costs. Next, you will need to insert into the groove the cap of the nail head. Nails are distributed along the door in accordance with the previously driven dowels. The pads must be pressed to the floor and be hammered using a wooden extension. The installed paddles will press the laminate board against the floor surface. The porcine has a rounded surface that will not allow a person to stumble upon entering the room. Such paddles in a wide range are presented in any store specializing in the sale of building materials. After all the laminate panels are laid, it remains to mount the plinth. This will require several tools, namely:
Install the plinth. At this installation of the laminate can be considered complete. For panels to serve for as long as possible, it is important to follow some recommendations for their further operation. Back to contents</a>
Recommendations for the use of laminate
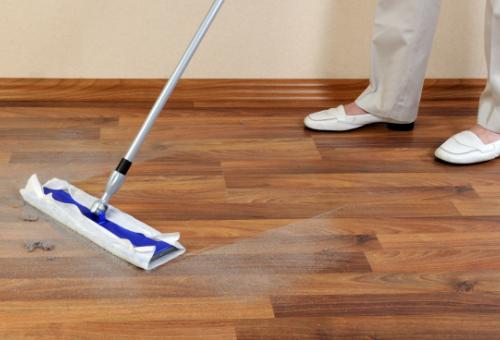 Laminate can be washed with special detergentsmeans or a vacuum cleaner. Remember that laminate flooring can not be tiled floors with high humidity and frequent water spills. That is, in the toilet and bathroom to lay the laminate is prohibited - it will very quickly become unusable. If you pour water on the cover in other rooms, immediately remove it. In the course of operation, various kinds of minor defects can appear on the surface. You can easily remove them with a special grout. In addition, such grouting can eliminate defects in the wrong installation of panels. Also grouting allows you to correct large swings and slits on the joints of laminate panels. There are similar grouts of sealant, silicone and other substances. This processing allows to increase the service life of the panels and to maintain its original quality for a longer period. Laminate is not very demanding in the care. For washing it is possible to use special means for care of a laminate which in a wide assortment are presented in any shop of household chemical goods. For cleaning, a washing vacuum cleaner is a great fit. If there is no such, use a soft damp cloth with a special means for the laminate. After wet cleaning, wipe the surface thoroughly. Do not forget that water is one of the worst enemies of flooring. Thus, the laying of laminate panels traditionally begins with a corner near the window opening and is guided towards the door. The main thing is to correctly calculate the necessary number of panels and buy high-quality material, and the installation itself will not cause you any special difficulties. Do everything according to the instructions given, and the finished coating will please you for many years with its quality and beautiful appearance. Successful work!


