Every DIYer knows the value of a homemade productsofa, because the quality of sleep depends on it. To make this interior element, you will not need much effort and time, but you need to fully follow the step-by-step instructions. Diagram of the internal filling of the ottoman.
Material selection
At the very beginning, you need to choose the type of couch,which you have to make with your own hands. The designs can be not only simple, but also very complex. Moreover, the difficulties almost always lie in the number of parts used, so in practice this will only take time. For a test, it is better to take the average option, which is quite easy to assemble, while you will need to use all the basic techniques. Technical characteristics of chipboard. After the ottoman has been determined, the material must be selected. Only 2 options are suitable for this work:
For clarity, a plate will be used.medium density and 20 mm thick, which is almost always used in factory conditions. The edging used will be standard paper on a polymer base. Return to the table of contents</a>
From sawing to installation
 Sofa assembly option. Tools and materials:
- roulette;
- electric jigsaw;
- Screwdriver;
- a simple pencil;
- Chipboard;
- zinc-plated corners.
Once the final choice has been made, you need to cut the chipboard according to the previously prepared diagram:
- 700*800 mm - 2 pcs (headboard and footboard);
- 700*1795 — 1 piece (bed);
- 200*1800 - 3 pcs (stiffener strips).
In each segment, except for the bed, you need to dospecial connecting grooves. The groove depth on the supporting segments is 170 mm, and for the stiffening strips - 30 mm, due to which the end result is an ideal joint with a barely noticeable seam. They will be located at a height of 400 mm from the floor level, and in the place of the side stiffener (improvised replacement of the back), an indentation of 10 mm is made, after which a groove is formed. Connecting the sofa structure together is quite easy, so everything can be done by hand. First, the supporting structure is assembled from 2 supports, after which the back is installed.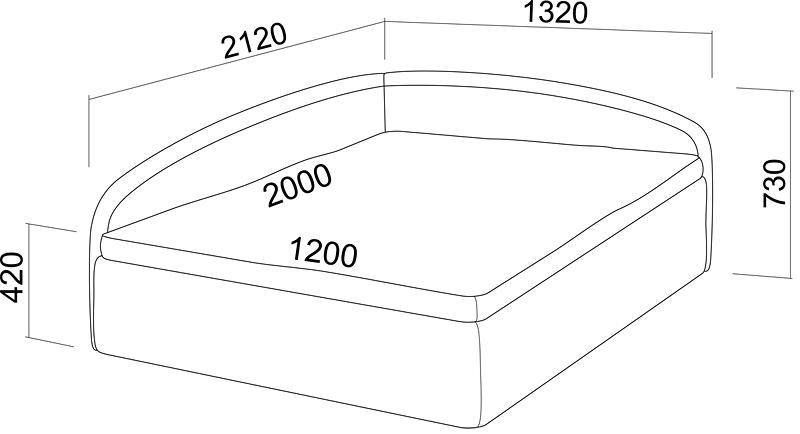 Drawing of a round ottoman.After all the joints are formed, you need to use galvanized steel furniture corners with 2-3 screws. They are fixed in the lower (hidden) part of the structure at a distance of 15-20 mm from the edge so that it is not visible. Also, during fixation, you need to be careful when tightening so as not to overtighten. If you are working with a screwdriver, then the ratchet should be set to the most sensitive level, due to which, when reaching the peak point, it will simply stop. When performing with a screwdriver, you will feel excessive resistance, which will be a signal to move on. Before screwing in the screw, you need to make a hole of 12-15 mm, for which the drill should have a depth gauge or tie the drill with blue tape at the desired level. In any case, you need to achieve ideal quality so that nothing is visible from the outside. At the very end, all the edges of the sofa are glued with a special edging. For the joint, you will need a regular iron, which is used to “smooth” the edging into place (the polymer base melts and provides a reliable bond with the chipboard). It is advisable to use the help of another person or fix the edging with tape along the edges, since after ironing it will be impossible to fix anything. Return to the table of contents</a>
Additional aspects
If you wish, you can put it under the sofa.install drawers. The number depends on preferences, but it is better to make at least 2, because in this case you will not have to put much effort into removing them. It will not be possible to use rollers due to the small height, so the entire base should be as uniform as possible so as not to interfere with removal. Sometimes the side edge, headboard and footboard of the sofa are upholstered for beauty. Any upholstery materials can be used, and only foam rubber can be used as a volumetric filler (batting will not give the desired effect). Any glue can be used for foam rubber, but it is advisable to fix it with a stapler in 2 layers, because the plate is not reliable enough for such work. Anyone can make it, but you need a reserve of patience, as well as a quality tool. It is better to think over each step several times, and only then do it, because even a small miscalculation can cost additional financial costs. In total, production takes no more than 2 days, and if you get your hand in, you can do it in less than 1.


