High-quality and reliable wooden furniture inIt is not so easy to buy in modern stores. Cheap products do not last long, and interior items made of solid wood are quite expensive. Therefore, many home craftsmen assemble cabinets, nightstands and even beds themselves. Construction of a wooden chair.Moreover, it is possible in just a few free evenings. At the same time, you can take into account individual interior requirements and assemble a dining set that will decorate your living room.
Preliminary stage of work
Before doing it yourself, you need tomake a detailed drawing of the future furniture. It is better to start its creation with making a sketch. This way you will be able to imagine the future appearance of the chairs, think over individual details and the general design. Next, you need to think over the sizes of all the elements and draw a diagram (Fig. 1). Figure 1. Diagram of a pine chair.Then you should think about the choice of material for making the chair. If you are a beginner carpenter or make furniture for a summer house, then ordinary pine will suit you. Furniture for the living room or hall is usually made of more expensive types of wood, such as oak or beech. In any case, you will need a square section beam (20 * 30 mm) and an edged board (80 * 15 mm). You can also take thicker material. But then your chair will be much more massive. Be sure to prepare the tools you will need for the job in advance. You cannot do without the following equipment:
- electric jigsaw and electric drill;
- Screwdriver;
- hacksaw;
- screwdrivers;
- carpentry tools (chisel and sharp knife);
- Clamps;
- Furniture stapler;
- grinder or special drill bit.
Don't forget to prepare the tools formeasurements: tape measure, ruler and square. They will help to assemble a reliable and durable chair. Finishing tools depend on the furniture decoration method you choose. Usually, such furniture is covered with stain and furniture varnish. Return to contents</a>
Self-assembly of a chair
 Assembly diagram of a wooden chair.Chair backs can be panel (solid, cut from a carpenter's board or a sheet of plywood) and lattice (assembled from slats). The type of back largely determines the assembly pattern of the product and the choice of fasteners. If you have chosen the first type of back for your chair, you will need 4 dowel assemblies. For reliability, the fixing points can be duplicated with 2 screw ties, which are installed under the seat. Some craftsmen take self-tapping screws for these purposes. But such a connection is unreliable, since after some time the wood in the nest will crumble and the screw will begin to dangle. The lattice back of the chair is assembled from individual slats. Their number depends only on the designer's idea. But usually from 2 to 6 elements of a round, square or hexagonal section are used. For massive furniture, thin ready-made balusters or special figured elements are sometimes used. When installing, it is worth considering that the main load falls on the extreme side slats. They play the role of load-bearing parts. The middle crossbars perform only a decorative function. From above, the slats must be pulled together with a lumbar crossbar. The crossbars are connected to it using round dowels. For side posts, the fastener diameter must be at least 20 mm. The middle elements are placed on tenons, the diameter of which does not exceed 12-14 mm. The back of the table is fastened to the seat in the same way. Return to contents</a>Manufacturing and installation of legs
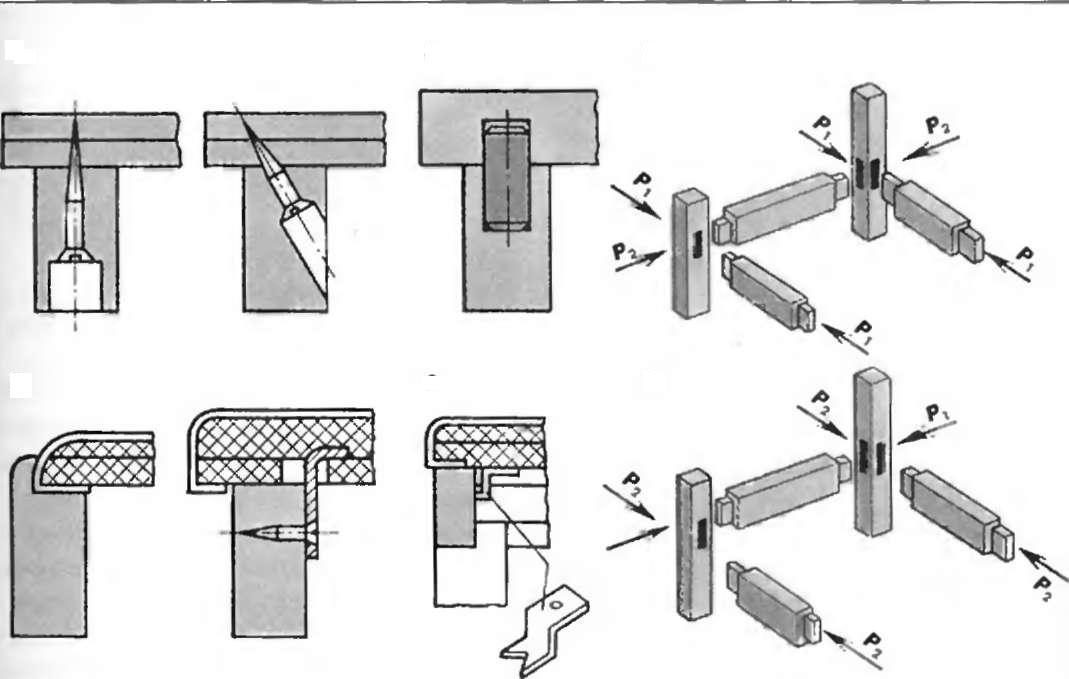 Figure 2. Scheme of fastening the chair supports.When making chairs with their own hands, craftsmen usually do not undertake the production of curved cross braces, because it is quite difficult to create such a blank yourself. But if you decide to make a chair with a concave back, then you need to comply with the following parameters:
Before you make a chair, you need tothink over the fastening of its legs. The most reliable is considered to be furniture with planted supports. The fastening scheme of these elements should be studied (Fig. 2). First, it is necessary to prepare the crossbars. They can be round, square or of complex cross-section. At the ends of the slats, it is necessary to form rectangular tenons that will enter the holes of the vertical supports of the furniture. It is more reasonable to form nests with the help of special equipment, since a hand tool will not provide sufficient accuracy of the connection of the parts. If you do not know how to make a chair with such fasteners, or you do not have a woodworking machine at hand, then the manufacture of such parts can be ordered in a carpentry workshop. Figure 3. Assembling a soft chair.The nests are marked according to the specified size and the holes are drilled. In this case, the tool is held at an angle of approximately 90°, guiding the drill with a block, which acts as a template. For this, use hardwood, 40-60 mm thick. It is wiser to pre-drill the corresponding holes in the template, which will be located at the angle you need. This will help direct the drill correctly. The parts to be drilled are tightened together with clamps. This will help to accurately form the nests. When all the blanks are made, you can begin to assemble them. First, assemble the lower block. Lubricate the tenons with wood glue and drive them into the grooves. Tighten with clamps until the composition is completely dry. After which the joints need to be cleaned. The legs are leveled. To do this, place the frame on a flat surface and mark the excess wood that needs to be sawed off. Round off and clean the ends of the supports. Return to the table of contents</a>Assembling the chair seat Before you dochair, you need to choose the type of seat softening. For homemade furniture, thick foam rubber (at least 10 cm) is usually chosen. This material is quite cheap and reliable. To make the seat, you will need the following blanks:
- plywood foundation;
- a detail of softening (it is cut out exactly according to the size of the base);
- a lining made of sackcloth or canvas (with allowances of 5-7 cm);
- element of the upper upholstery (with allowances of 10-12 cm).
Remember that the seat can be installedonly on a fully finished frame. That is, your chair must be assembled, sanded, varnished or painted and completely dry (Fig. 3). Otherwise, there is a high risk of staining the upholstery. Drill holes in the plywood base for the fasteners or install furniture corners (the choice of fasteners is up to you). Grease the foam blank with glue, let the composition dry slightly and coat again. Apply the softener to the plywood part and press lightly with your hands. Pin the interlayer and upholstery fabric with tailor's pins. Fasten the element from one corner of the seat with a furniture staple (from the bottom of the part). Slightly pull the fabric to the opposite corner and also fix it. After the upholstery is fixed from the corners, sew the fabric along the perimeter. Make sure that no folds form on the upholstery. Lastly, fasten the free triangles of fabric by folding them 2 times. Install the seat.


