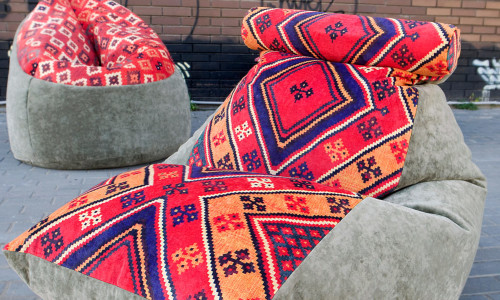
Upholstered furniture is used for various purposespremises. It is distinguished not only by its attractiveness, but also by its increased level of comfort. Among the advantages, it is necessary to note the variety of the assortment. The pouf chair is especially interesting, which differs from ordinary upholstered furniture in that it can take free forms. It is not so difficult to make, instead of a frame, you can use a special filler, which will allow the piece of furniture to take the necessary form. Such a chair is also commonly called a bean bag. It got its name due to its shape, reminiscent of a tightly stuffed bag, on which it is comfortable to sit. Figure 1.A strong and dense fabric is used to make the pouf. To make a pouf with your own hands, as in Fig. 1, you can use scraps of fabric that are left over from upholstering furniture. They can have different colors, but the fabric itself should be strong, easy to clean from dust and dirt. It is best to make 2 bags. One of them will contain the filler, and the second will be a decorative outer one. To make it easy to remove it for washing, you can use a zipper or beautiful large buttons, Velcro tape or any other convenient option.
Materials and tools for making armchairs
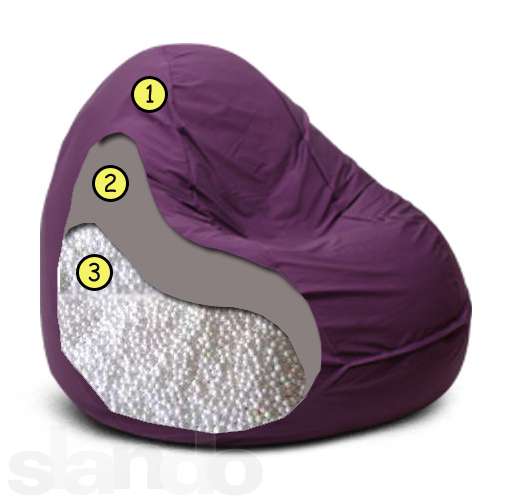
 Structure of a soft chair (pouf): 1.External cover. 2. Internal cover made of durable fabric. 3. Filler: foamed polystyrene. To make a pouf with your own hands, you need to take 2 types of fabric. Any available fabric is perfect for the internal cover, but for the external one you need to choose something more interesting. You should take into account the overall interior of the room, choose a texture that will repeat the upholstery of other pieces of furniture or draperies. It is important to choose a suitable color, the resulting chair should complement the design of the room, and not be an alien element. Flock is absolutely not suitable for sewing, do not take too light and thin fabrics, as they will quickly become unusable. It is best to use dense, wrinkle-free options, upholstery fabrics. For sewing, you need to choose threads that match the colors of the material, you can use contrasting shades. All of them should be durable, intended for sewing upholstery, for use with sewing machines. For work, you need to prepare the following sewing accessories:
- scissors;
- needles;
- chalk for marking the fabric;
- millimeter paper;
- The tailoring ruler and centimeter soft tape;
- iron.
 A variety of soft chair shapes.The chair cover should consist of 2 parts - internal and external. The internal part contains the stuffing, and the external part is decorative. For the external part, you need to use fasteners so that the fabric can be removed for washing. There are several options:
- zippers;
- beautiful large buttons;
- Velcro tape;
- hooks;
- bands for ties.
A universal option is a regular zipper, best hidden, which will not be visible from the outside. To make a pouf chair yourself, you can use the following as stuffing:
- foam rubber in the form of ribbons or plates;
- balls of polystyrene, which allow printed soft furniture to take any form;
- fluff, which today can be bought by weight (the most expensive option, although its quality and high);
- sintepon.
In this case, it is best to usepolystyrene balls, you will need about 4 kg. To quickly and neatly stitch all the seams, you need to use a sewing machine (preferably with an overlock function). You need to select the necessary tools for the sewing machine, but usually they are all already included in the kit. These are special needles, bobbins and other attributes. Return to the table of contents</a>
The process of tailoring your own hands
 Pattern diagram for a soft chair.It is not so difficult to make a pouf chair with your own hands, but it is necessary to follow the sequence of actions, including creating a pattern. In order to quickly make a pouf from fabric with your own hands, you must first make a pattern, for which you use graph paper. You can easily buy it at any office supply store, you only need to take a large sheet, not small ones, they are completely unsuitable for work. The dimensions of the future bean bag will have the following values:
 Scheme – pattern for frameless furniture.You can also take other sizes that are more suitable for the interior. After the sizes are determined, you need to mark the middle of each base on paper. Step back 2.5 cm from it towards each opposite base (from the bottom to the top and vice versa). A smooth line will connect this point with the ends of the side lines. As a result, you will get 2 large semicircles that are directed inside the trapezoid. The material for the side parts of the future chair will be cut out along the resulting wedge. Draw 2 circles with a compass, the diameter of one of them will be 12 cm, and the diameter of the other - 30 cm. These will be the upper and lower bases. To make a chair, you need to transfer the finished pattern from paper to a piece of fabric. First, you need to attach the pre-cut wedge of paper to the fabric, cut out the part, not forgetting about allowances of 3-5 cm. You will need 6 of these wedges (separately for each cover). The base circles are cut out in the same way, but only 1 piece is needed for each cover. Return to contents</a>
Connecting prepared parts
 A variation of a bean bag chair pattern.Now you can start sewing the ottoman chair. First, lay out 2 wedges face down on a horizontal flat surface. They are basted, i.e. the wedges are stitched with wide rough stitches. Then the blanks are stitched, while you need to step back the distance necessary for sewing in the zipper (depending on the length of the zipper). For example, if its length is 50 cm, then you need to step back 25 cm from the edge. After this, the zipper is applied to the piece, stitched, then the basting stitches are carefully removed. The resulting seam is ironed to one side, all the remaining wedges are sewn to the piece. In total, there should be 5 seams for one large piece, the 6th seam is not stitched yet. This will need to be done later. On the front side, you need to stitch the 2nd line, it should be at a distance of 1 cm from the previous seam. This allows you to strengthen the connection, make it more attractive. Some craftswomen advise using contrasting threads to decorate the seams to highlight the trim. It turns out beautiful, especially if the color is chosen correctly. Next, you can start sewing on the upper part of the chair, after which you iron all the allowances. The zipper opens and its lower part is sewn. The inner cover, which the ottoman will have, is sewn in a similar way, only a smaller base is taken for it. Before finally stitching all the seams, you must first fill it with polystyrene balls. This must be done so that the chair retains some freedom, takes the shape of the body, but is not hard or too soft. In order not to make a mistake, before stitching the last seam, you need to “try on” how comfortable the stuffing will be for use. After all the covers are ready, and the inner one is already stuffed with polystyrene, you need to carefully fasten the upper cover on it - a comfortable and beautiful ottoman chair is ready! You can use various materials to sew a soft ottoman chair, but it is best to use small polystyrene balls for stuffing (for the given example, this is about 4 kg), and use dense upholstery materials that are easy to clean as fabric. Sewing a ottoman chair with your own hands is not so difficult. A little imagination and patience are enough. The result will be impressive, such upholstered furniture will become comfortable and favorite for relaxation.


