Make beautiful and stylish chandeliers with your own handsfor the living room is not that difficult. You will need scrap materials, free time and a little imagination. Who would have thought that a lamp made from plastic bottles or beer can rings can decorate the living room? Such a chandelier will look so that no one will guess what exactly you made it from. Making a chandelier with your own hands is quite simple, you just need to apply a little patience and accuracy.
Chandelier from plastic bottles
You will need:
- thin and thick wire;
- a cartridge and an electric wire;
- plastic bottles;
- round pliers and pliers;
- sharp scissors;
- soldering iron.
The first thing you need to do is make a framelampshade from wire. You need to make 1 small ring with spacers and 1 large circle. Then you need to connect the rings with arched spacers, you can do this with a soldering iron, but if this work seems too difficult for you, then tie the joints with thinner wire. Use round-nose pliers to align the wire. If desired, you can paint the frame with spray paint or wrap it with thin twine, but this is not necessary. Sequence of making a chandelier fromplastic bottles. Cut off the neck and bottom of a plastic bottle, cut out maple leaves from the remaining part. You don’t need to stick to one size. Use a soldering iron to melt the edges and draw the veins of the leaves. Make holes for the connection with a hot gypsy needle or an awl. Next, attach the leaves to the lampshade, using thin wire for this purpose. Hang the leaves on a fishing line to the bottom ring so that a cascade is formed. You can make a chandelier for the living room from the bottoms of plastic bottles. In this case, you need to make a lampshade from 3 rings of different sizes, which are connected together using a fishing line. The top (largest ring) is made with spacers and a small ring in the middle (for inserting the cartridge). Next, attach the middle circle, tie a ring of a smaller diameter to it. Melt the knots with a soldering iron or a lighter. Cut off the bottoms of plastic bottles (it is best to use transparent, colorless or blue containers). You should get beautiful five-petal flowers; if desired, you can additionally cut each petal. The edges are either melted with a soldering iron or sand is heated in a frying pan, then the bottle flower is dipped into it, held for 1-2 seconds, and then removed. Connecting holes are burned in 4 petals out of five. The canvas is connected in a checkerboard pattern, while the pieces of fishing line between the flowers should be from 6 to 10 cm - then the chandelier will be openwork and light. The first and second tiers are made in such a way that they cover the lower ring, but the third (last) can be made in the form of a long pendant. Such a chandelier will look especially impressive in a living room with high ceilings. Return to contents</a>
Chandelier in high-tech style
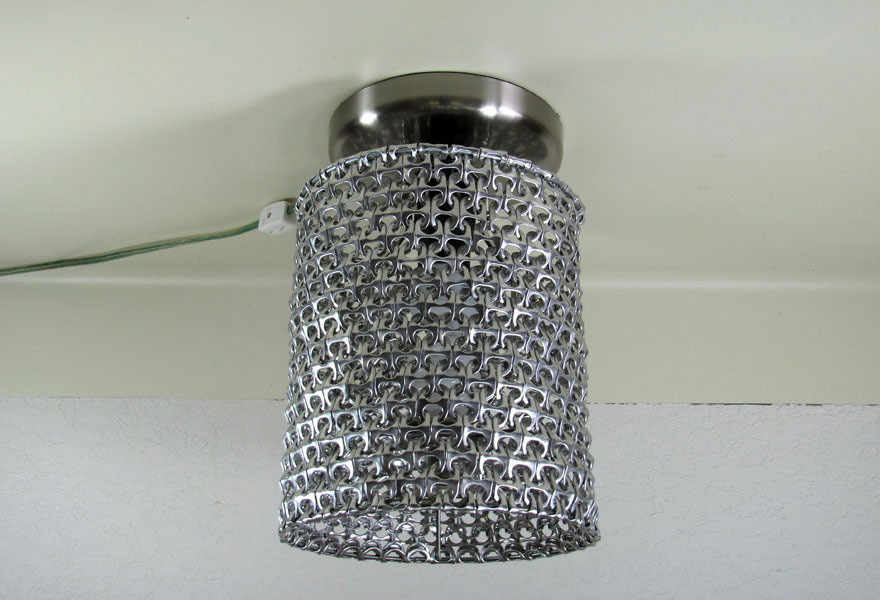
 To fasten the rings from beer cans you will need a soldering iron or wire. You will need:
- rings from beer cans;
- pliers;
- a cartridge and an electric cord;
- wire.
You can make a chandelier from ordinary onesbeer or can opener rings. For the lampshade, you will need to make 2 rings of the same diameter from wire (they do not need to be connected together). The top ring is made with spacers and a circle for the cartridge in the middle. Then everything is very simple: all the ring openers are bent in half, some are fixed on the top circle. The weaving is done either in a checkerboard pattern or in the form of strips that are connected together with thin wire. The first option is a little more complicated, since each ring must be cut with pliers or metal scissors. Then the cut edge is inserted into 2 adjacent (upper) rings, the result is a checkerboard weaving resembling chain mail. To make strips, you do not need to cut anything, the bent ring openers are simply inserted into each other like a chain, then the rows are connected with thin wire (can be replaced with a cord). The lower edge of the chandelier is fixed on the second ring, the socket is threaded through, the wires are attached to the ceiling, the connection point is masked with a bracelet made of the same ring-openers. With such a chandelier, your living room will acquire a special charm and individuality. For a chandelier made of hangers, you will need: Sequence of making a wooden chandelier.
- wooden hangers;
- wire;
- drill;
- pliers.
High-tech style chandelier made of wooden hangerscan decorate any living room. First, you need to make a wire lampshade from rings of larger and smaller diameters (you can use a ready-made frame from an old chandelier). At the ends of each hanger, you need to drill holes for fastening. Then screw the "hangers" with wire to the upper ring of the lampshade, move them to the side, and then wind them to the lower circle. Each hanger is attached at an angle, while the next piece should slightly cover the previous one. If desired, you can paint the "hangers", but this is not at all necessary, the chandelier looks amazing without it. Return to the table of contents</a>
Chandelier of rose petals and glass beads
You will need:
- hoops of different diameters - 3 pcs.;
- artificial rose petals;
- glue gun;
- wire;
- metal krimp;
- fishing line.
Lamp made of rose petals and glass beadslooks very romantic. First of all, you need to make a frame from wooden hoop rings, they are fastened together with a fishing line (large, medium, small). Wire spacers are inserted into the upper ring and a hole is made for inserting the cartridge. It is advisable to paint the lampshade to match the color of the petals. Next, make garlands of petals. To do this, you need to cut the fishing line, glue (in pairs) the rose petals using a glue gun, string glass beads between them, and attach a teardrop-shaped bead at the end of the garland. If you want to place the beads at a distance from each other, then use special metal crimps for fastening. In this way, you need to make all the parts. Finished garlands are tied to the frame at a distance of 3-5 cm from each other (depending on the diameter of the petals), the ends of the fishing line are hidden under the crimps. The result is a beautiful three-layer structure with a flowing cascade of beads and petals. Instead of ready-made petals, you can use homemade ones; fabrics such as silk, satin, and chiffon are perfect for this purpose. The fabric is soaked in a decoction of starch and simple soap, then the petals are cut out, given the desired shape using scissors (pressing along the edges of the part) or making indentations with heated metal balls (a tool in the form of a ball with a handle for making artificial flowers). The veins on the petals are pressed using a heated awl, but it should not be too hot. Making a chandelier with your own hands is an interesting creative process that will help you not only save money, but also spend time usefully.


