The desire to transform your interior and make a differencethe most interesting forms are acquiring a zest in the design of the room today. LED ceiling lighting is one of the most common ways to decorate your home, to emphasize style and individuality. With the help of ceiling lighting you can makeroom stylish and individual. The advantage of this solution is that the installation of LED lighting is quite simple, so you can do it yourself. You yourself will be able to give any look to your ceiling, while saving on hiring specialists.
What kind of diode illumination should I choose?
There are several options for how to use and install LED ceiling lighting. Let's look at the main types: Types of lighting.
- general;
- target lighting;
- design.
General lighting performs direct functionslighting of the room, is carried out with the help of lamps built into the ceiling or by means of built-in lighting fixtures. But you need to be careful if you independently install lighting systems, ceiling lighting: the total weight of the lamps should not exceed 10 kilograms, since drywall has a low load-bearing capacity. Directional or target lighting is an excellent option for visual zoning of the room. For example, to highlight the work space. Designer lighting performs an aesthetic function, provides unobtrusive light that creates coziness in the room. The most popular option for designer lighting is to install diode. With this type of lighting, the diodes are partially hidden under the drywall, so the light is diffused, dim. No less effective is recognized as combined lighting, when a diode edging is used together with a standard light source - a chandelier. Such ceiling lighting exists in ready-made versions in any stores specializing in lighting. Return to Contents</a>
Advantage of self-installing diode illumination
 Comparison of different lighting technologies. There are several reasons why you should choose LED ceiling lighting for DIY installation:
- affordable price;
- energy saving;
- simple installation;
- security.
LED strips are inexpensive, and with them you canyou will constantly save due to the fact that diodes do not require a large amount of electricity. One of the main advantages of diode lighting is that this method is very easy to install, high-quality and effective do-it-yourself ceiling lighting is now available to anyone who has at least basic knowledge of electricity. Diode strips are attached to a self-adhesive layer, which is located on the diode strips themselves. Therefore, you can also save on electrical specialists. Diodes are also the safest option, since the risk of fire, short circuit wiring is minimized also because this type of lighting, such as diode backlighting, does not heat up and does not require thermal insulation. Return to contents</a>
How to choose a diode tape
Any LED strip has a number of parameters that must be taken into account when choosing your lighting option: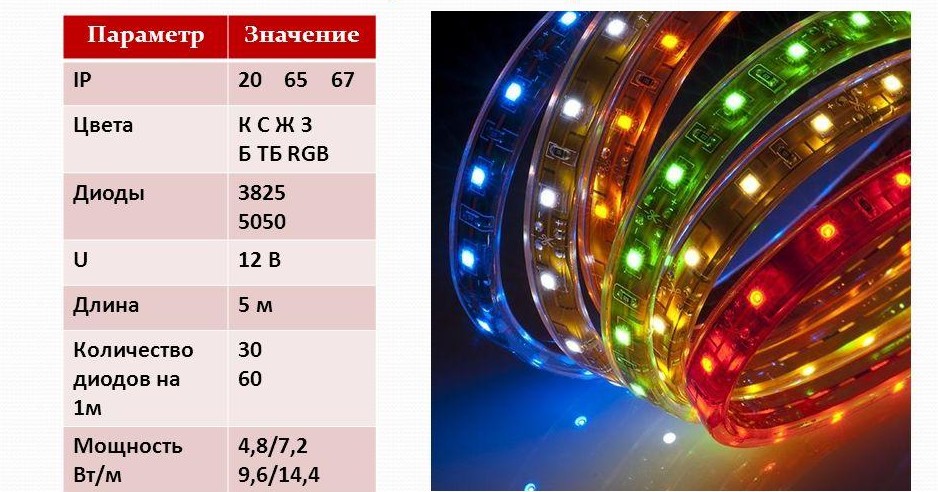 Basic parameters of diode strips.
Return to Contents</a>
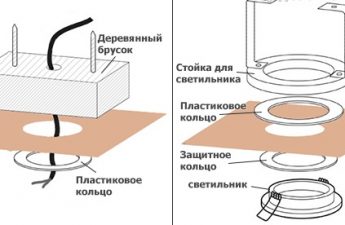
Installation of the diode illumination of the ceiling with your own hands
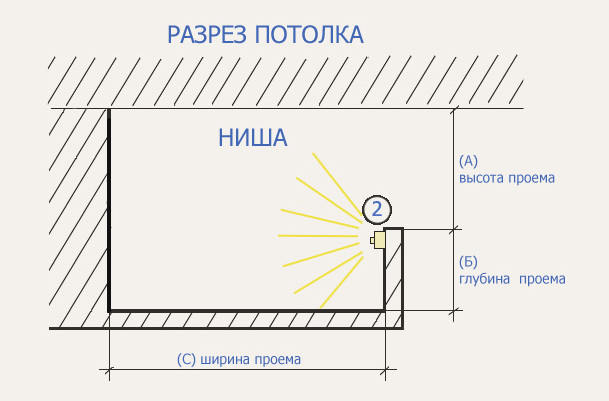 Scheme of installation of LED backlight onsuspended ceiling. LED ceiling lighting is most often used in suspended or multi-level ceilings. This type is very easy to install, most often with double-sided tape, and many LED strips are equipped with a self-adhesive strip on the back side, so applying original lighting solutions to the ceiling or wall niches is even easier. Before starting work, you need to degrease the surface to which you plan to attach the LED strips. Usually, LED strips are sold in 5-meter lengths, so before starting installation, we need to determine how much material will have to be purchased. DIY ceiling lighting will work for a long time if you correctly calculate the power and connect a sufficient number of power supplies. Before making LED backlighting, pay attention to what it will be powered by: large power supplies are difficult to hide even under plasterboard blocks, so it is better to stock up on several small ones. As a rule, a separate power source must be mounted for every 15 meters of tape. If you are installing ceiling lighting for the first time, the strips themselves can help you choose the power supply - some diodes indicate which dimmers are needed, so you can easily create the required type and power load. For an original and aesthetic appearance, LED lighting is masked: the diodes should not be visible, they are covered with a side and a plinth. Sometimes the lighting line in stretch ceilings is taken out beyond the ceiling covering, the translucent film diffuses the light perfectly. Pay attention to the distance between the light sources and the masking ceilings: on the one hand, the diodes themselves should not be visible, but at the same time the light should not be interrupted or too dim. With the correct calculation of the position of the diode strips, the interior will receive the right accents, and the light will originally emphasize the strengths of the room design. Sometimes it is better to make LED ceiling lighting by attaching the strips even perpendicular to the ceiling so that the light falls where you planned, does not get lost and does not diffuse too much.
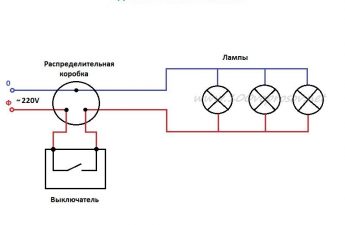
 LED strip connection diagram.In order for the ceiling lighting to work for a long time, it is necessary to follow several simple rules: perform installation carefully, do not allow damage to the diodes; if you plan to give the lighting line bends, then keep in mind that you can only bend the strips with a radius of at least 2 cm; when connecting the strips together, be sure to take into account the polarity of the diodes; before connecting the diodes to the power supply, first connect the controller. Making LED ceiling lighting is quite simple, but before you start installing, consider such important criteria as the size of the room, the location of doors and windows, how you plan to use the rooms, what work zones they will be divided into, all this will allow you to harmoniously distribute the lighting and make the work easier. Do-it-yourself lighting will give you pleasant emotions, surprise guests with originality for a very long time.