Virtually all floor coverings require thatbeneath them was an ideal horizontal base. Only in this case it is possible to make a flat floor in the room. Even the wooden ceiling, which does not seem to touch the base, is easier to arrange on the logs, which are supported on a plane without bumps. The main leveling element of the floor is still the screed. Recommendations that will be given below, will help to make the surface for the finish finish any flooring material - from tiles to laminate.  Only on a perfectly flat horizontal base can make a flat floor.
Preparatory stage
Strong and durable floor screed will turn outOnly if you properly prepare the surface for its installation. No matter how much you want to skip this stage and just stretch the solution over the old coating, you still have to remove it to the bottom. After that, all remnants of the screed, garbage and dust are removed. In the overlapping solution, possible cracks are embedded, and the surface itself is thoroughly dried. After that, waterproofing is put on the slab. So, to remove the old cover and prepare the grounds for a new one you will need: 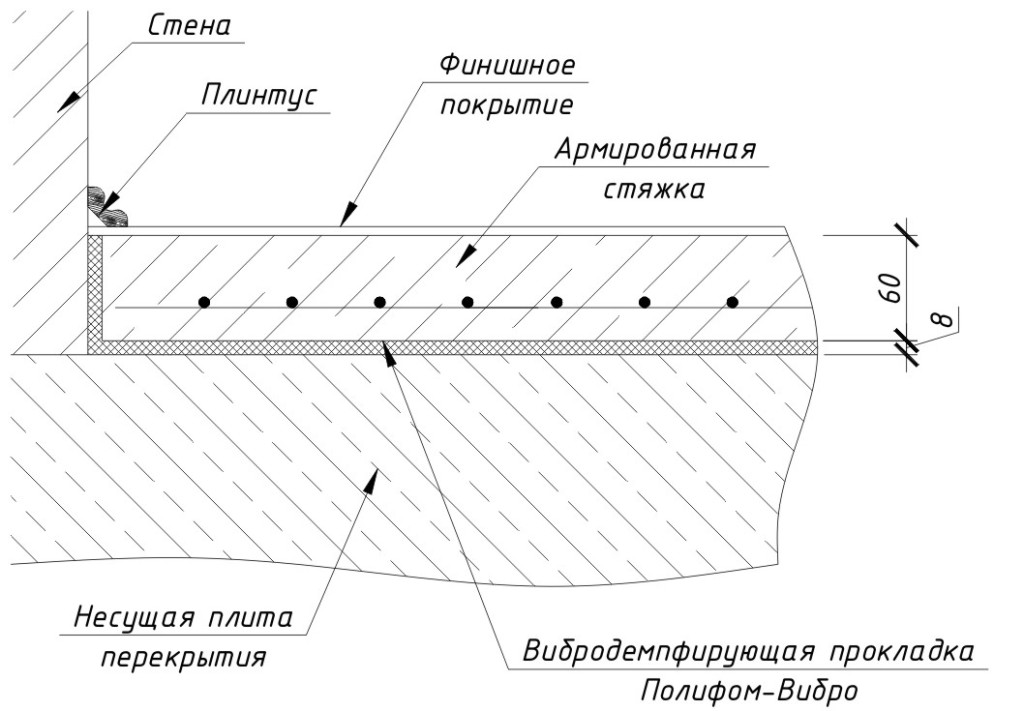 Scheme of leveling the floor with a concrete screed.
- perforator;
- shovel;
- trowel or spatula;
- broom;
- cement-sand mortar.
Before laying the waterproofing surface, the surface must bebe treated with antifungal formulations. They are applied to the overlap with a brush or roller. After the impregnation the floor is primed. The floor screed is arranged after its waterproofing. As a moisture-repellent membrane, a dense polyethylene film and bitumen-based roll materials can be used. Today there are liquid mastics that can be applied to the floor in one or more layers. Polyethylene is put on the base with the pressure on the walls. The height of the blanks should slightly exceed the thickness of the future coating. In the same way, the roofing material is laid. The edges of adjacent sheets and film, and bituminous material must overlap. The joints of polyethylene are pasted with adhesive tape, and the connections of the roofing material are spilled with bitumen. Waterproofing is fixed on the wall to prevent further work. Now the floor screed will be protected from moisture, which without a membrane could destroy it from the bottom. Back to contents</a>
Plotting a plane
Before you make a floor screed, you need to create a horizon that will make it easier to fill. For this stage of surface leveling, the following are useful: 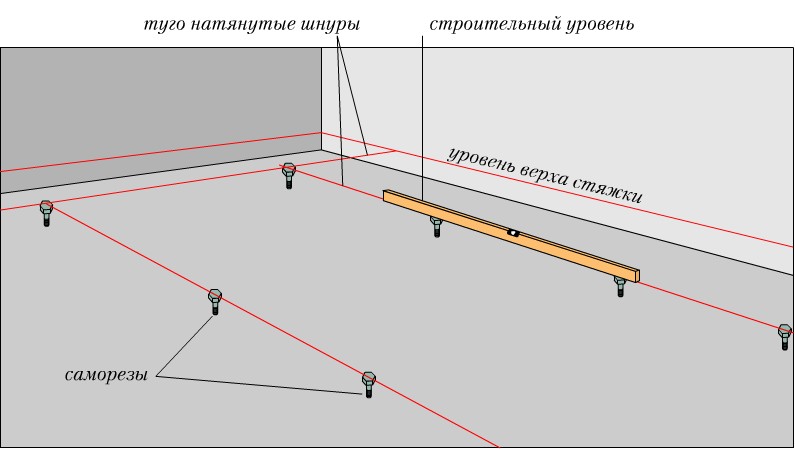 Landmark for leveling the floor.
- hydro level;
- long ruler with a level;
- a piece of chalk;
- a painting line;
- dowel-nails;
- alabaster or gypsum;
- hammer drill;
- Screwdriver;
- trowel;
- metal beacons;
- synthetic yarn.
Now take in the hand the chalk and hydrauliclevel. Make a mark on the wall of the room near any corner. The point can be located at any height from the floor, if only it would be convenient for you to make markings, but it is best to perform it at a height of 1.5 m. Using the level, put another mark on the other side of the wall. In the same way, make a markup on the remaining surfaces of the room. On walls with a length of 3 m, it is better to apply more than 2 points. Neighboring tags on the walls are connected by lines repulsed by a chalk rubbed with chalk. You have a so-called zero horizontal line, starting from which you create a plane of the floor. 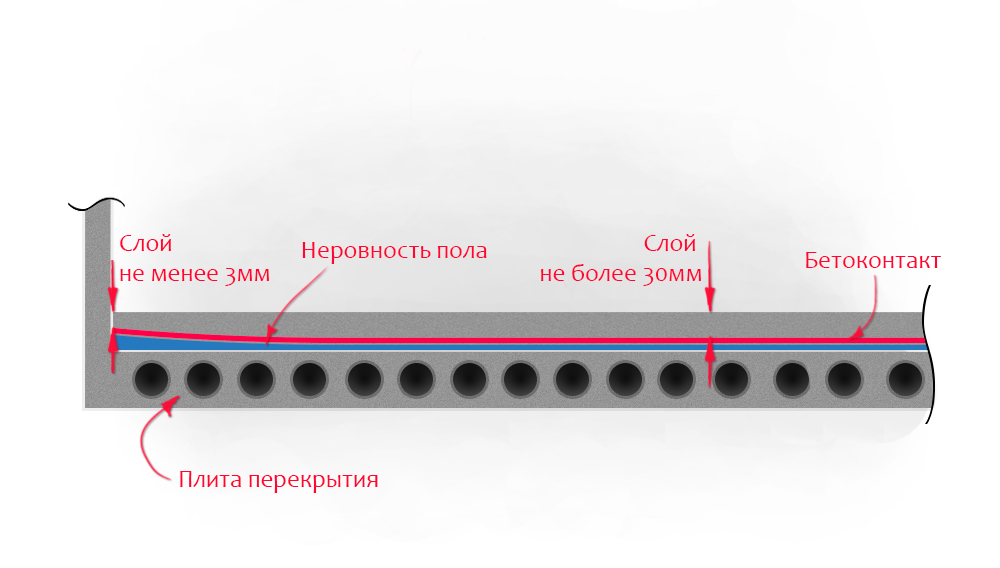 Scheme of filler leveling floor. To do this, you need to measure the distance from the line to the floor at regular intervals. In most cases, the height of the overlap at different sites will differ. For the basis, take the smallest gap between the horizontal and floor and subtract from it the value of the thickness of the screed. At this distance from the horizontal line, make marks on the walls and apply lines with a cord. Along them, drill holes, drive into the wall dowel-nails and pull between opposite surfaces of the thread. As a result, the plane of the future sex has turned out. Beacons are installed under the threads. The first and last profiles are put in 10-15 cm from the walls. The distance between the beacons should be 15-20 cm less than the length of the rule. Lighthouses are directed from the far wall to the door to the room. The profile is laid on the slides of water diluted with gypsum or alabaster. The distance between the gypsum supports is 25-30 cm. If the beacon protrudes from the plane, then it is pressed into the hill by a construction ruler with a level. On supports of insufficient height, additional portions of the solution are applied. A ruler with a level applied along and between the beacons is checked once again for the horizontal. Back to contents</a>
Filling and leveling the screed
The work should be carried out at a temperature of 15 to25 ° C. It is advisable to complete the filling of the overlap at a time, otherwise later, cracks may appear in it. In addition, the quality of the screed is affected by the uniform composition of the solution. It is necessary to achieve that each batch is performed in exactly the same proportions as the first. You need the following tools to work:  Tools for leveling the floor.
- shovel;
- rule;
- Master OK;
- semifunctional;
- putty knife;
- pliers.
Pour the solution into the space between the wall andthe first two profiles. Conduct a rule on lighthouses. Pull the device toward you. The rule removes excess solutions and forms an even surface. After leveling (after 20-30 minutes), the pad can be rubbed with a half-hook. Pour the next square to the right or left of the first one. So move in the direction of the entrance, not forgetting to clean the aligned areas. The screed is not ready yet. After 2-3 days, it should be removed from the beacon, as there is a possibility of rusting on them, which will eventually come out. To make the profile easier to remove, when you bookmark it, you should make a mark on the walls. Beacons are pulled out with a scraper, with which the edge of the profile is exposed. Then pliers or tongs come into play. The remaining slots are sealed with a primer, after drying it is filled with a solution. The mixture is leveled with the rest of the surface with a spatula. Do not remove the profile immediately after pouring the screed, this will be more detrimental to its integrity. After a month, the coating will be ready for laying the tile or the wooden floor. Within 3-5 days, the floor screed needs to be moistened with water. In the first decade, the solution should solidify under a polyethylene film. Back to contents</a>
How to make leveling screeds in bulk materials
 Scheme of using a self-leveling mixture. Screed from the solution has already created a smooth surface, ready for finishing with many materials, but the ideal floor plane is achieved by laying the filler floor. In addition, it will create a durable and strong moisture-proof film on the screed. In addition, it can serve both as a floor covering, and as a basis for further finishing. All the same, the screed is subject to some shrinkage, so the floor can correct this disadvantage. Before it is poured, the screed is primed for sealing microcracks in the surface. Along the walls you need to lay the expansion joint - damper band (it is removed after the work is finished, and the remaining groove is covered with sealant). Work with fill floors is necessary in the absence of drafts. Each layer of the coating should not be thicker than 0.5 cm. The filling of the mixture of medium density also starts from the far side of the door of the site. The floor is leveled by the rakley. During pouring, air bubbles form in the solution. To get rid of them, before the mixture is frozen, it is necessary to hold the surface with a needle roller. Stepping on the floor can only be done in shoes specially created for this job. A few hours after application, the filling floor will harden. Full freezing will be completed in 3-4 days. </ ul>


