For a person who has decided to take up capitalrepairing your apartment, there is now a very rich choice. At the same time, you have to deal not only with finishing work, but also with electricity. There are many materials on the market, thanks to their technological properties, allowing even a beginner to get a decent result. LED can be quite easily implemented using spotlights or specialized installation kits. A ceiling with lighting will add zest to the interior of any room.
Main options for highlighting
Using different lighting options you canachieve both purely decorative and purely practical effects in lighting the space. Among the wide variety of lighting solutions, there are several that are most common: Connection diagram for multi-colored LED backlighting.
Return to Contents</a>
Classification of diode lamps
LED ceiling lighting can beimplemented using individual LEDs, assemblies made in the form of strips, plates. The most convenient for self-assembly are LED strips. They are long strips up to 5 m, on which conductive tracks are formed. Along the entire length, with a certain periodicity, diodes are installed - light sources.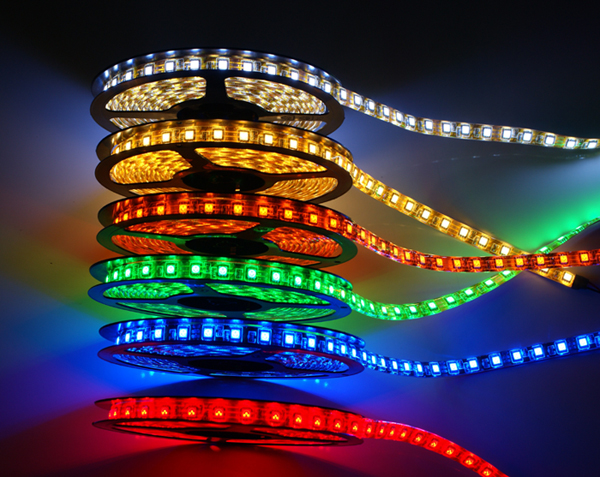 LED strips are the most convenient forself-assembly. According to the emitted light wave, there are two types of tapes - LED and RGB. In the first case, the resulting light shades can vary from white to warm yellow. RGB tape allows you to change the shade of light radiation. The emitted wavelength is adjusted by an additional controller device. The power of the light strip is indicated in the first two positions of the digital part of the marking. The technical specifications usually indicate the specific power of the backlight per meter. Knowing the value of the specific power, you can easily calculate the total power that the LED backlight will consume. To do this, simply multiply the rated specific power by the projected length of the tape. Based on the obtained value, you can correctly select the power source and controller. Another frequently used option for organizing the backlight is the use of ready-made flat LED assemblies, structurally designed as lamps. The parameter characterizing the intensity of the glow is the number of light sources per meter. Return to contents</a>
Preparing for the installation of LED strip
Before you start installing the ceiling lighting system yourself, you need to decide on a number of points:
- how the backlight will be structured;
- what mounting elements will be used;
- what will be the color background of the lighting;
- how the system will be managed.
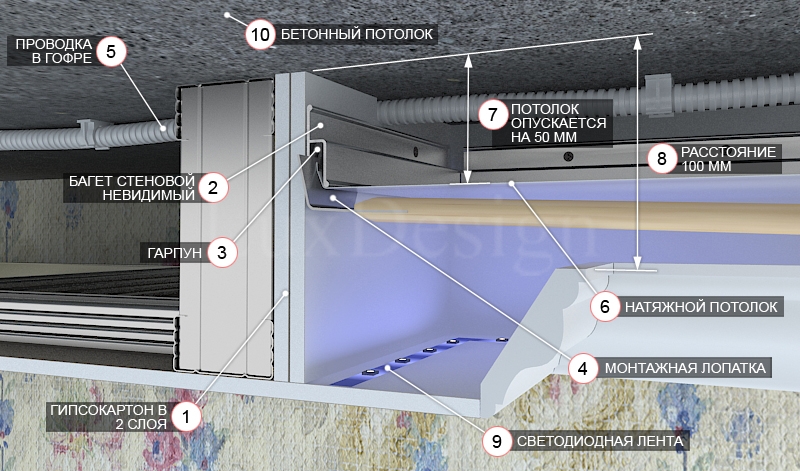 Scheme of LED lighting for stretch ceiling.LED ceiling lighting should be mounted on ready-made structural elements. In case of using a contour system, the mounting LED strip can be fixed on shelves formed by ceiling cornices. In the absence of a cornice, a small shelf made of plasterboard is formed along the perimeter of the room, on which the backlight sources are installed. The strip can also be used to design a difference in ceiling levels or to provide local illumination of one of the corners of the room or a niche. Return to contents</a>
Composition of mounting kits of a ribbon luminaire
The easiest to do on your ownThe main purpose of the design is to install LED strip lights. There are ready-made installation kits available for sale, which have different characteristics. It is not difficult to select a specific kit that meets the conditions of the planned operation. The kit usually consists of the following elements: Connection diagram for single-color (monochrome) LED backlighting.
In case of using LED strip everything is somewhateasier. Since the wavelength of the light does not change, there is no need for a controller. The assembly is connected to the power source directly. Basically, there is no need for remote control. The contacts of the backlight system are output either to a regular key switch or to a device for smooth brightness control (dimmers). It is worth noting here that regular dimmers used with incandescent lamps are not suitable for LEDs. There will be periodic blinking, like in a strobe. Therefore, if you want to perform smooth adjustment, you will have to buy a device that supports LED lamps. Return to contents</a>
Mounting of LED strip
The LED strip has a light to make work easierOn the back side there is an adhesive layer with a protective film. To carry out the installation process, it is enough to remove the film and press the tape firmly to the selected surface for a few seconds.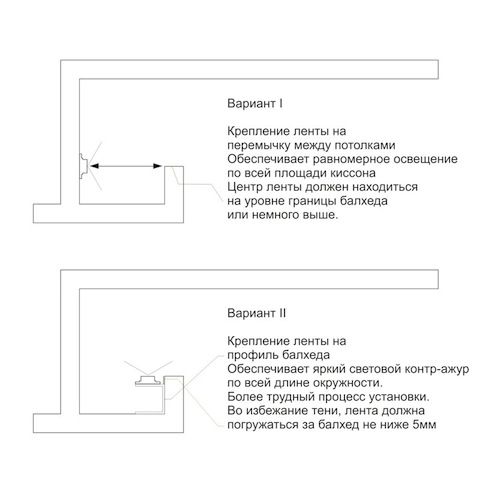 Options for mounting LED strip.The LED assembly has very small dimensions and is installed on pre-prepared mounting surfaces. Therefore, when switched off, the strip and light sources will be almost indistinguishable. The main task in this case will be to mask the power source, controller (if any) and connecting wires. Connecting wires can be hidden in decorative cable channels (for external installation) or behind the surface of the wall sheathing material (plasterboard). In a concrete or brick wall, you can cut a groove in advance, where you can then hide the wiring from the lamp. The power supply and controller will also have to be hidden somewhere - behind the ceiling surface or in a specially prepared niche in the wall. Return to contents</a>
Installation rules and recommendations
The instructions supplied with the installation kitskits, prescribes a number of rules to be followed when installing the backlight, compliance with which will extend the service life of the system and obtain more uniform lighting. During installation, the LED strip must be secured in such a way that the edges of the mounting shelf do not fall into the cone of light from the source and do not cast a shadow on the ceiling. The presence of a shadow on the ceiling is undesirable both in itself (in some cases, this can be played up) and due to the increased requirements for the quality of the edges. An uneven line of shadow from the mounting shelf can spoil the final appearance and lead to the need for re-installation. The optimal way to install the strip is to install it on the horizontal part of the shelf at the same level as the edge or below it by a few millimeters. The luminous flux will then be directed towards the ceiling. It is permissible to use the option of gluing the light strip to the wall surface. The center of the LED, in this case, unlike the previous case, should be a few millimeters above the edge of the cornice. It should be borne in mind that in large rooms, LEDs may be in the field of view of a person located at the opposite wall. Backlighting in large rooms may require the use of tapes longer than the standard. In this case, they are connected either by special terminal clamps or by soldering. Bright, uniform glow along the entire length of the backlight is ensured by parallel connection of individual sections. With a series connection, the outer sections will have a dimmer glow. It should be noted that safety precautions are important. Electrical connections should be made only after installation work is completed and all contacts are checked for correct connection.</ ul>


