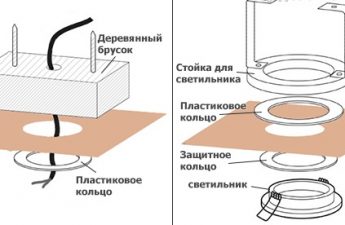
There are a lot of them on sale in stores todaylamps for every taste. They all differ not only in technical characteristics, but also in design, as well as the degree of originality. But there are several options for how you can make unusual lamps from jars with your own hands. Of course, they will not shine as brightly as chandeliers, but a romantic atmosphere will be guaranteed. Let's consider two main options for such lamps, from glass jars and from tin ones. If you have a candle and a jar of baby food on handpuree, you can make a very beautiful lamp. At first glance, lamps made from jars may seem like an absolutely useless idea that does not carry any decorativeness or interest. But you will see that this is far from true.
Luminaire made of tin cans
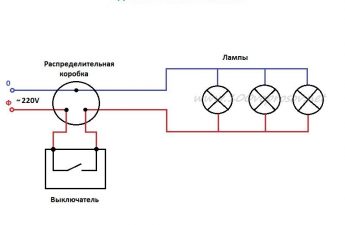
So, how to easily make a lamp from tinbanks? Everything is very simple if you have the necessary materials and tools at hand. You will spend no more than an hour on the whole job. The bank can be taken from a regular tin from under canned peas or corn. In addition to the bank, for the work you will need:
- small towel;
- a hammer;
- a long nail;
- Scotch;
- soft paper and a simple pencil;
- markers;
- a small flat round candle.
Now get to work.First, you need to prepare a tin can. To do this, fill it completely with water and put it in the freezer. It is necessary for the water to freeze in the container. This will prevent deformation of your future lamp. While the water is freezing in the can, prepare a template with a picture. For this, you need to use soft paper. It is best to use millimeter paper. To make the picture as symmetrical and even as possible, cut out a piece of paper equal to the height of the can. The length of the piece should be equal to the circumference of the can around.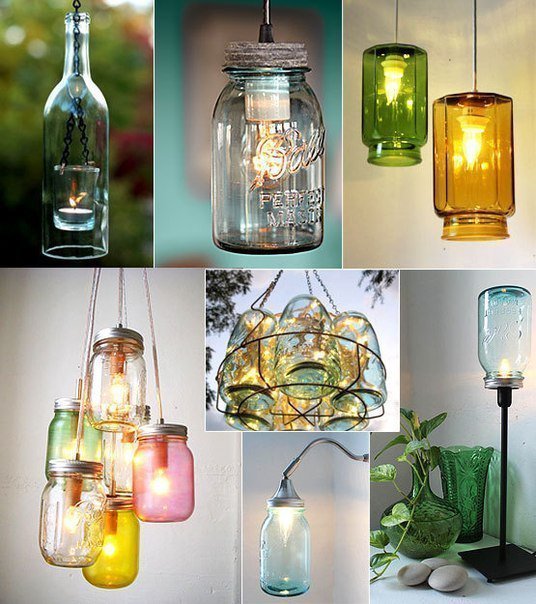 The simplest lighting option for the homeare lamps made of glass jars. You can choose any pattern. Keep in mind that it will consist of small holes, which will need to be punched into the walls of the jar using a stencil. This can be either a regular pattern or a specific pattern. Apply it to paper with a pencil or marker. Now take the jar with ice and wrap its walls with a paper template with a pattern. Fix it with tape so that the paper does not move anywhere during the work. Now put the jar on a towel and start tapping the pattern on the jar with holes through the stencil using a nail and a hammer. Work carefully and slowly so that the ice inside does not chip off or fall out. When the entire pattern is pressed into the walls, place the jar with ice in warm water. Let it lie there until the ice completely melts and turns into water. After that, all that remains is to give the jar a decorative look. To do this, you can use permanent markers to draw a pattern on the walls or simply paint the outside of the jar with regular acrylic paint. It is better to choose a darker color of paint so that the pattern is more clearly visible. When everything is dry, light a round candle and place it on the bottom of the jar. In the dark, a romantic illusion of stars will be created. Your DIY jar lamp is ready! Just make sure that the walls of the jar and the bottom do not overheat. To do this, place an additional porcelain or metal circle on the bottom under the candle for protection. Return to contents</a>
Lamp from a glass jar
The second option is a lamp based onglass jar. For this you will need a regular liter, three-liter or any other volume glass jar. In addition to it, for work you must have with you:
- silicone transparent adhesive;
- brushes;
- Glass balls, in which one half is flat (sold as sets for decorating aquariums and filling transparent vases);
- scissors;
- beautiful ribbon;
- a small round candle.
Before work, you must first wash it thoroughly anddry the jar. Then you need to decide how exactly you will decorate the walls of the jar with glass. There are two options. The first is to cover the entire surface completely. The second is to glue them in a certain order, creating a specific pattern or ornament. Whatever you choose, the principle is the same: the outer wall of the jar is generously smeared with glue using a brush, onto which the glass pieces are gradually placed. It is important that the glue sets quickly. When you do this, wait a little while until the glass pieces are completely attached and harden on the jar. Then take a ribbon and wrap it around the top of the jar, tying it with a bow. This way the lamp will acquire a festive look. As a result, the lamp made of a glass jar will look. Now you just have to put a candle in the jar and light it. Now you know how to make a lamp. And your friends will sincerely admire such simple and exquisite beauty! The described methods for making such lamps are both the cheapest and the most original. And even if you don’t have such work experience, you can easily make them yourself in a short period of time.