Over time, holes and cracks form in the floor, and sometimes radical changes are required to make it easier to move around the apartment or house. Concrete floor diagram.It turns out that it is quite possible to repair a concrete floor with your own hands, the main thing is to accurately determine the degree of complexity of the upcoming work. The importance of this point is determined by the need to purchase materials and learn the sequence of actions in a given situation.
Dusty floor in the apartment
When moving into a new house or apartment, a personoften already has some kind of floor, say concrete. But modern builders rarely care that the covering, that is, its last layer, is made of a special impregnation:
- polymer;
- inorganic.
These materials can increase the strength of a concrete floor several times if they are chosen correctly. Therefore, the first repair may ultimately result in the treatment of the concrete floor from its dustiness.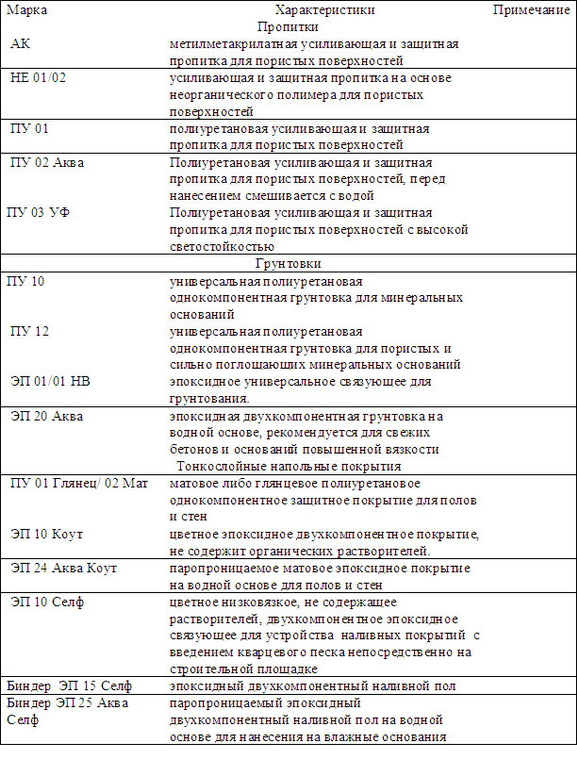 Table of polymer impregnations.Existing impregnations actually assume a certain porosity of concrete. It is laid down at the design stage. Having started pouring floors from the zero stage, it is possible to achieve a surface strength no worse than on the runway. But considering the situation with repairs, it should be noted that it is also possible to choose a polymer or inorganic impregnation by trial and error. The principle of action of polymeric materials comes down to two possible physical processes:
- sealing of the surface layer due to polymerization;
- modified neoplasm of concrete.
The latter is achieved when concrete enterschemical reaction with active elements of chemical impregnation. Considering that the floors are initially polished, after polymerization and possible finishing using diamond film, the resulting surface will be glossy. If you add acrylic dye, it can become the desired color. Return to contents</a>
Easy floor repair
When a person is sure that floor screeding is not required, cosmetic repairs may be sufficient. This means:
- sealing small potholes and pits;
- elimination of minor cracks;
- removal of roughness on the surface.
 Step-by-step repair of large cracks in the screed.Repairs begin with cleaning the concrete floor from dust, dirt, and foreign objects. The next step is to clean the rough spots, which can be done using a grinding machine. Before preparing the solution to fill cracks and holes in existing concrete floors, you need to clean them to the logical end. That is, so that when you touch them, the edges are strong enough and do not crumble. This can be done with a jigsaw. Using a working vacuum cleaner, collect the accumulated debris. Next, a concrete mixture is made, which includes sand, water, and cement. It is necessary to determine the proportions based on what kind of composition the finished concrete floor already has. If this is difficult to do on your own, it is better to consult a professional. All ingredients are thoroughly mixed and poured into the right places. This can be done in different ways, for example, using a construction syringe, then the solution will definitely fill the entire required volume. Let the composition harden, and go over the surface again with a grinding machine. When carrying out minor repairs, pay attention to the following points:
- Special hydrostable impurities are added to the bathroom solution;
- The temperature difference on the balcony: the floor must be stable to them;
- the kitchen should have a heat-resistant surface.
Therefore, it is necessary to carefully study the composition.the purchased mixture for the solution. It is necessary to look at the conditions of pouring the floors with your own hands, including. Some experts believe that it is possible and necessary to add PVA glue in small quantities to the repair solution. Return to the table of contents</a>
Leveling and priming under the screed
 Scheme of using self-leveling mixture.Sometimes the floor really needs major repairs. Then it is necessary to make a new screed. This is very painstaking work, since it will be necessary, in addition to performing high-quality pouring, to ensure the leveling of the concrete floor. You will have to start by cleaning the surface from debris and dust, you can use water. After this, it will be possible to assess the current state of the concrete surface. If necessary, you need to clean it from exfoliated concrete. In order for the concrete floor repair to be of sufficient quality, it is convenient to use a construction water level. Two people will be needed to work with it. The principle of its use is based on the fact that under the influence of atmospheric pressure, the water line in two communicating flasks will always show the horizon. By moving them around the sections of the room, you can calculate a relatively ideal horizontal plane, which will subsequently become the surface of the concrete floors. During floor leveling, a zero level is installed, a distance is measured from it, which will determine the thickness of the fill of at least 3 cm. To increase the adhesion of concrete floors to the poured solution, they are primed. This stage of repair is carried out solely to avoid concrete spreading, which very often happens with certain properties of the concrete mixture. Primer is necessary in case of a large spread in the thickness of the floor fill. It will facilitate uniform drying of the solution along the entire perimeter. Return to contents</a>Installation of beacons
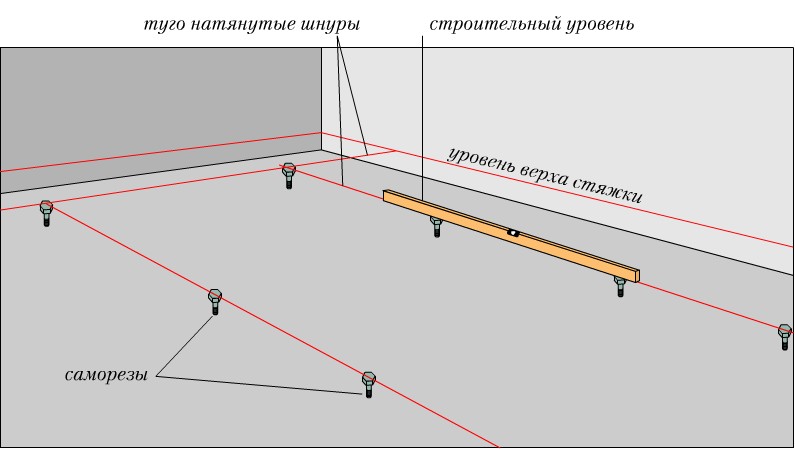 Scheme for installing beacons on the floor.To level the concrete floor pouring, it is necessary to install metal slats, prepare small wooden blocks in advance, the guides will be attached to them. You will need self-tapping screws and a drill.
- the maximum distance between the beacons is 1.2 m;
- the first is set through the highest point of the surface;
- T- or U-shaped billets are used.
It is necessary to monitor two directions of the slats: each of them must be installed horizontally, and all of them must be parallel to each other. In order not to become a waste of time, it is necessary:
- To install wooden blocks along the determined lines, at the appropriate height;
- The prepared solution is placed along the same lines with small bumps;
- Put a metal frame on the uneven bars and mortar, removing the excess;
- attach the screws to the floor bars and slats.
Be sure to keep an eye on the place where it is locatedthe highest point, acting on the principle of "measure seven times, cut once". Sometimes it is necessary to take bars of different heights or put improvised construction waste underneath, which is undesirable, since during pouring it can slip off unnoticed, which in the future will give rise to the formation of a crack or pore. Return to the table of contents</a>
Pouring and finishing work
To complete the concrete floor repair,It is necessary to prepare a cement mortar of proper quality. Following the instructions recommended by the manufacturer of cement or cement mixture, mix the mortar for the concrete floor in a large container using a construction mixer. Some companies offer an electronic calculation of the required proportions, as well as the volume of the finished mortar. The mixer can be made from a drill equipped with an appropriate attachment. As you can see, such repairs will require the owner to have not only ingenuity and resourcefulness, but also possession of a fairly large arsenal of household appliances, devices and improvised means. Some of them can be borrowed from friends or borrowed from construction crews. But the fact is that the container for the mortar must be large enough. The finished mortar is laid out along the beacons, between them, and constantly leveled with a rail, removing excess, lightly pressing the mortar, pulling the improvised means towards you. Slowly, moving along the entire perimeter of the room. When the entire floor is filled with mortar, for the strength of future concrete floors, the work must be stopped, let the mixture dry and harden. To complete the repair, you can sand down the resulting unevenness, you can use the recommendations for dust removal from floors. But at home, additional coatings such as:
- linoleum;
- parquet;
- ceramic tile.
The story would not be complete withoutmention of a self-leveling poured concrete floor. It is related to finishing works, is poured on an already prepared surface and does not require grinding after hardening. If such a pour is used, it is recommended to go through the priming stage twice, and the layer thickness should be no less than 5 cm.


