They are very popular todaysuspended ceilings made of various materials. Such structures can be mounted from drywall, plastic, PVC film. This design will hide any unevenness and is quite easy to perform. Various lighting fixtures are also used to illuminate the premises. If in past times the ceiling was decorated only with a chandelier, today a point is more common. Such lamps can be distributed over the entire area. In addition, they take part in the zoning of the premises and perform this function perfectly.  Spot illumination of the ceiling is commonly used inas the background lighting of the room. Backlight with the help of such elements can be performed independently, the main thing is to observe certain rules and take into account the features. Depending on the material from which the ceiling is made, the features of its installation differ.
The main characteristics of the design of point lighting elements
 The device of the point light. Spot light is a small lighting device that is installed in a suspended structure. As a result, the instruments will be at the same level with the surface. They are small in size, so in order to fully illuminate the room, you need to use several elements. It is very important to arrange them throughout the area. The structure of the luminaires, which are intended for installation in gipsokartonnye sheets, has special spring fasteners. Such a fastener is inserted into a special prepared hole and straightened in it. With the help of it, they reliably hold onto the drywall sheet. In order to close the gap between the hole and the base, a special decorative cover is made from the outside. It can have a different shape, color, size, so it will not be difficult to find the one that most suits the interior of the room. Back to contents</a>
Basic recommendations for the location of lamps
 Variants of the arrangement of spotlights. Almost all spotlighting has a small illumination sector, which does not exceed 30 °. Therefore, it is necessary to arrange the lamps in a row, at the same time it is necessary to observe a certain distance between them.
In order to illuminate the room as much as possibleevenly, it is recommended to place the spotlight in a staggered manner. Such ceiling lighting can also be installed on plasterboard elements of walls, furniture and other decor elements. Back to contents</a>
The main varieties of spotlights
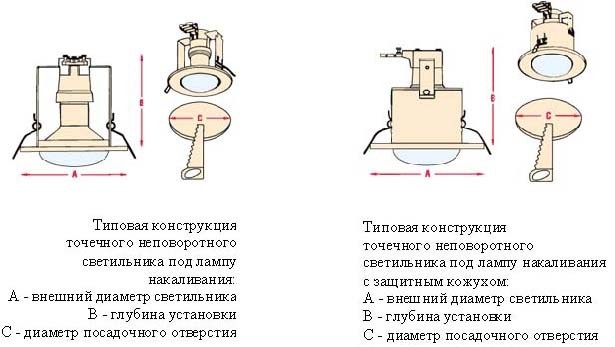
At the planning stage, it is worth considering whatdevices will be used for lighting. In order to choose the most suitable option, it is necessary to take into account certain factors. Depending on the type of device design, they can be divided into two types - rotary and non-rotating. Non-revolving lamps are distinguished by a very simple system. 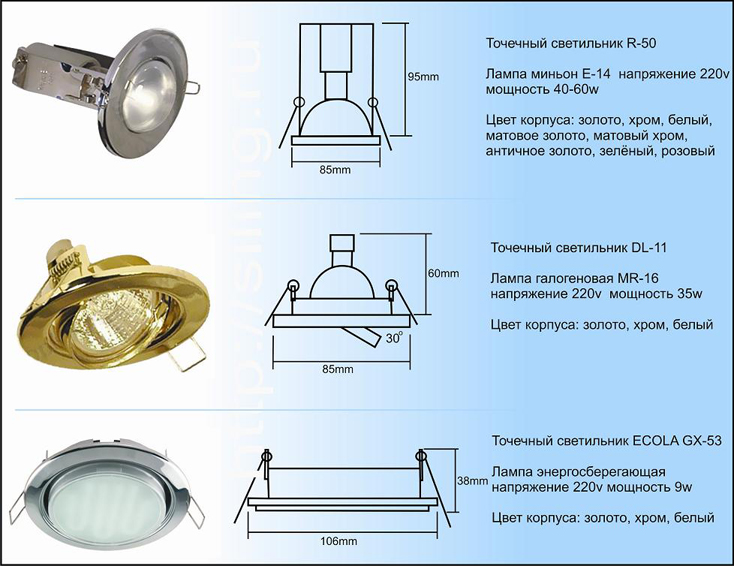 Types of spotlights. In this case, they are installed in one position, with the flow of light always directed in one direction, and it is impossible to direct it to the other side. Rotary devices have a more complex shape, which entails a more laborious process of installing such a fixture in the plasterboard ceiling. The advantage of such a luminaire is the ability to direct the flow of light in the necessary direction. The source of light can be the following types of lamps:
- ordinary incandescent lamp;
- halogen species;
- luminescent;
- LED options.
From which light source is selected, there will bedepend on the amount of energy consumed, the radiation spectrum, size and parameters. In order to install a conventional incandescent lamp, you need to use a backlight, whose height is 12 cm in size. Therefore, in advance you need to think about the height at which the plasterboard base will be lowered. As for the LED and luminescent options, to set them, the level should be lowered only by 6 cm. It should be noted immediately that the cost of such lamps will be much higher. Each variety is represented by a huge model range, which allows each buyer to purchase the required option. Before buying it is important to study all the subtleties of the presented model and only after that make the final choice. Back to contents</a>
Ceiling lighting: planning stage and preparatory work
 Two-level ceiling with spotlightson the perimeter of the room. After the lighting devices are selected, you can proceed to mount them. In case the ceiling lighting is created by oneself, it is worthwhile to start it at the stage of mounting the metal profile frame. This advantage makes it possible to arrange the wiring and arrange the fixtures in the required places. During planning it is necessary to perform the following works:
- on the basis of the ceiling, make a layout in which the light sources will be installed;
- all lighting devices must be located at a distance of 25-30 cm from the metal profile;
- it is very important to take into account the ceiling levels and perform the layout of different levels of the false ceiling.
It is very important at the planning stage to take into account suchlighting fixtures like a ceiling chandelier, wall lights and sconces. If a suspended chandelier is installed in the center of the ceiling, the spotlight can be located around the perimeter of the room or in separate areas. Back to contents</a>
Wiring: Recommendations
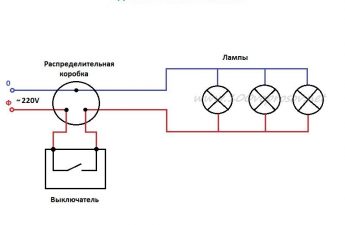
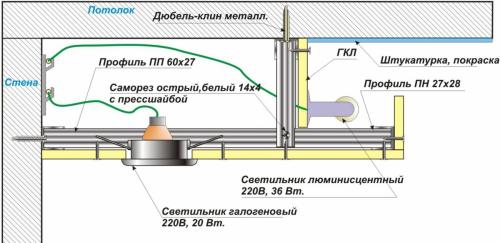
 Layout of wiring in a false ceiling andinstallation of a spotlight. At the stage of mounting the skeleton for a false ceiling, it is necessary to make a marking on which the wiring will be laid. On such a marking it is very important to make notes, where the illumination, switches and chandelier will be located. If there are elements with illumination on the wall, markup must be done for it. You can use different wires for wiring. To choose a wire it is worth considering some aspects. For reliable connection to the luminaires, it is recommended to use a soft multicore wire. To perform all wiring, use a hard or soft wire VVG or SHVVP - 3x1.5. The second option will be advisable to use if terminal blocks are used to connect the luminaires. For the wiring, corrugated pipes must be made of plastic. Such insulation will prevent various mechanical damages. Corrugated pipe prevents moisture from entering the wiring. To ensure that the wiring does not dangle under the frame, it can be attached to the metal profiles with special plastic clips. Back to contents</a>
Executing a hole for lighting installation
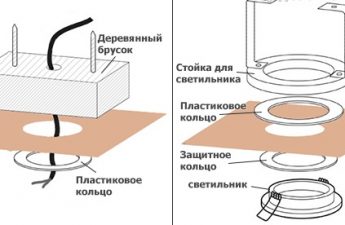
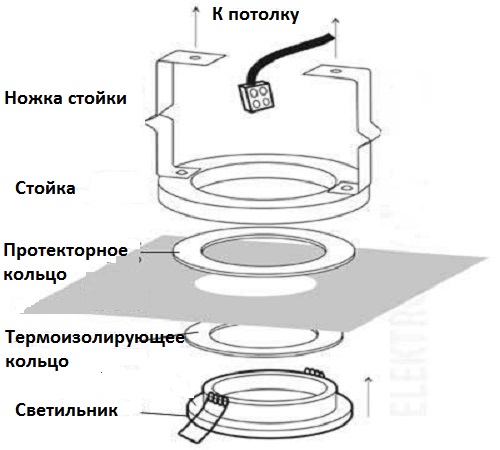
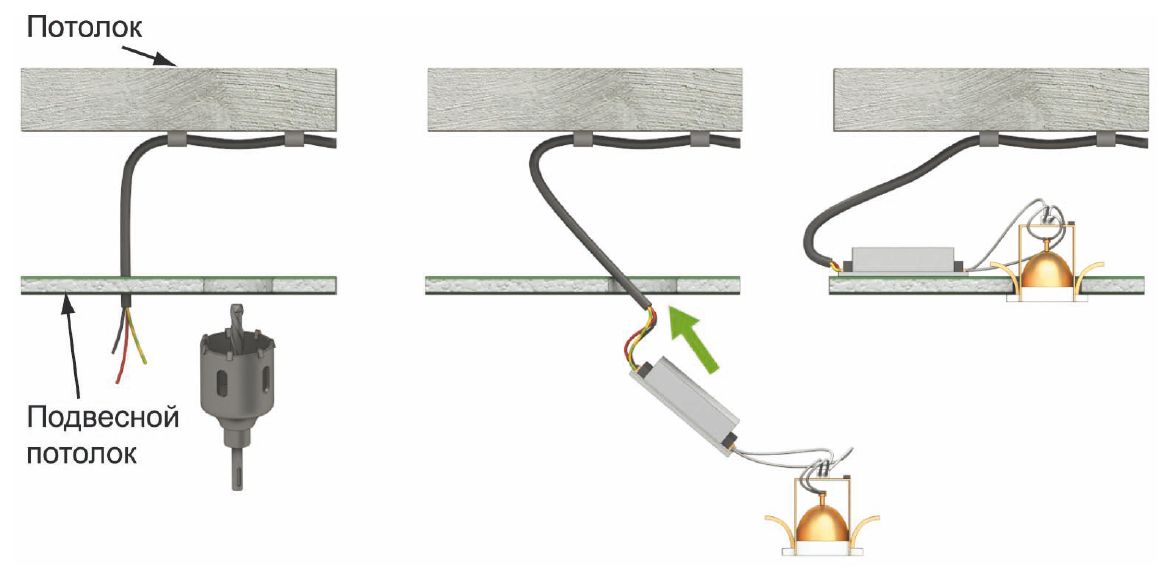
 Schematic of a hole for spotlights. In order to install a spotlight in a gypsum board, it is necessary to make holes of a suitable diameter. In order to make holes of the correct diameter, it is worth examining the information on the package from the lamp. Often manufacturers indicate what diameter to do. It is also recommended that you check the dimensions yourself. Most often, holes are made with a diameter of 60-75 mm. To perform such a hole, you need to use a drill with a special "crown" attachment. Perform such work is on loose sheets, but you can perform work on the finished structure. After all the holes are made and the wiring is done, you can start finishing work. Such works include plastering, sanding and painting. The spotlight is installed after the ceiling is fully ready. First, a point light fixture is installed in the hole. After it is fixed, you can proceed to install the selected lighting source. The bulb is connected to the cartridge, and eventually the decorative cover is put on. After installing all the elements, you can check the health of the entire system. Check the wiring system is recommended before it is wired with plasterboard. For this it is necessary to install bulbs in all cartridges. If the system does not work, you can fix it.