Today one of the most trendy elementsdecoration of rooms inside the house is considered hidden ceiling lighting. Its main purpose is to create additional lighting in the end parts of the room. In order for hidden lighting to meet modern requirements, it must be arranged in accordance with all the rules of placement. The main function of the light backlight is to provide additional illumination to the room.
Principles of installing hidden lighting on the ceiling
Regardless of the configuration of the ceilings inIn your home, this type of lighting can be installed in any corner. This is achieved thanks to the flexibility of devices that provide hidden lighting. There are 2 simplest methods for arranging additional lighting:
- illumination of the gypsum cardboard aperture;
- illumination of polystyrene cornice.
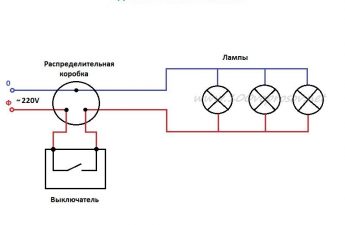
 LED backlight connection diagramceiling. With the first method, a plasterboard box should be placed along the edges of the entire ceiling area in the room being renovated. Backlighting is then installed inside this box. The advantage of this installation method is the heat resistance of the plasterboard material, that is, it will withstand the impact of any lighting fixtures. The box holds under the ceiling much better than a polystyrene cornice. In addition, this method allows you to attach lighting fixtures directly to the profile. In addition to hiding the backlight, the plasterboard box can be used as cladding for other electrical network elements that are undesirable for the eye. The disadvantages of this method are the high cost and labor intensity of the installation process. It will require certain knowledge from you in the field of repair and architecture. It is worth considering that it is highly undesirable to install such a box in the kitchen. Due to high humidity, the plasterboard material may crack over time. Return to the table of contents</a>
Preparing for the arrangement of the ceiling lighting
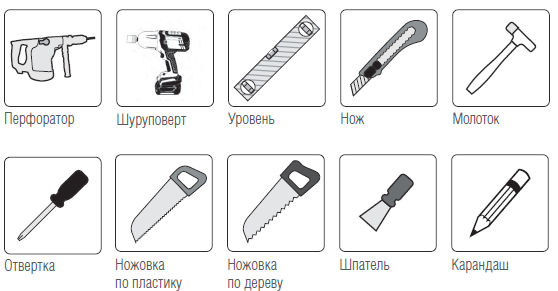
Before starting work, you will need to prepare the following tools and accessories:
- electric drill;
- curved screwdriver;
- plane;
- a small saw;
- scissors for cutting metal;
- roulette;
- level;
- self-tapping screws;
- gypsum plasterboard and profile.
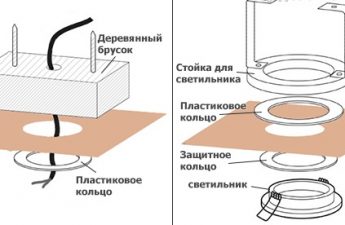
 Tools for mounting LED pendants.First of all, you need to choose the type of opening that you want to arrange in the room being renovated. In small rooms, it is recommended to make ceiling lighting in an open opening. In this case, there will be no need to arrange a border along its edges, and the distance to the ceiling will be the smallest. A closed opening implies the placement of a low border hiding the lighting fixtures, it will require arrangement 5 cm lower. Next, you need to mark a longitudinal line on the wall surface with an orientation to the level. According to this marking, you will need to attach a UD profile, which will become the foundation for the lighting opening. After this, you need to mark the next line for fastening on the ceiling, not forgetting to use a tape measure for accuracy. Along the line, you need to drill holes at intervals of 50 cm, push plastic dowels into them and secure the UD profiles with hardware. It is unacceptable to use wooden dowels instead of plastic dowels, since they absorb liquid intensively and swell quickly, which contributes to their falling out.
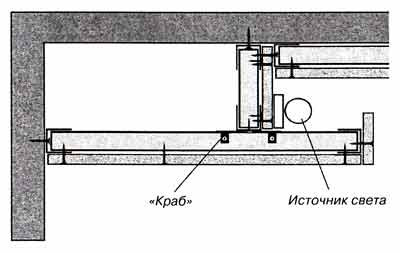
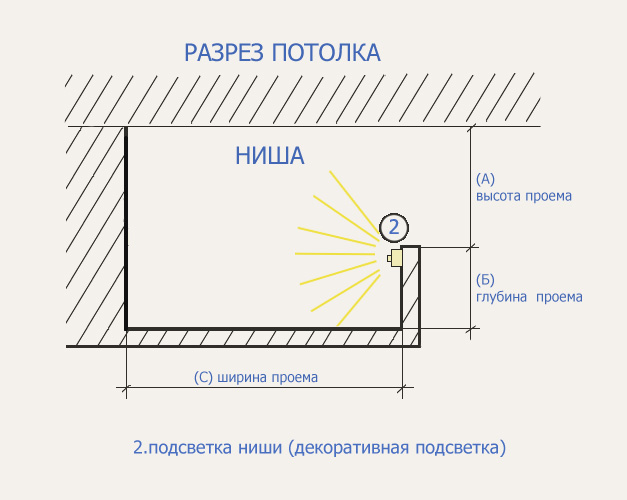 Hidden lighting scheme.CD profiles are used as support posts, so they need to be cut and secured with self-tapping screws. Since there will be no high pressure on the lathing being created, the support posts do not necessarily need to be connected to the wall profiles. When attaching the plasterboard box, you need to monitor the seam between the two sheets of material; it should be placed on one profile. To make the plasterboard material uniform and neat, you need to cut it with a small saw or hacksaw. In this case, the edges should be trimmed with a plane. To complete the arrangement of the box, you will need to thoroughly putty the joints and holes that appeared as a result of screwing in the self-tapping screws. Before puttying, the seams can be carefully treated with masking tape. The putty used should be gypsum. If you paint the box yourself, do not forget to prime it. Next, you need to place and connect the lighting fixtures. Openings made of this material allow you to place various lamps and lamps. Modern plasterboard ceilings are usually equipped with LED strip. Its productivity exceeds the simplest lighting devices by 10 times, while the efficiency is 22%. It is worth considering that such ceilings can only withstand a small weight. Lighting devices should weigh no more than 10 kg, otherwise they may fall off. Return to contents</a>
Arrangement of polystyrene cornice lighting on the ceiling
 Plasterboard ceiling with lighting.As a rule, such works require special tools and equipment, so they are often performed by a qualified construction team. At the same time, stretch ceilings can be created from polystyrene cornices, which will simplify the process of arrangement. Such a ceiling can be created by hand. Polystyrene cornices have a smaller margin of safety compared to plasterboard material, and it is also less heat-resistant. This means that the cornice can only be equipped with an LED strip, other lighting devices will spoil its surface. Its main advantages are ease of arrangement and low cost. Installation of a polystyrene cornice can be completed in just 3-4 hours of work. Return to contents</a>How to arrange hidden lighting inpolystyrene cornice yourself First of all, you need to make markings at a distance of 5-10 cm from the ceiling. The polystyrene cornice will be glued along this longitudinal line. In case of uneven ceilings, it is recommended to make markings with an orientation towards parallelism, since the line drawn with a level may go crooked. After completing the markings, you need to process the places where the cornice will be glued. It is recommended to thoroughly clean the surface from plaster and wallpaper glue, and then prime it with a primer. There is an option to glue the cornice without processing the coating, but in this case you will need to purchase a structure with a large connection area.
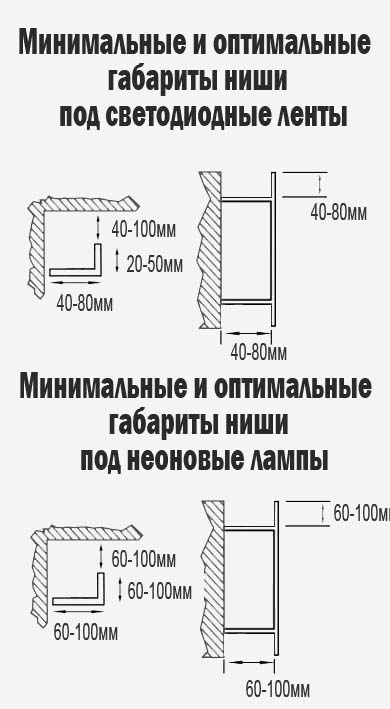 Minimum dimensions of the niche for lighting.After this, we apply glue to the surface to be treated and press the cornice well, holding it in this position for a few seconds before moving on to the next one. For a good connection, it is recommended to use the following types of glue:
- liquid Nails;
- acrylic putty;
- Titanium.
All existing seams need to be glued morecarefully. To strengthen the structure, you can use matches, which will replace the dowels. Particular attention should be paid to the end sections, since the polystyrene cornice most often sags in these places. To eliminate this possibility, it is recommended to purchase special corners in a hardware store. After completing the placement and strengthening of the cornice, it is necessary to bring electrical wiring into it and arrange a power supply unit that will supply current to the LED strip. It is recommended to fix the unit on the wall, since it gets very hot and weighs a lot. To securely fix it, you need to use nylon clamps. When connecting the LED strip, you need to pay attention to the marking of the electrical wiring. It is worth considering that strips longer than 5 m should be connected to the network in parallel. In the case of a series connection, there is a risk of burning out the tracks. To create hidden lighting, it is enough to buy a strip with 40-60 LEDs. With a larger number, you will get an alternative light source. When connecting cables, do not leave any uninsulated sections, otherwise they may come into contact with hardware and cause a short circuit. Standard tapes have a voltage of 12 V, select the appropriate power supply for them.