In recent years, the installation of suspended ceilingsis becoming increasingly popular. It can be quickly installed, it is reliable, beautiful and easy to maintain. However, its aesthetic qualities can only be fully revealed when the surface has special lighting. LED backlighting is backgroundlighting and is aimed more at creating an attractive appearance of the ceiling. The very structure of the material from which the ceiling is made dictates the installation of LED lighting. It is this that is most fully capable of demonstrating all the advantages of a stretch ceiling. At the same time, almost any user can install it for the ceiling with their own hands, since this does not require special efforts and qualifications.
Properties of LED strip and its features
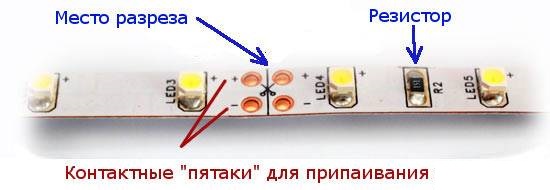 LED strip device.This is a modern lighting device, which is a polymer tape, on which LEDs are fixed at the same distance from each other. Each of them is paired with resistors that create resistance. Its width is usually from 8 to 10 mm with a thickness of 2-3 mm. Its reverse surface is adhesive, which makes it easier to attach LED backlighting to most surfaces, including stretch ceilings. Such tape is sold in 5 m long sections, which are wound on a plastic reel. The smaller the distance between the diodes, the brighter the backlight. One of the main advantages that allow using LEDs to illuminate stretch ceilings is the almost complete absence of heating. In addition, they are very durable, since they operate on low-voltage power and burn out extremely rarely. The color of such an LED strip can be different. There are also multi-colored varieties with remote control. Another very important advantage is the combination of lightness and flexibility. Thanks to this, you can lay out almost any figures. Among the disadvantages, it is worth mentioning only the significant cost and the need to install a step-down transformer, which provides power with a voltage of 12 V. Return to the table of contents</a>
Selecting a variety of tape and calculating its correct amount
 Types of LED strips.First of all, you need to decide on the LED strip that will be used for . It is produced in many varieties and its quality depends primarily on the type of LEDs that are on it. Most often, these are SMD 5050 and SMD 3525. The first of them is 2 times larger in size than the second and has 3 crystals, and the second has only one. Another indicator is the number of LEDs located on a 1 m long section. This can be 30, 60, 120 or 240 units. If 30 and 60 can only be used as hidden lighting, then a larger number can be used as the main lighting. In addition, the strip can be moisture resistant and consume electricity of varying power. After choosing the type of LED strip, you need to calculate its quantity for a given room. This depends on both the area and the height of the ceiling. It is worth considering that no more than 2 sections of 5 m in length can be connected in series. The power supply must have a slightly higher power than is necessary for the entire set of strips used for LED lighting in a given room. Return to contents</a>
Installation of LED lighting on the ceiling with your own hands
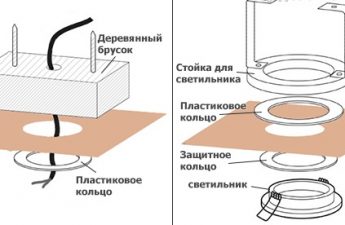
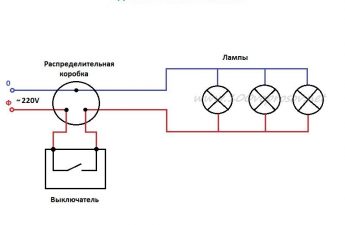
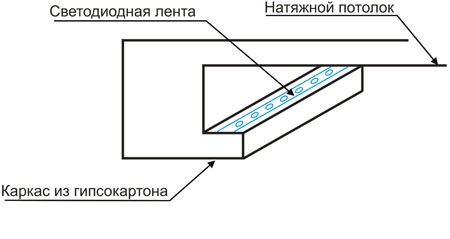 Scheme of installation of LED strip on the ceiling.The main feature of installing such lighting is that the strip must be installed hidden and emit light reflected from the ceiling surface. To enhance this effect, foil strips are glued next to the strip. One of the ways to install LED strips on a stretch ceiling is suspended plasterboard boxes, which are mounted along the entire perimeter. Their height can be from 10 to 20 cm, and the width should not exceed 50 cm. The design of such a box provides for a special niche, where in addition to the strip itself, power and control units are placed. The reflected light from it is directed to the center of the ceiling. The lower part of the box protrudes towards the center at a distance of about 8 cm, and at the end of it there is a protruding upward segment of about 6 cm. It forms a niche, from the upper edge of which to the ceiling there is a gap about 10 cm wide so that the strip itself can be inserted. If the stretch ceiling sheet has a glossy surface, then it has an almost mirror effect. Then it will simply reflect the inside of the niche together with the LED strip, if it is made in the manner described above. A slightly different solution is required here. The niche must be hidden somehow. In this case, a closed box is made of plasterboard, the backlight will come from inside it through special holes. It is possible to install the backlight without using plasterboard structures. The LED strip can be glued to the surface of the main ceiling, and then mount the stretch ceiling. Its canvas will be illuminated from the inside, but in case of a malfunction, the LED strip cannot be removed without first removing part of the canvas. The distance between the LEDs and the ceiling canvas should be at least 5 cm. The LED strip is always mounted before the ceiling canvas is stretched. Electrical wires with a separate switch must be connected to it, and power and control units must be secured. The tape itself is glued gradually, 50 cm at a time, unwinding it from the reel and removing the protective paper from the adhesive surface. The surface to which it is attached must be cleaned of dust, dirt and well degreased. It can only be cut in specially designated places, because the LEDs are divided into interconnected groups of 3-5 pieces. In general, there is nothing complicated in installing LED strip lighting on a stretch ceiling, you just need to follow the sequence of actions and technology.