It's not that difficult to make your home cozy.The main thing is to decide on your wishes, sketch out a project and be patient. Lighting plays an important role in creating comfortable conditions. Depending on the spectrum of light that prevails in the room, the mood (and sometimes even well-being) is formed. The type of lighting is also important: general, spot, combined. Recently, LED lighting has become popular, which has a number of advantages even compared to modern halogen and neon lamps. With the help of ceiling lighting you can liven up anddecorate any interior. It looks especially impressive. A flight of design thought can turn this integral element of the room into a truly unique object: if you make a backlight, they can take the form of a star, a flower, a snail. Even the simplest suspended ceiling, equipped with an LED strip hidden in a niche, will become a harmonious addition to the interior, will help smooth out the shortcomings of the room, if any, or highlight individual accents.
LED backlight: advantages and features
The advantages of LED lighting, in addition to low cost, include:
- bright even light;
- long service life (up to 13 years);
- energy efficiency;
- simplicity of laying (the tape is fixed in the niche space to the plasterboard with adhesive tape);
- variability of color modes, which can be controlled remotely by means of a remote control;
- the possibility of giving a variety of shapes due to the flexibility of the product;
- excellent efficiency (almost all energy goes to the allocation of light, and not to heating the air);
- no flicker and ultraviolet radiation.
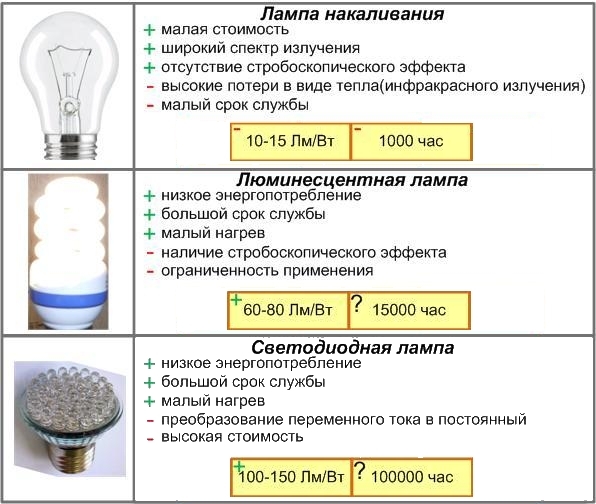 Comparison of LED bulbs with other lighting elements. The modern market offers a wide range of LED strips for backlighting (or LED strips). They differ in characteristics:
- type of LEDs, their size and quantity in 1 m / p (density);
- color (monochrome or color);
- color temperature (2700-10000 K);
- voltage (12/24 V);
- resistance to moisture (some models have silicone insulation, so they can be used in rooms with high humidity).
Even if you drop such a product with sufficient forcegreat height, you can not worry about its integrity. With the help of such tape you can build an advertising sign, decorate the landscape, the facade of the house. Complex ceiling structures made of plasterboard, illuminated by diodes, create amazing effects. The ceiling lighting elements are located in a niche made of plasterboard. Return to the table of contents</a>
Necessary materials and tools
How fast and affordable?First, you need to develop a design for the ceiling and niches. You can come up with your own solution or use the services of a professional designer. A niche for lighting has the appearance of a ledge running along the perimeter of the room or the edge of individual parts of the ceiling. Naturally, you need to think in advance about the color scheme of the lighting, which matches the decor and overall interior.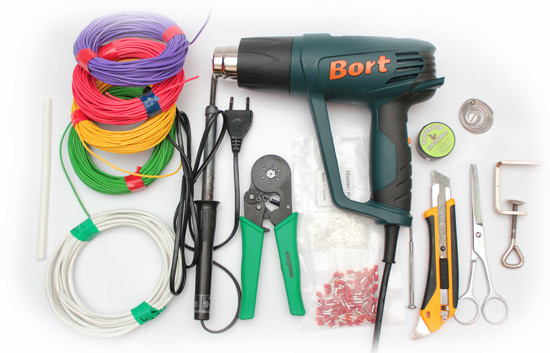 Tools for mounting LED lighting:soldering iron, scissors, industrial hair dryer, contact crimper, wires, heat shrink tube. Do not forget that the ceiling and niche being mounted will "eat up" part of the room's height. Therefore, when thinking over the design project, it is necessary to take this fact into account and select the appropriate profile. Then you need to purchase the necessary materials:
- plasterboard (depending on the humidity in the room) - regular or moisture-resistant;
- profile - start and main;
- hangers straight;
- fasteners (dowels, screws);
- tape with LEDs for illumination, power supply, conductor with cross section from 0.75 mm.
The following tools will be needed:
- water level, cord for marking;
- perforator;
- screwdriver with special devices for work on plasterboard;
- Bulgarian;
- pliers;
- knife;
- screwdriver;
- tools for work with putty, sandpaper.
Return to Contents</a>
Calculation of materials
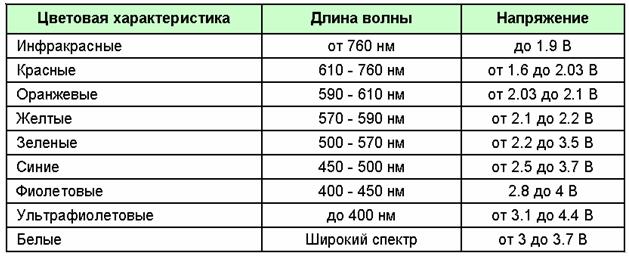 Table of LED types.Before purchasing the necessary consumables, you need to calculate the need for them. To do this, you need to determine the size of the surface for sheathing with plasterboard. If the ceiling is planned to be made at one level, then you just need to multiply the length and width of the ceiling, for a multi-level structure - calculate the sum of all areas. The size and type of niche are also taken into account. Based on the fact that one sheet of plasterboard has an area of 3 m² (1200x2500 mm), you can calculate the required number of sheets. The resulting number is rounded up. You can use the formula: N = (S1 / S2) * k, where N is sheets, S1 is the area for finishing (m²), S2 is the area of the sheet (m²), k is the correction factor. There are three coefficients for different areas:
- less than 10 m² — k=1.3;
- from 10 to 20 m² — k=1.2;
- more than 20 m² — k=1.1.
Calculate the number of starting profile (UD)It's simple: divide the room perimeter by the profile length (3 or 4 m). The main profile (CD) is calculated as follows: 3 CDs are needed for one sheet. The required number of sheets is divided by 3 to obtain the consumption. The "butterfly" hanger for attaching the CD profile to the ceiling is calculated taking into account the step (60-80 cm). Two dowels and suitable screws are needed for one hanger. The same dowels are used for the starting profile: the running consumption is three pieces per meter.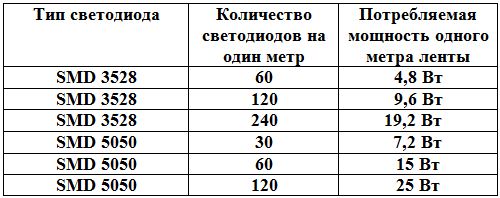 Table of power consumption of LED strips.The consumption of #1 screws per sheet of gypsum board is about 40 pcs. These screws are used to fasten hangers, fix both profiles, joints and connecting brackets. To mount one sheet, you will need 50 screws 25 mm long. Naturally, small fasteners should be taken with a good reserve. For rooms with at least one linear dimension over 3 m, connecting brackets are needed. They are calculated as follows: N = (L / 0.4) - 1) * k, where N is the brackets, L is the longest length, k is the coefficient. Return to the table of contents</a>
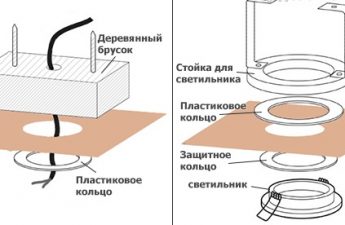
Where to hide the highlight?
The niche for laying the lighting can be fixed anddirectly to the ceiling, and to the plasterboard ceiling at the same level. It is possible to make the backlight using a molding of sufficient width and thickness. In any case, before starting the installation work, you need to think about where to place the power supply for the LED backlight, because it is much larger in size than the tape itself, and it also noticeably heats up during operation. Therefore, it must be attached in an easily accessible place, but at the same time so that it is not visible and can be easily replaced. And of course, it is necessary to provide at least a small heat dissipation. In advance, before installing the niche, you need to connect the wires to the power supply to connect the backlight.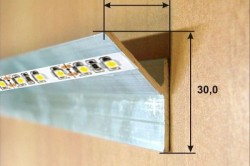 </a>Fastening of aluminum corner for LEDtapes. So, an alternative option for a niche is a baseboard. If you decide to take the path of least expense and hide the lighting behind the molding, you must first take care of eliminating the defects of the ceiling: after installing the LED strip, they will become more obvious. Therefore, the surface must be carefully putty, and only then painted. The baseboard is glued in such a way as to leave a gap between it and the ceiling of at least 10 cm. The tape is glued on top of the molding closer to the edge. But still, niche lighting looks much more impressive. You will have to tinker a little here. Return to contents</a>
Assemblage of a skeleton of a niche and installation of illumination
Plasterboard panels for installing lightingceilings are attached to a frame assembled from the same metal profile that is used for the ceiling structure. Initially, the starting profile is mounted:
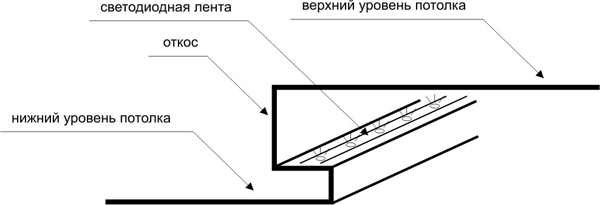 Scheme of LED strip placement on the ceiling.When the base is ready, the cable for connecting the backlight is laid. This is done in a plastic corrugated box, which, in turn, is attached with clamps to the ceiling posts. After assembling the main frame, you can already do the sheathing with plasterboard sheets, for which you need to:
The niche can be made open or closed.Using the open type, you can immediately mount the backlight on the ledge, and with the closed one - you still have to work. The closed niche should be equipped with a side that will redirect the glow to the ceiling. To create it, a starting profile is fixed to the edge of the ledge, and plasterboard strips up to 5 cm high are attached to it. The outer corner must be protected from deformation by gluing pads (made of plastic or metal). After completing the main installation work, the finished niche for the backlight is putty, additional finishing is optional (paint, plaster, wallpaper, etc.). Finally, installation of the LED strip itself. Before installing the LEDs in the niche, you need to prepare the strip: connect individual sections to the main cable, which, in turn, is connected to the power supply. The process is as follows: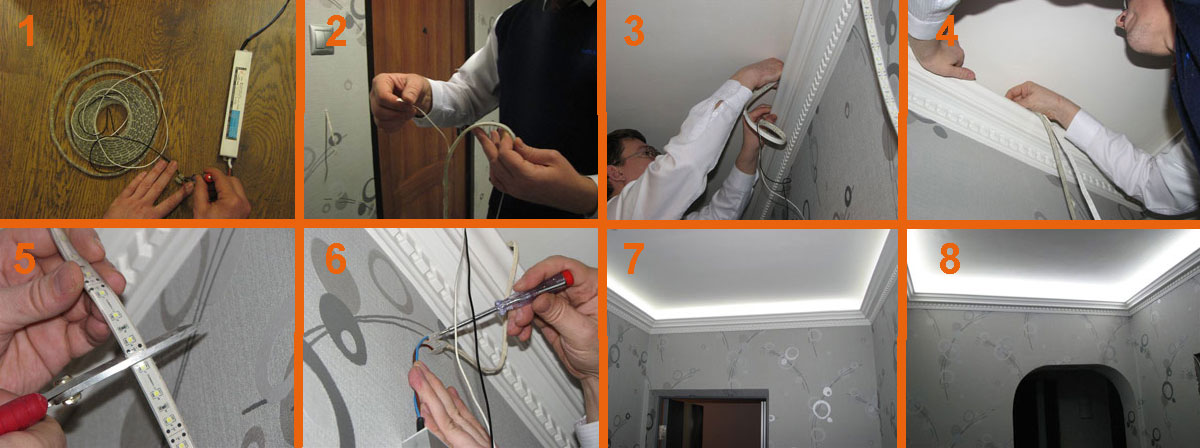 Sequence of connecting the LED strip.
Before installation, the entire system must becheck for functionality. After installing the tape in the niche, it will be difficult to fix anything. If everything is in order, the tape is glued to the cornice. When laying the backlight in the niche behind the curb, it is imperative to ensure that the wires and bulbs do not touch the metal elements of the structure. Before gluing the backlight tape, you also need to follow a few simple rules:
The LED strip is attached to the surfacesusing an adhesive layer applied to the back side. The protective coating is removed immediately before installation. It is necessary to properly secure the backlight in the niche, for this it is necessary to ensure that the tape does not twist or bend, it should not be bent under any circumstances. Following fairly simple rules and stocking up on patience, you can literally make backlighting in a niche with your own hands in 1-2 days, transform the room and enjoy the achieved effect for a long time.