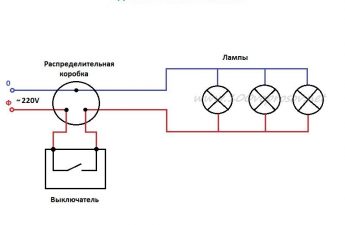
In modern design use a wall lamp, a chandelier, andalso spotlights that are capable of providing a necessary flow of light to a certain area. All electrical appliances, which include lighting, have their own peculiarities during installation. However, the connection of point lights themselves, it is possible, but with the observance of technology work, as well as security measures.  The scheme of connection of point ceiling luminaires to a current of 220V.
Some nuances of installation
When installing the spot, you should take into account the features of the ceiling coating. So, for example, if the building material used in finishing the ceiling refers to fuel, then you need to consider the following: 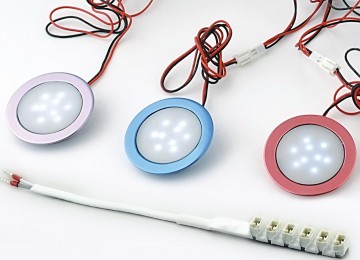 For wiring of lighting devices, special heat-resistant wires should be used.
- for wiring for lighting devices, special wires must be used which are heat resistant;
- the connection of the wiring when connecting the spotlights must be reliable and isolated;
- the power of the lamps that are used must match the technical characteristics of the wires, otherwise they will be subject to excessive overheating.
When selecting wires for connecting spotlights, the following criteria must be observed:
- they should not burn;
- should be resistant to prolonged exposure to high temperatures.
Such requirements correspond to the cable, ywhose outer layer of braid is made of fiberglass, and the inner insulation is made of organic rubber of increased strength. These wires allow you to install a spotlight in rooms of any purpose, for example in kitchens, saunas, baths, bathrooms, and also in unlimited quantities within reasonable limits. To ensure reliable connection of wires during installation, you can use a special tool - crimping tool. It connects the cables with hollow copper sleeves, which serve as a reliable insulation. An alternative to the press can be pliers, which are identical in principle to the action. Back to contents</a>
Necessary materials and tools
Connecting spotlights requires the following tools and materials, such as:  Variants of connection of spotlights.
- lighting;
- supply wire, switch;
- special connecting elements (terminals or sleeves);
- insulating tape or heat shrink tubing;
- pliers;
- a drill with a special nozzle (if the ceiling is made of plasterboard, laminate, plywood);
- tape measure, pencil.
Spot lights within the same roomare chosen the same. This provides more correct lighting in the room and supports the overall picture of the interior. In this case, it is necessary to take into account the presence of a light-reflecting layer in the lamp, which ensures the enhancement of the light output. For spotlights most often choose lamps whose power does not exceed 40 watts. This provides good illumination due to the fact that such lighting fixtures are installed at a fairly close distance from each other. Back to contents</a>
Stages of installation of spotlights
The process of connection is the sequential execution of the following steps: 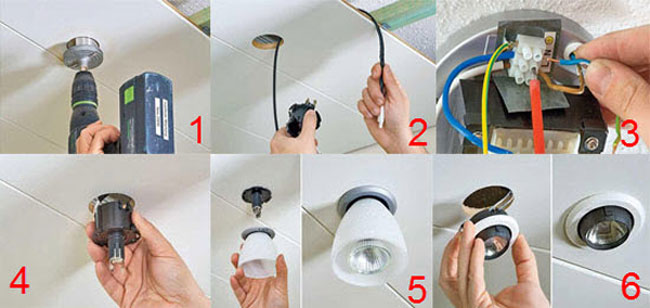 Steps for connecting a spotlight.
- design and marking;
- laying and pulling cables to the installation site;
- making holes and connecting;
- testing of connections.
Such a detailed breakdown into the stages is related tothe fact that part of the work must be done while forming a ceiling coating. Planning of the location of the luminaires is made before the lining is made with the finishing material, that is, during the installation of the frame. Design takes on a special meaning when there are several levels at the ceiling. In this case, it is necessary to provide wiring to the luminaire mounting points at each level, taking into account the distribution of the light flux. Lamps that are located within the same level, should form one single contour. When planning the number of spotlights that will provide the required illumination of space, it is necessary to take into account that the distance from the wall to them should not be more than 60 cm, and the distance between the centers is 25-30 cm. At the same time the luminaire from the frame must be at least 30 see If the lamp is placed closer to the frame, then its installation at the final stage can be difficult.  The device of the lamp. The presence and location of other lighting fixtures in the room affects the final number of fixtures. A spotlight can be equipped with a rotation mechanism, by means of which the direction of the light flux can be changed. Therefore, they can be diverted by using several lamps at the same time. The wiring is laid during the installation phase of the frame. It fits into special boxes or fixed on it in such a way that when making holes for spots it is not difficult to get it. If the choice of places for installing spotlights during the installation of the frame is not possible, then you can lay the cable only to 1 luminaire. And each next point light fitting to the previous one, stretching the wire already in the mounted ceiling cover. But this method of laying the wiring somewhat violates safety techniques, since the wires remain to lie directly on the surface of the suspended ceiling. The cable can be used with 2 or 3 cores when laying on a frame or in protective boxes. The loop for fixing each point fixture is left at a value of 10-15 cm. It is attached to the frame near the location of the point fixture by means of a plastic screed. But the fastening should not be tight, so as not to cause any difficulties when dismantling it at the final connection. Drilling holes for each spotlight is carried out after the ceiling installation is completed. Proper design of the location of the spots makes it possible to avoid their location on the metal frame elements. In addition, if the spotlight is located at the junction between the skin sheets, then it should be moved or redistributed sheets in such a way that the joint was moved to the required distance. To ensure that all the spots are located exactly along the line, preliminary marking with roulette and pencil is done.
 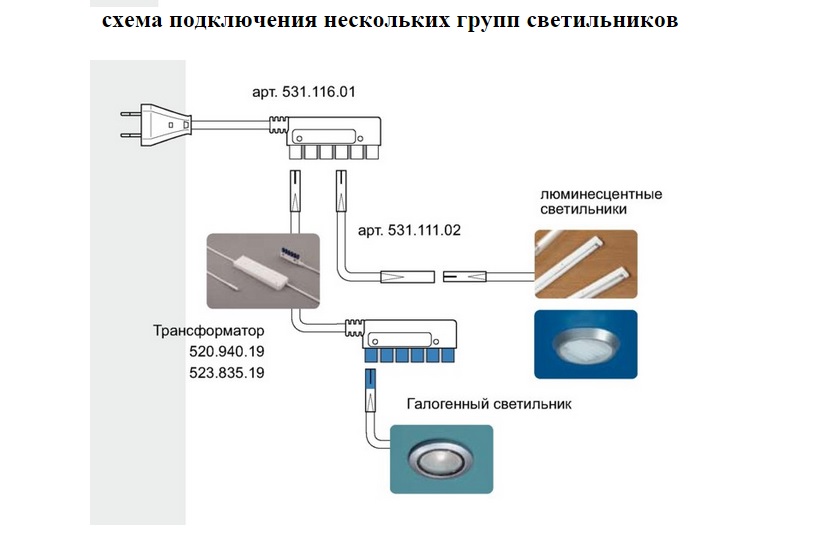 The scheme of connection of several groups of fixtures. The holes are drilled with a drill with a special nozzle - a circular saw, whose central drill is installed in the center of the luminaire. A perfectly smooth circle is formed, which avoids unnecessary gaps. The diameter of such a saw should be less than the corresponding external size of the luminaire by 3-4 mm, but more by 3-4 mm than internal dimensions. After all the holes are drilled, it is necessary to get a loop of wire, which was left to fix the spot. If such loops have not been made, or if the wiring for each spotlight is not connected, then it is necessary to stretch the cable to them. Pulling the wire must begin with the fixture, gradually moving further along the line of their installation. This can be done with a hook, which is made of strong wire. Back to contents</a>
Concluding moments of the workflow
After laying the wire or pulling the loopIt is necessary to release the wire from the insulating layer for further fastening. These bare wires are clamped in the luminaire terminal according to the wiring diagram that is attached to the instrument. On the spot there are signs that it is necessary to make connections: L - phase wire, N - neutral wire, PE - ground. At this stage it is necessary to carry out all carefully, accurately and technically correctly, observing all safety measures. After connection to the mains supply, it is necessary to insert a spotlight into the hole, slightly bending the clamps of the structure. This will allow him to go to rather tight, without forming gaps between the lid of the lamp and the hole in the ceiling. Thus it is necessary to watch that wires of fastening did not get between скобами. After that, the supply wire is connected to the switch, the lamps are screwed in and a test run is made. Once all the fixtures are lit, the installation is considered complete.