Modern design of apartments dictates newrequirements for the design of ceilings. The suspension and tension ceilings, ceilings made of plastic panels and others are widely used. The installation of point lights with their own hands solves the problem of a modern approach to lighting. More and more often, a massive chandelier is replaced by a source of point lighting.  Correctly installed spot lightswell illuminate the room. The installation of point lights by their own hands is quite simple. At the same time, the use of such equipment allows using the main advantage - uniform lighting of the room, ensuring the absence of shadows. A wide range of produced options allows you to choose the shape you like and the color shade of the glow.
Basic designs of spotlights
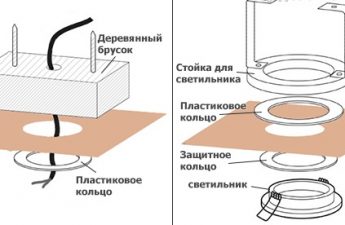
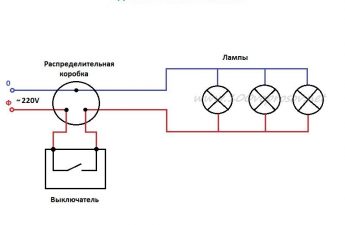
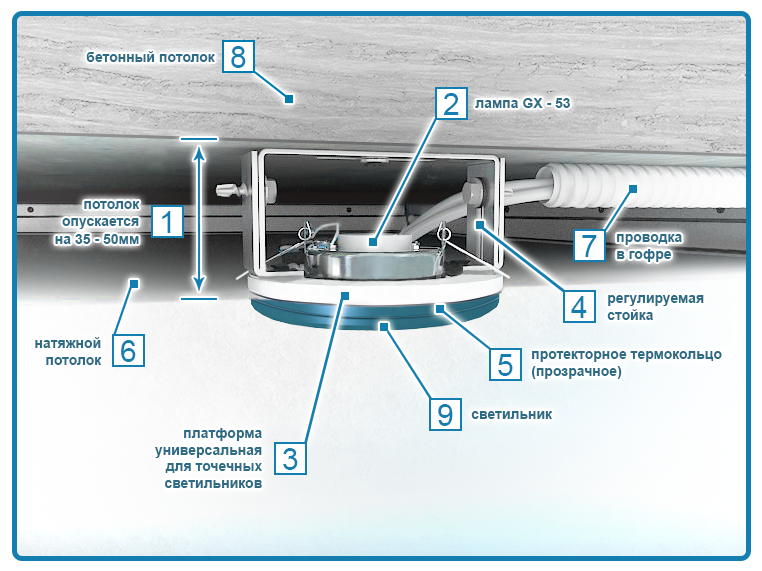
 Scheme of connecting point ceilinglamps for 220V. Point light fixtures are installed in suspended or overhead systems (including with the use of drywall), in which there is a gap between the main surface where the equipment is fixed and the room element. Usually they are placed on the ceiling or wall. Sometimes with the help of spotlights decorate the furniture elements. In general, the design of a spotlight includes the following elements:
- Mounting armature (body) with spring-loaded paws on which the cartridge is attached;
- mirror reflector;
- external decorative panel;
- lamp.
 Connection diagram for the halogen protection devicelamps. An external plastic or metal panel is fixed on the face of the suspension system. As a rule, it has a round shape, but can be in the form of a square, a polygon, an asterisk, etc. The color of the panel can be chosen at the discretion of the consumer. It creates a decorative look and limits the area of the lamp. As a light source in a spotlight, a small-sized incandescent lamp, a fluorescent lamp, a halogen lamp, or an LED lamp can be used. Such lamps can be designed for different voltages, 12 or 100 (110) V with connection via a step-down transformer or 220 V. For power supply, the equipment is supplied with contact terminals or the already ready-to-connect cable runs are removed from the cartridge. The cartridge is used standard, with screw thread. Sometimes, to ensure the possibility of changing the direction of the light flux, the luminaire structure is complicated by the introduction of hinges. Lamps of such lamps have an unusual flattened flask and are enclosed in a second glass case. Back to contents</a>
Preparation for installation work
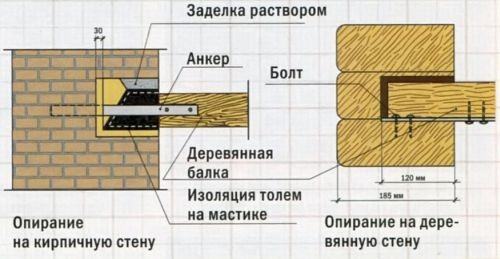
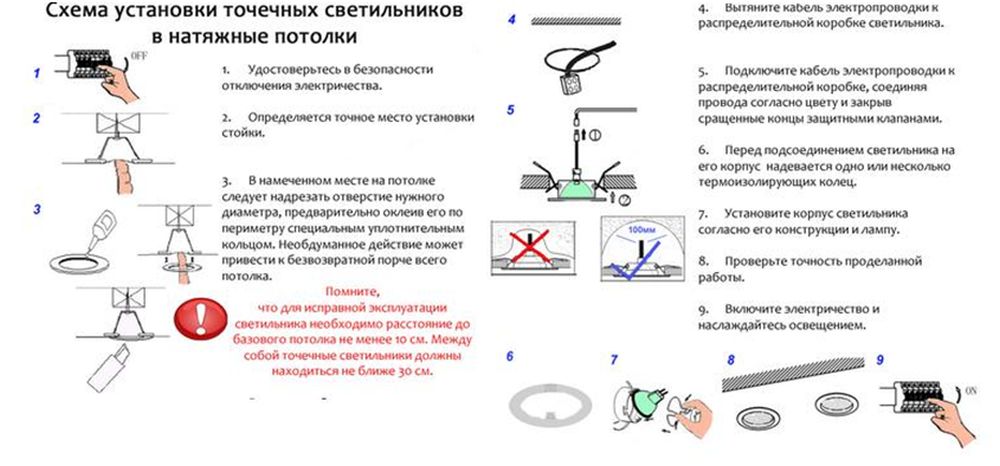 Scheme of installation of spotlights. During the preparation of the installation it is necessary to decide how and in what quantity to install the fixtures. First of all, it is necessary to clarify the adequacy of the gap between the hanging element and the ceiling for the installation of the lighting device, proceeding from the condition that the minimum depth for a halogen lamp is 60 mm, and for an incandescent lamp - not less than 120 mm. The number and distance between the luminaires are determined by the necessary illumination of the room and its uniformity over the area. When determining these parameters, several conditions must be taken into account:
 The device of the point light. The tool required for the preparatory work:
- electric drill;
- milling crown;
- knife;
- roulette;
- line meter.
Preparatory work for installation begins withmarkup. First, the position of the luminaires extreme to the wall is noted. In order for the wall not to be in the shade and to be evenly illuminated, the distance from the wall to the first lamps should be no more than 60 cm.Then, the position of the remaining lighting fixtures is marked according to the chosen location and taking into account that the distance between them is no more than 1 m. In the marking places, holes are drilled for spotlights with a diameter corresponding to the diameter of the lamp body. Lighting devices with a diameter of 68 mm are most widely used. The hole is made by drilling with an electric drill with a crown (wood grain) of the required diameter. Back to the table of contents</a>
Preparation and installation of electric wires: step-by-step instruction
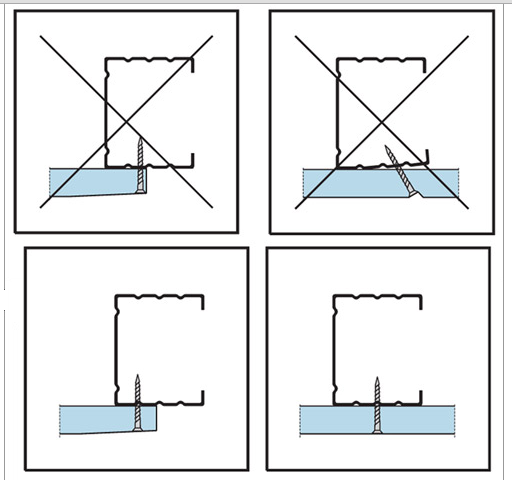
 Scheme of wiring installation under gypsum board. Tool for the installation of electrical wiring:
- screwdriver;
- knife;
- pliers;
- pliers for sleeves;
- indicator screwdriver.
- consumable material:
- wire ВВГ 2х1.5 or ВВГ 3х1.5;
- the wire of the RCMM;
- tape insulation;
- connecting sleeve;
- clamp;
- tube corrugated.
Order of electrical connection of lighting fixturescan be different. Most often, all lamps are switched on simultaneously (one-button switch), but a scheme of switching on separate groups of lamps (two or more key switches) can be used. Accordingly, the parallel connection of the luminaires is ensured by a single bundle of wires, or several beams are formed. They are connected to the mains supply in a standard junction box. 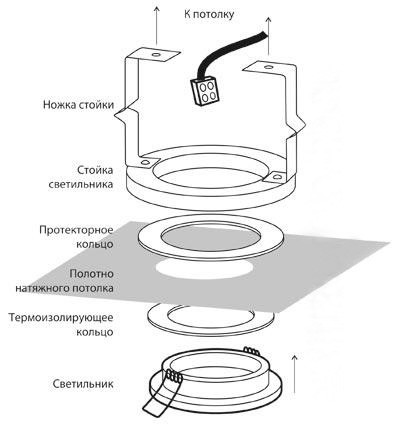 Scheme of mounting a spotlight on the tensionceiling. When choosing the type of electrical wire, the ceiling material should be taken into account. If the installation is performed on non-combustible material, for example, plasterboard, it is possible to use such a known wire, as the wire ВВГ 2 (3) х1,5 in two-wire or three-wire version. When the luminaires are mounted on plastics, it is necessary to use a wire with non-flammable insulation - RKGM. For ease of installation, the wire must be flexible, which is provided by the multi-wire construction of the core. The ends of the wires are connected to one of the terminals of the lamp holder and grouped into a bundle, fastened with standard clamps. The second outputs of the cartridges of all luminaires are connected by a bridge with each other, and the wire from the connected pins is connected to the beam. Similarly, the ground terminals of the luminaires are connected together. The formed bundle of wires is pulled into a plastic corrugated tube of the correct size. The corrugation is necessary to avoid the risk of contact between the conductive parts of the wiring and the metal elements and the protection of the insulation of electrical wires. All wiring connections are recommended using standard terminal screws. The free end of the bundle in the corrugation enters the junction box, where it is subsequently connected to the common electrical network. As a result of all procedures, a group of wires was formed, including a bundle of wires, the ends of which should be connected to each other to connect the phase; zero wire and ground wire. For convenience of connection these kinds of wires are expediently divided on color. Back to contents</a>
Installation of fixtures: completion of installation
At the final stage, the following tool is needed:
- screwdriver;
- pliers;
- knife;
- tester.
At the final stage of installation, thefinal installation of spotlights. The housing of the spotlight is inserted into the hole, while the spring clips are compressed and reduced to the top. When the spotlight is completely immersed in its place, the spring of the latch expands and fixes the casing on the suspended surface of the ceiling. The corrugated tube with wires is neatly placed on the inner surface of the hanging element, and its free end is fed into the junction box. After fixing the suspended ceiling element, a final check of the installation is necessary. First of all, the reliability of fixing each spotlight is checked. Then the correctness of the electrical connection of the lighting devices is checked. After this, the electrical wiring of the lighting devices is connected to the common electrical network. At the end of all operations, the lamps are screwed in. The installation of point lights with their own hands is completed. The installation of point lights by oneself is not a very complicated operation. Their installation can be done by almost any person, while observing the basic rules and safety requirements. At the same time, the use of spotlights allows you to make your house more modern and beautiful, and the lighting of the room - more even and more saturated. </ ul>