Covers for chairs are able to turn theseitems of furniture that could lose their appearance, in the refined elements of the interior. If you choose the right fabric, you can not only transform the chairs with your own hands, but also make them a harmonious complement to the decoration. Covers can bring to the room a note of aristocracy and luxury, and they can add chairs wherever they are. 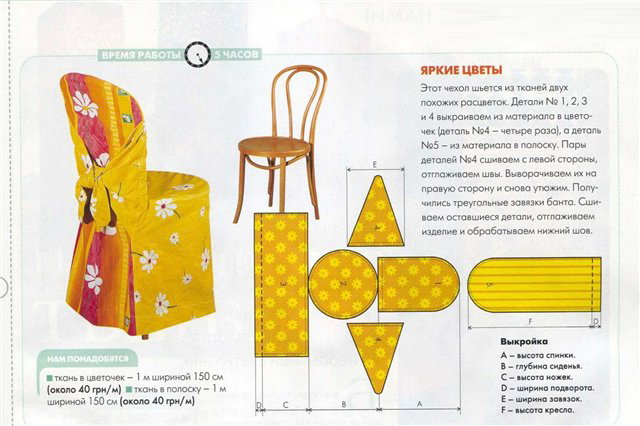 Scheme of the cover for the chair. Cloaks may have different shapes, but they need to be selected depending on the design features of the chairs. As an ideal configuration of the backrest, there is one that has a straight form or tapers to the top, without tilting. Such backs will be good to hold a short or long boot. If the chair has a non-standard back, then for it you can sew a short pillowcase, which covers 1 / 3-2 / 3 back.
 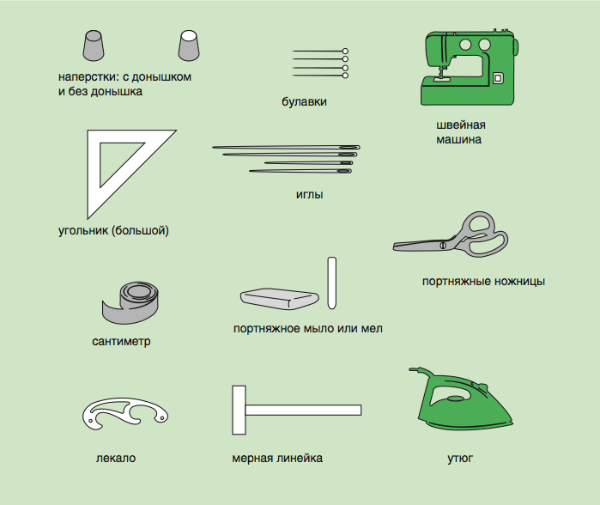 Tools for sewing a cape on a chair. Cloak in the classical style will have a skirt, laid in the front corners in the form of assemblies. If the wrinkles are ironed, then the piece of furniture can look more strictly and neatly, which will reflect the classical style. And if the ruffles are made more magnificent, then the chair will look flirtatious. The cloak can be made more interesting by adding it to the edging made of braid. Alternatively, you can use a cord or core material, which you will have to cut along the braid. The edge must be located along the perimeter of the seat and on the bottom base of the hem. At a short cape on its bottom it is necessary to start out a fringing. This will get the finished look of the thing.
Tools and materials
- Ruler;
- pencil;
- scissors;
- chalk;
- the cloth;
- sewing machine.
Back to contents</a>
Open the fabric on the cloak
If you want to make a cape that will notonly look good, but also will last a long time, it is necessary to make it from a dense fabric. To exclude its accidental damage, you must use the elements of calico for cutting. Patterns made of paper should not be used, because the pattern must match the design features. 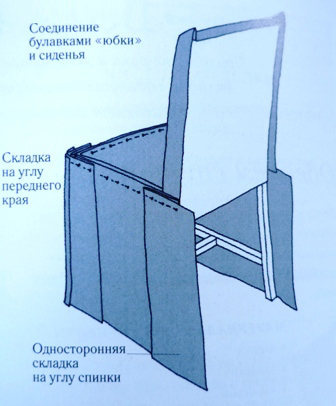 Connection scheme cloak pins. Now you can start to cut out the component of the cover for the backrest. For the beginning it is necessary to make measurement of a back, having defined its height and width. Then you can mark the dimensions on the fabric, adding to the horizontal 15 cm, and to the vertical - 5 cm. Now note the location of the share thread, which will be located along the vertical back. On the marked lines should be found 2 parts. Cut pieces must be folded together. From the top line it is necessary to postpone 2.5 cm and draw a contour along which it is necessary to fold the fabric. The prepared strip should be laid on the back, wrapping the chipped part up. With the help of pins, it is necessary to chop the edges of the fabric to the left and to the right, leaving the stock to fit the cape. Now you can determine what should be the length of the cape for the back. You can mark the places where the lines will be placed with a stroke. Then you can remove the workpiece from the back and remove the pins. The lines must be drawn using a ruler. You can make a cloak around the marks and put it on your back, this will allow you to make adjustments. As soon as the workpiece is removed, it is possible to add the allowances of 2 cm from all sides, and then to cut the top element of the cape according to the marks. Cloaks on the chairs must have darts if the backs have convex elements. The fabric in the darts should be chipped and marked with a pencil. The technology at the next stage involves cutting out the bottom element of the cover. To do this, make measurements of the seat, moving the dimensions to the fabric. It is important to add a margin on both sides of 15 cm. Now, on the surface of the fabric, you should again note the direction of the share thread. It must be remembered that this mark must coincide with the position of the share thread on the top element of the cape. The next step is to cut the workpiece according to the marks made.
  Pattern of a cape on a chair. The cut out blank must be placed on the seat, reinforced with pins. It is acceptable to use scotch. The boundaries of the seat must be marked on all sides (except for the rear). At the same time, the corners must be rounded. Strokes should be noted where the rear edge of the seat is located, and it is important to take into account the free overhang of the hem between the legs of the chair. Once the tissue is removed, you should draw a clean line. Now again you need to place the template on the seat to finally check the dimensions. Do not forget about adding allowances of 2 cm to the seams, they should be marked by a ruler. Cutting should be done along the lines of allowances. Back to contents</a>
The process of tailoring
In order to sew a cloak to a chair,prepare the patterns to measure the total length of the seam of the 3 sides of the seat: right, front, and left. To the received figure it is necessary to add 30 sm which are necessary for folds. 2.5 cm should be added to the allowances. In size, the front element of the skirt should be cut out. The width of the fabric should be identical to the length of the hem, multiplied by 2. In addition, the value to be added is 2.5 cm, which will be needed for the allowance. Now you need to determine the length of the seam between the rear legs to cut a strip of fabric, the length of which will be identical to the resulting figure with the addition of 2.5 cm. This piece will become the rear element of the hem of the skirt. The workpiece will have a width equal to the length of the rear hem element, multiplied by 2 and with the addition of 2.5 cm. Now you can turn off the inner corners and fillets on the pattern of the lower part of the cape. Somewhat not reaching the seam, it is necessary to make incisions in the corners of the back side of the workpiece. Then you can chop the strings with the rear corners of the pattern, having performed these actions from the front side. The next step is to fold the front skirt element along and in half. The sides of the material must be facing outwards. The short sides should be stitched, having deviated from the edge of 1.5 cm. Now you can unscrew the element and iron it. The rear element of the skirt should be subjected to the same procedures. On the untreated edge of the skirt you need to identify and mark the central part. On the front side of the workpiece, it is necessary to measure the distance from the central part to the corner, and after adding 7.5 cm, which is needed for the fold. This same method will allow you to mark the second corner and the lower elements of the skirt. Angles should be marked with pins. The incisions for folds should be made, and the step between them should be 15 cm. The angle marking should be located in the central part of the fold. Between the cuts, two seams should be detached with a deviation from the edges of 6 mm and 1.5 mm. Now you can cobble the pattern of the seat and the front element of the skirt, wrapping them face to face with each other. By tightening the threads, it is possible to obtain an assembly adjacent to the seat. Next, you can attach the skirt to the bottom of the cloak on the chair with your own hands. Now you can chop the rear element of the skirt with a pattern of the seat, connecting the front parts. The sub-string should be made using the zipper foot. The tape should be swaddled from the wrong side to the marks, which will allow tying the cover on the front legs. The hem should be cleavage with strings, the seat and the lining should be facing the sides to each other. Prostrochku should be done with a hole in the back, which will make the eversion of the cover. After you can all iron. The remaining hole should be sewn by hand. The cape on the chair is ready, and it can be worn by tightening the strings. The cover on the chair can be sewn in the same way. The cape on the chairs will transform the interior and advantageously update the style of furniture.


