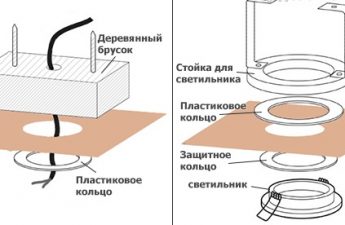
Recently, the cost of LEDlamps and bulbs in stores has significantly decreased, which contributes to their increasing popularity among the population. But it should be noted that anyone who understands electricity at least a little and knows how to hold a soldering iron in their hands can make an LED lamp with their own hands. In this case, the costs will be minimal, and the result will exceed all expectations. LED lamp device.The only difficulty with this work is that LEDs require constant current and low voltage to operate, which can be achieved by soldering a special electrical circuit. It is also necessary to take into account that it will be necessary to provide for heat dissipation from the lamp components.
Features of the LED lamp manufacturing
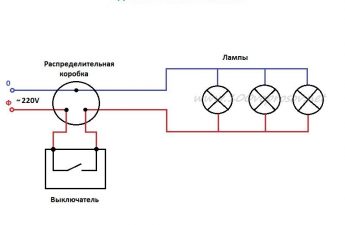
 Electrical circuit of a diode lamp. There are 3 effective ways to cool a LED lamp:
- through the body;
- through conductive paths, components and other elements of the printed circuit board;
- by means of radiators attached to the board or LEDs.
In the manufacturing option under consideration, cooling will be carried out using the housing. In order to manufacture an LED lamp, you will need to prepare the following accessories:
- a cross-shaped screwdriver;
- screwdriver terminal;
- rivet;
- drill battery;
- 4 LED aluminum rulers;
- Power Supply;
- soft rags;
- terminal box;
- plastic housing for cables.
 LED device.When choosing aluminum rulers, it is advisable to pay attention to designs with dimensions of 60x60 cm or 60x120 cm. It is better if the backing of the structures is made of aluminum, since this material simplifies the installation of elements and provides good heat transfer, cooling the LEDs. A design made of 4 rulers will be able to illuminate a room of a fairly large area with a ceiling height of more than 3 m. In addition, it is necessary to devote time to choosing a power supply. For long-term and successful operation of linear-type devices, a conventional power supply will not work; a device with high efficiency is needed here. Such characteristics correspond to a power supply with an LPC voltage stabilizer, which is ideal for installation in a case. An electrical box for plastic cables of a suitable size can be used as a case. It is in it that LED strips will be built in. In addition, many craftsmen, wanting to make an original lighting fixture to decorate the interior, use plastic PVC panels as a case, cutting them into pieces of the desired size and bending them to the required shape. The simplest way to create a case is to use regular plastic plugs, to which pieces of LED strips are sewn using fishing line. In this case, a plastic cable box will be used under the case. Return to contents</a>
Assembling the LED lamp
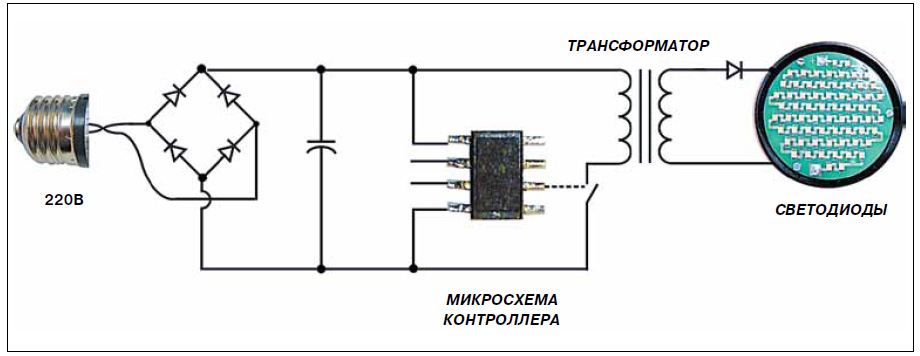
When all the elements for the LED lamp are prepared, you can begin to assemble it. Here you need to follow the diagram.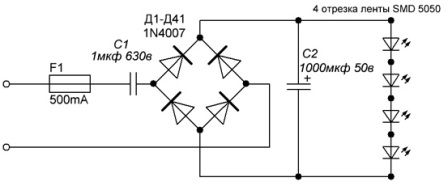 Power supply circuit for a homemade LED lamp.First of all, the case must be thoroughly wiped with a soft cloth. Then marks are applied to the base of the box, according to which holes will be drilled to secure the LED strips. After that, all holes are drilled using a drill and a 3.5 mm drill bit. The LED strip is secured in the holes with a riveter and pull-out rivets. When installing, it is extremely important to constantly check the LED strip connection diagram. It should be taken into account that the total length of the wire should not exceed 120 cm. The wires should be laid in such a way as not to sag from the case. Then holes are drilled for the power supply. The device, like the LED strips, is mounted in the case using pull-out rivets. Then the power supply is connected to the power wires, LED strips and the terminal block, to which all the wires are connected. Before plugging the assembled lamp into the electrical network, it is necessary to check all the elements with the presented diagram. If no violations are found, you can test the operation of the lighting device. A DIY LED lamp will perfectly decorate the room and add originality to the interior.</ ul>