If you have a couple of hours of free time and the desire to have economical and eye-pleasing lighting in your home, it is not at all difficult to make an LED lamp yourself. LED lamp device.
What will be required for manufacturing
- light-emitting diodes, in conditions of manufacturing of the house, with own hands, less labor-intensive and easy to use will be powerful (but not more than 1 W) output LEDs;
- current driver (power supply), if alteredsconce or floor lamp is ideal for a driver without a casing (almost not heated and smaller in size, but more difficult to attach) with galvanic isolation (safer);
- aluminum radiator for heat dissipation, the most suitable option is U-shaped construction profile;
- heat-conducting double-sided adhesive tape.
When making a radiator, it is important to considerarea of the plates. For a one-watt LED, a plate with an area of 2500 mm and a thickness of about 1 mm is required. For the driver, you need to pay attention to the output voltage, for example, 10 volts is indicated, which means it will pull 3 white LEDs connected in series, or the number of LEDs indicated on the marking, for example, "5-7x1W". A powerful driver, over 10 W, will interfere with a TV or radio, so it is preferable to take one with a filter from electromagnetic interference. Return to the table of contents</a>
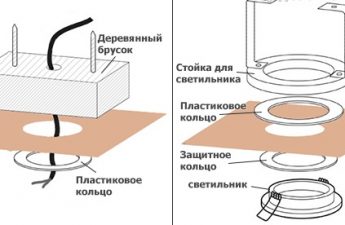
Step-by-step instruction for manufacturing the LED module
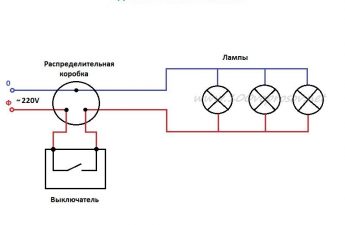
 LED connection diagram.To make a basic LED backlight, you will need: three one-watt LEDs, a piece of U-shaped aluminum profile 5-7 cm long (radiator), thermal tape and a 3x1W driver. The bottoms of the LEDs and the radiator are degreased, that is, wiped with alcohol or vodka. It is better not to use acetone, as the LEDs may become cloudy. The tape is cut into a strip 5-7 mm wide and glued to the radiator. The LEDs are evenly installed on the tape, observing the polarity, that is, "+" looks at the neighboring "-", to improve contact, press them slightly. Then, to solder the LEDs together, tin is applied to their terminals. For soldering, you can use a core from any multi-core wire. To prevent the tape from burning out during soldering, the LED terminals can be bent in advance or lifted, holding the case with your finger. The driver is soldered to the outer terminals. The module is ready. You can test LED lights by turning them on for 2-3 hours. Then touch the back of the radiator opposite the LEDs with your finger. By inserting a self-made module into the selected case, you will get a unique light. Using a more powerful driver and more LEDs based on this scheme, you can make a brighter chandelier or work surface backlight. Return to contents</a>
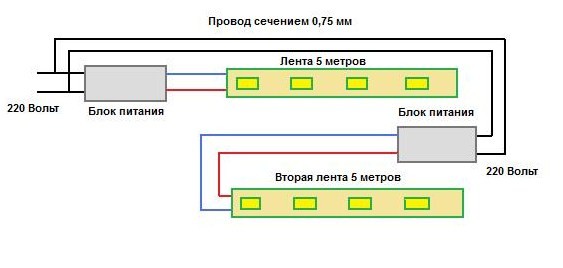
Manufacture of a lamp using an LED strip
For decorative lighting or localLED strip is quite effective for backlighting. Its flexible design allows for the manufacture of lamps of any size. The power wires are soldered to the contact pads located near the cutting line. The LED strip has a self-adhesive film for fastening. For the body, it is possible to use a plastic box for the cable of a broken floor lamp or chandelier. A lamp of a unique configuration can be constructed from pieces of plastic PVC panel. However, the simplest and fastest manufacturing option is to purchase special profiles for installing LED strips. Such lighting fixtures are perfect for additional illumination of work surfaces in the kitchen or near a computer, for illuminating an aquarium or indoor plants, or simply as decorative lighting.